
With the rise of cloud computing, hosting web apps on services like Heroku, AWS, Azure, Netfliy, and many more have been on the rise. Amidst all these options, Firebase has emerged as a great solution to host serverless web apps. It's easy, pretty fast, and Free! You don't need a lot of working to have your website running.
Getting Started
In this tutorial, I'll take you through all the steps involved in deploying a React app on firebase.
Prerequisites:
- A firebase project set up. If you don't have one, create one using the firebase console.
- A React app set up that you wish to deploy.
Getting Your React App Ready for Deployment
Run the following command to create a build directory with a production build of your app:
$ npm run build
Inside the build/static directory will be your JavaScript and CSS files. To know more about React production builds, refer to the
production build
section of the create-react-app docs.
Configuring Firebase
Install Firebase CLI
To host your site with Firebase Hosting, you need the Firebase command-line tool (CLI). Run the following npm command to install the CLI on your system globally
$ npm install -g firebase-tools
Login to Firebase
Make sure you're in the root directory of your React app and run the following command to log in to firebase in your terminal:
$ firebase login
If you're not logged in, you'll be asked to enter the credentials for your google account.
Initiate your project
Now that you've got the firebase CLI configured, it's time to initialize firebase in your react app. Run the following command:
$ firebase init
You will now enter the firebase tools shell and will be prompted with a sequence of questions and various configuration options. Let's go through these questions together step by step to achieve our desirable configuration.

Select the firebase project that you created
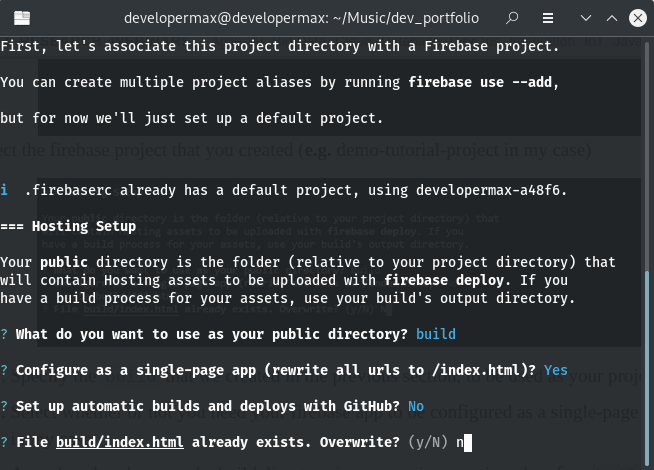
- Specify the build that we created in the previous section, to be used as your project's public directory.
- Select whether or not you need your firebase app to be configured as a single-page app. I'm selecting Yes in my case.
- As we've already created a build directory in our previous section, therefore build/index.html already exists. We would want to let it be as is and enter No for this question.
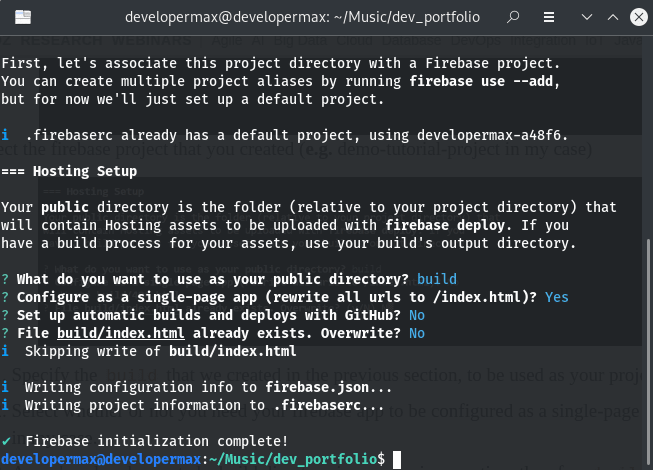
This marks the end of our configuration process and our app is now ready to deploy!
To verify the successful completion of the initialization process, simply check the presence of .firebaserc and firebase.json files. These are automatically created by firebase during the initialization process.
Deploy to Firebase
Just run the following command to deploy your app:
$ firebase deploy
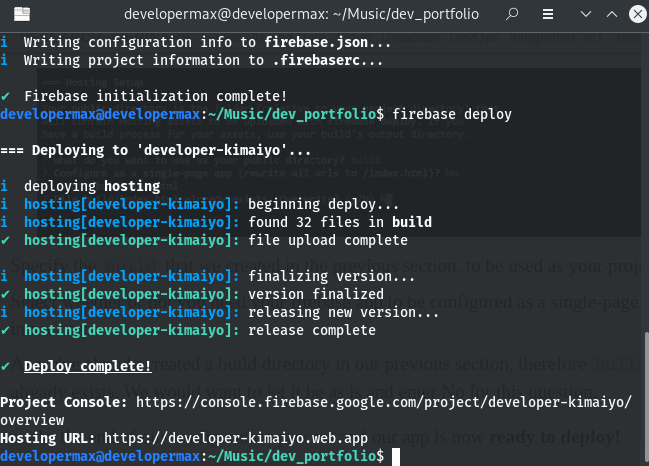
Firebase will now run the deploying process and will give you a unique URL where your app is deployed. For e.g. in my case, it was https://developer-kimaiyo.web.app
Voila! Your ReactApp is now deployed with Firebase hosting.
To know more about Firebase hosting, refer to the hosting section of the firebase docs.

Latest comments (0)