
Image optimization is not new. There are many great image optimization plugins you can use to make WordPress images look better and load faster. However, no plugin can replace an efficient workflow for creating and uploading images to your site, or a proper technical architecture for serving images to your users.
We’ll cover a few secrets that can help you get the edge and ace your website performance report.
1. The Usual Suspects
On most websites, 20% of images are causing 80% or more of the performance issues. It’s important to identify which images are causing trouble and give them tender loving care.
Here’s how to find issues with images:
- Identify your most important page templates—for example, your homepage, product pages, and blog posts.
- For each template, select a few representative pages, preferably those that are longer, more complex or known to have performance issues.
- Run each of those pages in a page performance tool and see what images show up as slow or problematic.
Below we ran the homepage of cnn.com in GTMetrix, and expanded the Optimize images section to see a list of the worst performing images.
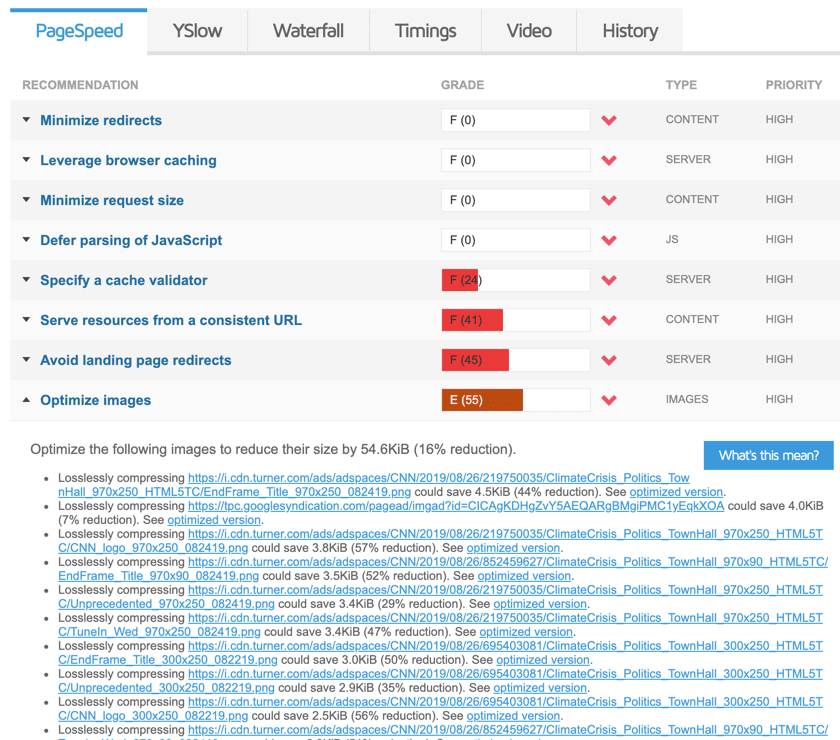
The most important part of the analysis is finding repeating issues. If a featured image on a blog post performs poorly, it’s quite likely that some or all of your featured images suffer from the same problem.
2. One Size Fits All
There are probably several people working on images in your website—webmasters, designers, web developers, content writers and editors. Do all of them know your policies for images? Start by defining a clear policy that states which image types you allow, their pixel size, and what type of pre-processing or compression they should go to.
In addition, create an image specs guide that covers all standard image types on your site. What are the sizes required for icons, sidebar banners, featured images, thumbnails, and so on? Share the guide with everyone who creates content or works on your website and make sure that they upload images in the appropriate sizes and proportions.
It’s true that you can always post-optimize an image using a plugin, but we advise letting plugins catch the exceptions. Enforce clear guidelines and have images uploaded in the proper format and size, which will always be more effective than squishing or compressing them in retrospect.
3. Express Delivery
Content Delivery Networks (CDN) are an excellent way to speed up the delivery of images and other static assets on your site. Modern CDNs can also help with some types of dynamic content. CDN services commonly used with WordPress include MaxCDN, KeyCDN and CloudFlare.
A CDN works by caching your assets in a remote Point of Presence (PoP) which is located near to your target users. CDNs maintain huge networks of PoPs so that wherever your user resides—New York or Jakarta—they will download the asset as quickly as possible.
The best thing about CDNs is that they can be deployed seamlessly, without ripping and replacing any part of your infrastructure.
This post provides step-by-step instructions on setting up KeyCDN and CloudFlare for your WordPress site. An alternative to setting up a CDN yourself is Cloudinary, which hosts your images in the cloud and serves them via an integrated CDN.
4. Cache, Cache, Cache
Most WordPress sites use a caching plugin—among the leading options are WP Rocket and Swift Performance. Caching plugins are very important for image performance—they can store repeating site elements such as images on your homepage, header, and footer in cache, and deliver them to returning users much faster.
If you already have a CDN, do you need a local caching solution too? Most experts agree that these techniques work hand in hand. CDNs do not cache all resources and in many cases have to pull them from your server just like users do. Caching is a fallback that all users, and also the CDN itself, can benefit from, and results in improved performance in almost all scenarios.
5. Be Lazy
Lazy loading means waiting with images that do not display on the screen right now, and not loading them (at least not fully) until the user actually scrolls down to view them. This can provide massive performance improvements on long pages with lots of rich media.
An excellent example is medium.com, where you’ll find that images appear fuzzy and then fully load once you get to them in the article.
Lazy loading has always been a performance best practice, but is now even more important, given that the Google Lighthouse performance benchmark puts a major emphasis on this technique, and can give websites a terrible score if they don’t exercise it.
It is possible to implement lazy loading yourself, but you’ll need some serious dev skills. Several plugins are available that can achieve it easily, including Smush Image Optimization and A3 Lazy Load.
Conclusion
Image optimization in 2019 is a must. You need it to reduce hosting costs, improve your site ranking, and provide your users with a site that loads fast. If your images aren’t optimized for web browsing, you risk losing your SEO ranking and your visitors.
Fortunately, image optimization is no longer a difficult process. There are many tools and resources, free and paid, automatic and semi-automatic, some leverage artificial intelligence (AI) software while others don't. Pick the tools that work for you, and use them to support your ongoing image optimization process. Put the five secrets into practice and experiment. Go with what works for you, and optimize the process.

Latest comments (0)