If you are into Crypto then chances are you have heard about NFT, especially after the incidents like Beeple sold his art for $69 million dollars or this friendship meme.
NFT is usually considered is suitable for arts like pictures only but this is not true. NFT is all about uniqueness, authority, and the transfer of ownership. We are going to use NFT for selling cars.
In this post, I will be discussing how to mint ERC721 NFT tokens and then integrate them with new or existing websites. The user who buys a car will be buying will pay the amount of the car being bought and the minting fee. I came across many tutorials regarding NFT or ERC721 tokens but none of them actually provided end-end solutions. It was quite frustrating because NFT itself is nothing unless it is integrated with an app. In this post, I am coming up with a fictitious car-selling portal site developed in PHP Laravel and web3.js. As I said in a previous post, that the backend framework or language does not matter. I will be writing this tutorial in a way that will highlight the NFT functionality and its integration. In case you wonder why I am using PHP not Python, well, it is just an attempt to break the taboo that blockchain programming is all about Javascript-based technologies.
What is NFT?
According to Wikipedia:
A non-fungible token (NFT) is a unit of data stored on a digital ledger, called a blockchain, that certifies a digital asset to be unique and therefore not interchangeable.[1] NFTs can be used to represent items such as photos, videos, audio, and other types of digital files. Access to any copy of the original file, however, is not restricted to the buyer of the NFT. While copies of these digital items are available for anyone to obtain, NFTs are tracked on blockchains to provide the owner with a proof of ownership that is separate from copyright.
NFT is quite a in demand these days. Though the majority of NFTs are built on Ethereum based blockchains but not limited to it. Blockchains like Solana and many others also offer NFT on their respective platforms.
I am not going to cover the Laravel code as such since this is not the scope of this post neither I am going to cover Truffle/Ganache and smart contract integration via web3.js. You can read about it here. The final website will look like the below( Ignore the crappy frontend please as I am more a backend guy!)
Website Development
The backend of the website is developed in Laravel. MySQL has been used for storing all data and IPFS is a decentralized CDN for images. Pinata Cloud which provides the pinning service was actually used to upload all images on IPFS. The flow of the website is pretty simple. Currently, dApps are considered those who are hybrid in nature that is, a few features are on blockchain, especially the payment one, and the rest of the info is in centralized systems. A user signs up and uploads the details of the car he wants to sell. The image is uploaded via Pinata API for pinning. The API returns a hash which along with other information is stored in the MySQL database. The cars table structure looks like the below:
CREATE TABLE `cars` (

`id` bigint(20) unsigned NOT NULL AUTO_INCREMENT,

`name` varchar(255) COLLATE utf8mb4_unicode_ci NOT NULL,

`user_id` int(10) unsigned NOT NULL DEFAULT '0',

`vin` varchar(255) COLLATE utf8mb4_unicode_ci NOT NULL,

`price` double(8,2) NOT NULL,

`url` varchar(255) COLLATE utf8mb4_unicode_ci NOT NULL,

`status` tinyint(4) NOT NULL,

`created_at` timestamp NULL DEFAULT NULL,

`updated_at` timestamp NULL DEFAULT NULL,

PRIMARY KEY (`id`)

) ENGINE=InnoDB AUTO_INCREMENT=1 DEFAULT CHARSET=utf8mb4 COLLATE=utf8mb4_unicode_ci;
The function that uploads the inventory looks like the below:
public function addedCar( Request $request ) {
  $url = $request->file( 'url' );
  $name = $request->get( 'name' );
  $vin = $request->get( 'vin' );
  $price = $request->get( 'price' );
  $uploaded_file_hash = '';

if ( $request->hasFile( 'url' ) ) {
   $url = $request->file( 'url' );
   $uploaded_file_name = strtolower( str_replace( ' ', '_', $name ) );

$response = Http::withHeaders( [
    'pinata_api_key' => '72a94c9c71e9e91de6e3',
    'pinata_secret_api_key' => '19e64398c5ef83b27374ebc0984befb15510cb1b7bea63faa7db0277398cb194'
   ] )->attach( 'file', file_get_contents( $url ), $uploaded_file_name )
                   ->post( '[https://api.pinata.cloud/pinning/pinFileToIPFS'](https://api.pinata.cloud/pinning/pinFileToIPFS'), [
                   ] );
   $data = $response->json();

if ( array_key_exists( 'IpfsHash', $data ) ) {
    $uploaded_file_hash = $data['IpfsHash'];
    $size = $data['PinSize'];

if ( $size > 0 ) {
     // It is time to upload it
     $car = Car::create( [
      'name' => $name,
      'vin' => $vin,
      'url' => $uploaded_file_hash,
      'price' => $price,
      'status' => 1,
     ] );

if ( $car->id > 0 ) {
      return redirect()->route( 'dashboard' );
     }

}
   }
  }
 }
Don’t be happy as these keys do not exist anymore 😉
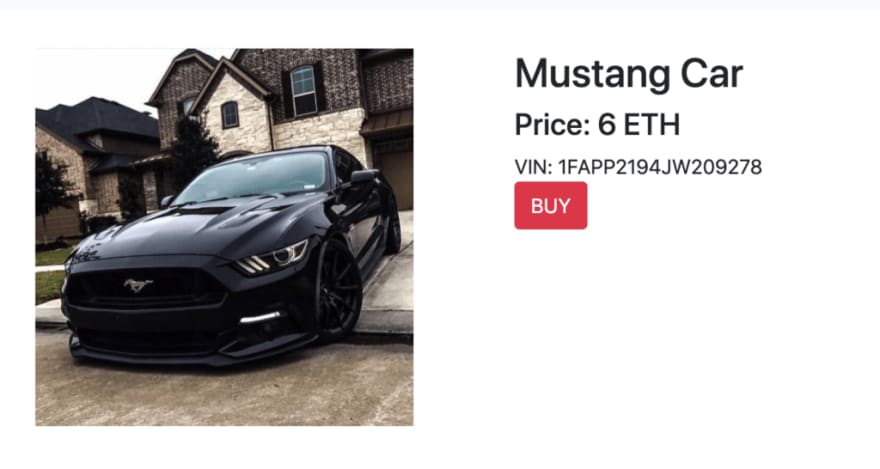
The car once uploaded appears like the below image:
As you see I have used VIN here. The reason to use it for to bring uniqueness to the product since NFT is all about uniqueness.
NFT Smart Contract
Currently, Ethereum offers two types of smart contracts standards: ERC721 and ERC1155. I am using the very basic ERC721 one since it serves the purpose well. I am using the one provided by OpenZeppelin. Using existing templates spare you to come up with your own faulty implementations while on the other hand smart contracts by OZ guys have been thoroughly audited by security companies. dCars NFT smart contract looks like the below:
Notice that dCars is inheriting ERC721 contract provided by OZ guys. I am also inheriting Ownable for ownership and authorization purposes thus make it secure. You can learn more about it here.
I am only implementing the minting feature because I am changing the default implementation by introducing Counters, rest of the functions that are already available to us. Thanks to our friend, Inheritence.
The mintNFT function accepts a tokenURI parameter which is actually directing to the Metadata of the individual NFT. The Metadata looks like the below. This is actually the metadata that helps to discover your NFT on NFT marketplaces like Openseas.
Web3js Integration
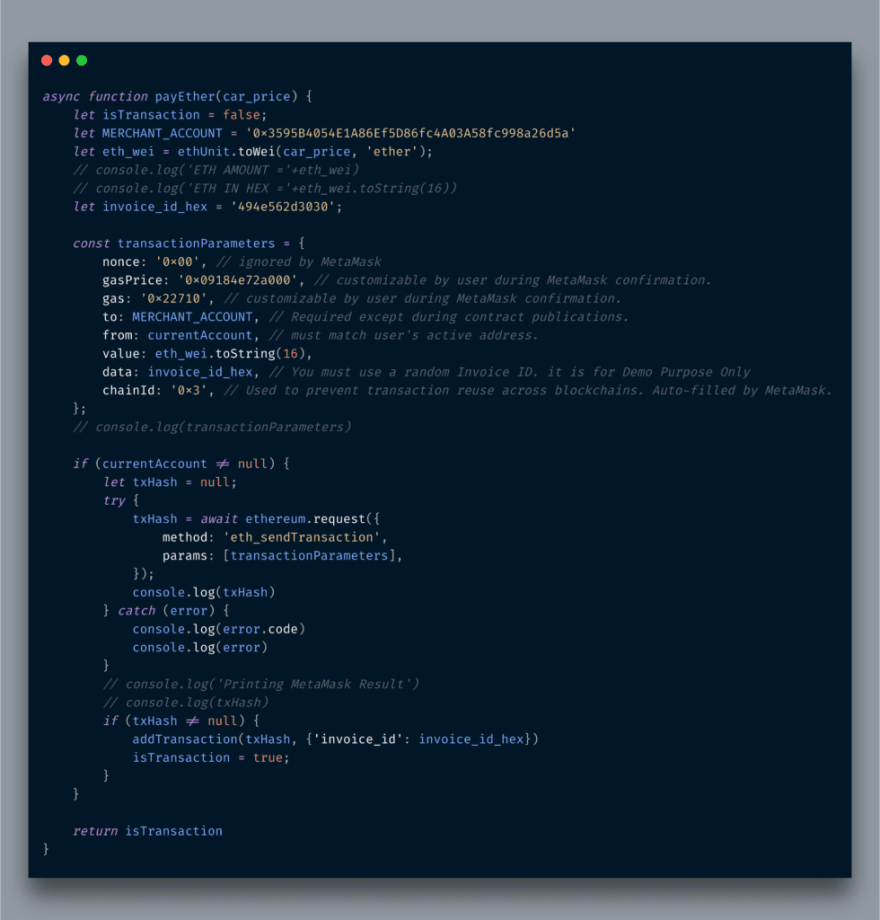
Here web3.js is being used for two reasons: First, asking the user to pay the price of the car itself, and second the gas fee for minting purposes. I am not going into detail about charging ETH from your user’s Metamask since I discussed it here and minting the NFT which is actually calling mintNFT function which I have discussed here. payEther function looks like the below.
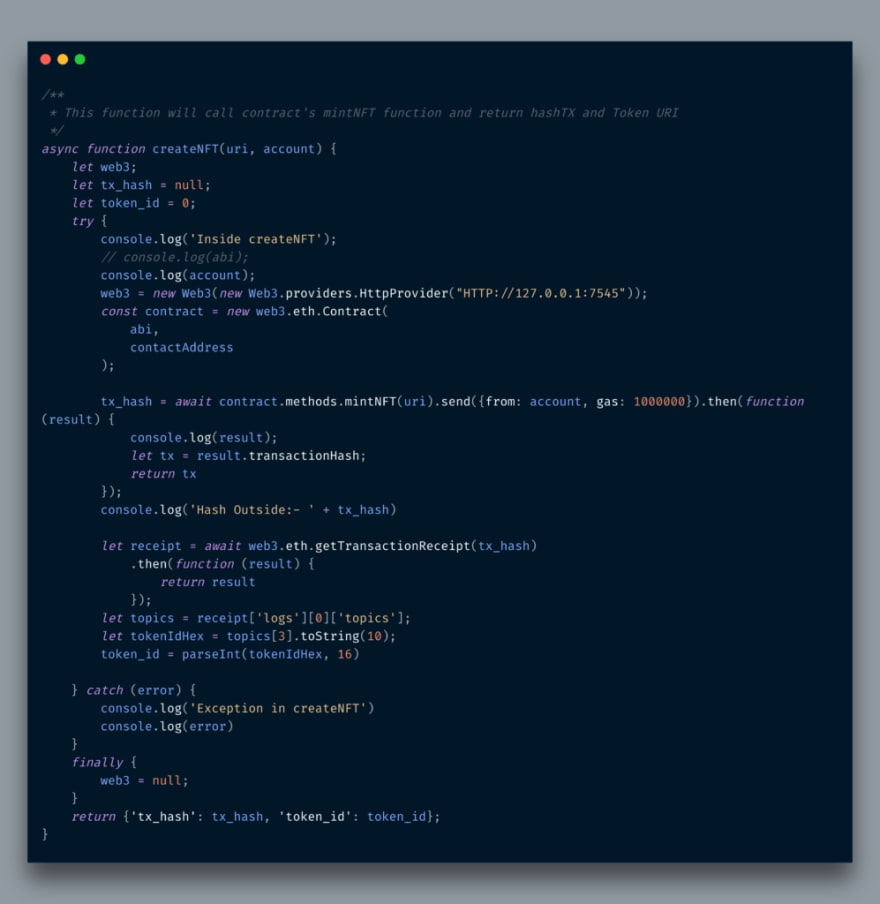
And createNFT JS function which is actually calling smart contract function looks like the below:
Both of these functions are actually invoked via the click event of the BUY button which after successful transaction stores info in relevant DB tables. After this the detail page will look like the below:
Visitors can see who is the current owner of this car and its history. It is quite possible that the owner makes it to resell to others, for that transferFrom smart contract function will be called which is not implemented here.
Conclusion
So in this post, you learn what is an NFT and how as a developer you can implement it in existing or new web apps. This is not a complete project, features like reselling have not been implemented in it. Like always, the code is available on Github.
Originally published at http://blog.adnansiddiqi.me on September 16, 2021.


Top comments (0)