Hello guys, today I am going to be showing you how to upload files with Laravel 8 through drag and drop using dropzoneJS. DropzoneJS is an open-source library that provides drag’n’drop file uploads with image previews.
Sometimes we might need to preview the image we are uploading and also resize before uploading, this can be achieved easily using a library in JavaScript, let's dive in.
Click on my profile to follow me to get more updates.
STEP 1: Install Laravel 8
To install the latest laravel framework, which is laravel 8.0 as of the time of publishing this article, run the command below
composer create-project --prefer-dist laravel/laravel laravel_8_file_upload
If you want to know more about the installation of Laravel, visit my previous article Laravel 8 CRUD App, A simple guide
Step 2: Database Setup
Create an empty database, Open the .env file, and update your database configurations.

Step 3: Create Migration Files
We need to create a migration file and define the fields for our table

Edit the migration file created to include our filename, go to database/migrations/ a new migration file will be created there, add the filename as a string in the up method
...
    public function up()
    {
        Schema::create('file_uploads', function (Blueprint $table) {
            $table->id();
            $table->string('filename');
            $table->timestamps();
        });
    }
...
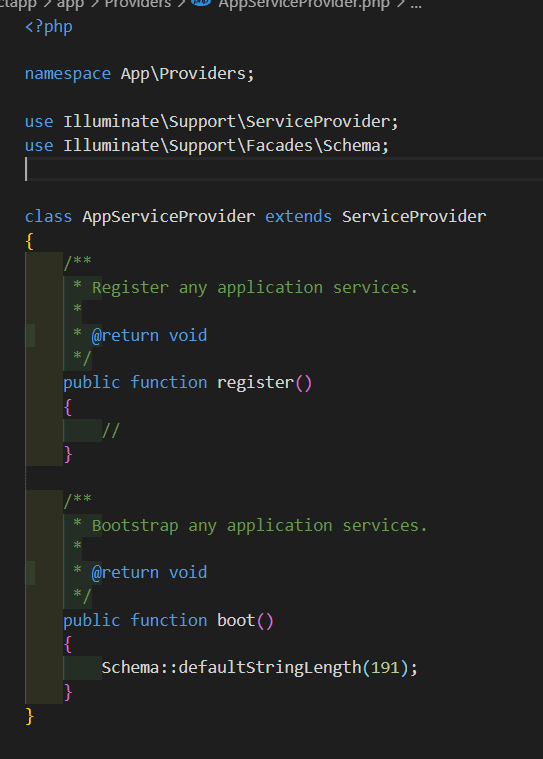
Step 4: Change Default String Length
Go to app/Providers/AppServiceProvider.php and add
Schema::defaultstringLength(191);
to the boot function, also add
use Illuminate\Support\Facades\Schema;
to the top

Finally, we run our migration command
Step 5: Run the migrations
Php artisan migrate
Step 6: Add Resource Route
In this article, I will be carrying out four operations methods, I will
- View all the files uploaded.
- Create file(s).
- Store the files to the database.
- Delete an uploaded file.
So instead of writing individual routes, I will just use Resource route which will automatically carry out those operations for me.
So go to routes/web.php and edit as follow.
<?php

use Illuminate\Support\Facades\Route;
use App\Http\Controllers\FileuploadController;

/*
|--------------------------------------------------------------------------
| Web Routes
|--------------------------------------------------------------------------
|
| Here is where you can register web routes for your application. These
| routes are loaded by the RouteServiceProvider within a group which
| contains the "web" middleware group. Now create something great!
|
*/

Route::get('/', function () {
    return view('welcome');
});

Route::resource('files', FileuploadController::class);
Step 8: Add Controller and Model
We are going to create our resource controller and also the model associated with it, we are going to use just one artisan command to create them, in running the command, it will indicate that the model does not exist, and do you want to generate it, type yes in the command
php artisan make:controller FileUploadController --resource --model=FileUpload
Step 9: Write Controller Methods
A controller is created with the command in step 8, go to app/Http/Controllers/, and click on FileUploadController.php and edit as follows
<?php

namespace App\Http\Controllers;

use App\Models\FileUpload;
use Illuminate\Http\Request;

class FileUploadController extends Controller
{
    /**
     * Display a listing of the resource.
     *
     * @return \Illuminate\Http\Response
     */
    public function index()
    {

        $files = FileUpload::all();

        return view('files.index', compact('files'))
            ->with('i', (request()->input('page', 1) - 1) * 5);
    }

    /**
     * Show the form for creating a new resource.
     *
     * @return \Illuminate\Http\Response
     */
    public function create()
    {
        return view('files.create');
    }

    /**
     * Store a newly created resource in storage.
     *
     * @param  \Illuminate\Http\Request  $request
     * @return \Illuminate\Http\Response
     */
    public function store(Request $request)
    {
        $image = $request->file('file');
        $FileName = $image->getClientOriginalName();
        $image->move(public_path('images'), $FileName);

        $imageUpload = new FileUpload();
        $imageUpload->filename = $FileName;
        $imageUpload->save();
        return response()->json(['success' => $FileName]);
    }

    /**
     * Display the specified resource.
     *
     * @param  \App\Models\FileUpload  $fileUpload
     * @return \Illuminate\Http\Response
     */
    public function show(FileUpload $fileUpload)
    {
        //
    }

    /**
     * Show the form for editing the specified resource.
     *
     * @param  \App\Models\FileUpload  $fileUpload
     * @return \Illuminate\Http\Response
     */
    public function edit(FileUpload $fileUpload)
    {
        //
    }

    /**
     * Update the specified resource in storage.
     *
     * @param  \Illuminate\Http\Request  $request
     * @param  \App\Models\FileUpload  $fileUpload
     * @return \Illuminate\Http\Response
     */
    public function update(Request $request, FileUpload $fileUpload)
    {
        //
    }

    /**
     * Remove the specified resource from storage.
     *
     * @param  \App\Models\FileUpload  $fileUpload
     * @return \Illuminate\Http\Response
     */
    public function destroy($id)
    {

        $fileUpload = FileUpload::find($id);

        $fileUpload->delete();

        return redirect()->back()
            ->with('success', 'File deleted successfully');
    }
}
Step 10: Edit the Model
We need to edit the model to tell it which fields can accept input, go to app/Models/FileUpload.php and edit as follows
<?php

namespace App\Models;

use Illuminate\Database\Eloquent\Factories\HasFactory;
use Illuminate\Database\Eloquent\Model;

class FileUpload extends Model
{
    use HasFactory;

    protected $table = 'file_uploads';
    public $timestamps = true;

    protected $dates = [
        'created_at',
        'updated_at'
    ];

    protected $fillable = [
        'filename',
        'created_at',
        'updated_at'
    ];
}
Step 11: create our views
We are going to be creating two blade fields, the index.blade.php and create.blade.php, go to resources/views/ and create a folder called files and the blade files 
index.blade.php
<!DOCTYPE html>
<html>
<head>
    <meta charset="utf-8">
    <title>How to Upload Files with Drag 'n' Drop and Image preview in Laravel 8 using dropzone</title>

    <!-- Font Awesome JS -->
    <script defer src="https://use.fontawesome.com/releases/v5.0.13/js/solid.js" integrity="sha384-tzzSw1/Vo+0N5UhStP3bvwWPq+uvzCMfrN1fEFe+xBmv1C/AtVX5K0uZtmcHitFZ" crossorigin="anonymous">
    </script>

    <script defer src="https://use.fontawesome.com/releases/v5.0.13/js/fontawesome.js" integrity="sha384-6OIrr52G08NpOFSZdxxz1xdNSndlD4vdcf/q2myIUVO0VsqaGHJsB0RaBE01VTOY" crossorigin="anonymous">
    </script>

    <link rel="stylesheet" href="https://stackpath.bootstrapcdn.com/bootstrap/4.3.1/css/bootstrap.min.css" integrity="sha384-ggOyR0iXCbMQv3Xipma34MD+dH/1fQ784/j6cY/iJTQUOhcWr7x9JvoRxT2MZw1T" crossorigin="anonymous">


    <style>
        .footer {
            position: fixed;
            left: 0;
            bottom: 0;
            width: 100%;
            background-color: #9C27B0;
            color: white;
            text-align: center;
        }

        body {
            background-color: #EDF7EF
        }

    </style>

</head>
<body>
    <div class="row mb-3">
        <div class="col-lg-12 margin-tb">
            <div class="text-center">
                <h2>Laravel 8 File Upload </h2>
                <a class="btn btn-success" href="{{ route('files.create') }}" title="Upload files"> <i class="fas fa-upload fa-2x"></i>
                </a>
            </div>
        </div>
    </div>

    @if ($message = Session::get('success'))
    <div class="alert alert-success">
        <p>{{ $message }}</p>
    </div>
    @endif
    <div class="container">
        <table class="table table-bordered table-responsive-lg thead-dark text-center">
            <thead class="thead-dark ">
                <tr>
                    <th>No</th>
                    <th>File Name</th>
                    <th>Date Created</th>
                    <th width="280px">Action</th>
                </tr>
            </thead>
            <tbody>
                @foreach ($files as $project)
                <tr>
                    <td>{{ ++$i }}</td>
                    <td>{{ $project->filename }}</td>
                    <td>{{ date_format($project->created_at, 'jS M Y') }}</td>
                    <td>
                        <form action="{{ route('files.destroy', $project->id) }}" method="POST">
                            @csrf
                            @method('DELETE')

                            <button type="submit" title="delete" style="border: none; background-color:transparent;">
                                <i class="fas fa-trash fa-lg text-danger"></i>

                            </button>
                        </form>
                    </td>
                </tr>
                @endforeach
            </tbody>
        </table>
    </div>

    <div class="text-center footer">

        <h4>The writer needs a job</h4>
        <h4>+234 806 605 6233</h4>
        <h4>kingsconsult001@gmail.com</h4>
        <h4>Github: www.github.com/kingsconsult</h4>

    </div>
</body>
</html>
create.blade.php
<!DOCTYPE html>
<html>
  <head>
    <meta charset="utf-8">
    <title>How to Upload Files with Drag 'n' Drop and Image preview in Laravel 8 using dropzone</title>


    {{--  dropbox CDN  --}}
    <link rel="stylesheet" href="https://cdnjs.cloudflare.com/ajax/libs/dropzone/5.5.0/min/dropzone.min.css">
    <script src="https://cdnjs.cloudflare.com/ajax/libs/dropzone/5.5.0/dropzone.js"></script>

    <!-- Font Awesome JS -->
    <script defer src="https://use.fontawesome.com/releases/v5.0.13/js/solid.js"
        integrity="sha384-tzzSw1/Vo+0N5UhStP3bvwWPq+uvzCMfrN1fEFe+xBmv1C/AtVX5K0uZtmcHitFZ" crossorigin="anonymous">
    </script>
    <script defer src="https://use.fontawesome.com/releases/v5.0.13/js/fontawesome.js"
        integrity="sha384-6OIrr52G08NpOFSZdxxz1xdNSndlD4vdcf/q2myIUVO0VsqaGHJsB0RaBE01VTOY" crossorigin="anonymous">
    </script>

    <!-- Bootstrap CSS CDN -->
    <link rel="stylesheet" href="https://stackpath.bootstrapcdn.com/bootstrap/4.1.0/css/bootstrap.min.css"
        integrity="sha384-9gVQ4dYFwwWSjIDZnLEWnxCjeSWFphJiwGPXr1jddIhOegiu1FwO5qRGvFXOdJZ4" crossorigin="anonymous">

           <style>
        .footer {
            position: fixed;
            left: 0;
            bottom: 0;
            width: 100%;
            background-color: #9C27B0;
            color: white;
            text-align: center;
        }

        body {
            background-color: #EDF7EF
        }

    </style>
  </head>
  <body>
    <div class="row mb-3">
        <div class="col-lg-12 margin-tb">
            <div class="text-center">
                <h2>Laravel 8 File Upload </h2>
            </div>
        </div>
    </div>

    <div class="container">
    <div class="row">

    </div>
    <form method="post" action="{{ route('files.store') }}" enctype="multipart/form-data"
          class="dropzone" id="dropzone">
        @csrf
        </form>
    </div>
       <div class="row mt-3">
        <div class="col-lg-12 margin-tb">
            <div class="text-center">
                <a class="btn btn-success" href="{{ route('files.index') }}" title="return to index"> <i class="fas fa-backward fa-2x"></i>
                </a>
            </div>
        </div>
    </div>

        <div class="text-center footer">

        <h4>The writer needs a job</h4>
        <h4>+234 806 605 6233</h4>
        <h4>kingsconsult001@gmail.com</h4>
        <h4>Github: www.github.com/kingsconsult</h4>

    </div>

    <script type="text/javascript">
        Dropzone.options.dropzone =
        {
            maxFilesize: 12,
            resizeQuality: 1.0,
            acceptedFiles: ".jpeg,.jpg,.png,.gif",
            addRemoveLinks: true,
            timeout: 60000,
            removedfile: function(file)
            {
                var name = file.upload.filename;
                $.ajax({
                    headers: {
                                'X-CSRF-TOKEN': $('meta[name="_token"]').attr('content')
                            },
                    type: 'POST',
                    url: '{{ url("files/destroy") }}',
                    data: {filename: name},
                    success: function (data){
                        console.log("File has been successfully removed!!");
                    },
                    error: function(e) {
                        console.log(e);
                    }});
                    var fileRef;
                    return (fileRef = file.previewElement) != null ?
                    fileRef.parentNode.removeChild(file.previewElement) : void 0;
            },
            success: function (file, response) {
                console.log(response);
            },
            error: function (file, response) {
                return false;
            }
        };
    </script>

  </body>
</html>
Step 12: Run the app
php artisan serve
Go to http://127.0.0.1:8000/files on your browser

Click on Upload files

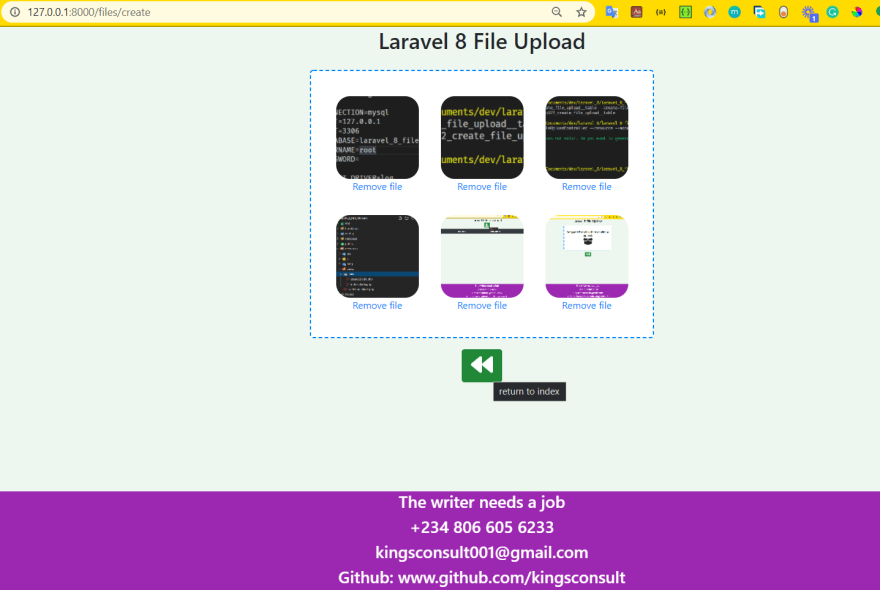
Click to select files or Drag and Drop here

When you have selected the files, it will upload to your database, the progress will display, you can choose to remove file.
Note
- The file will be removed from the screen, but it will not be deleted from the database, if you want to delete the file, go to index blade file and delete.
- If you refresh the screen, the files will clear, but it has already been uploaded to the database.
 Click the backward button to return to the index page
 The index files will now contain the uploaded files, you can delete the file from this page

Finally, we have come to the end of the article, if you follow the article religiously, you will not make a mistake, but in case you can't follow all through, this is the link to the repo
You can encourage me by clicking the heart button to show love, you are can also leave a comment, suggestion, etc. You are also free to contact me through any of my contact details.
click this link to view my profile and follow me
Visit my other posts


Oldest comments (2)
Explain why do you think laravel maintains its own directory structures
EXplain why do you think laravel has its own configuration file
How do you think that routing implements MVC in laravel frameworks
im getting cors blocked when trying to delete the thumbnail, can you please debug the code and see whats wrong ?
Javascript:
dev-to-uploads.s3.amazonaws.com/up...
Controller:
dev-to-uploads.s3.amazonaws.com/up...