Today I am going to explain how to create a view in SQL Server. Let’s first understand what SQL Server view is. The meaning of View in English is the ability to see something or to inspect something. Now, we will correlate this in SQL Server.
We know Tables in SQL Server, Tables are used to store data in the forms of rows and columns in relational database systems like SQL Server, Oracle, or other RDBMS systems. SQL Server VIEW is a database object which offers us the ability to see or inspect what is there in their respective Tables on which VIEW has been created without touching or accessing the actual Table in which data is stored.
Views do not store data physically in the database and are fetched directly from their respective tables whenever you try to access that View and that’s why we term it as a virtual or logical table.
When you access a View, it executes its SQL query and returns the output as per the data selection in the query. You should also note that when you create an index on the View, data got physically stored in the database for that View.
Next, you might be thinking about what the use of SQL Server VIEW is if we already have Tables in the database. The reason for creating a view in SQL Server is to address below concerns of the database users.
- Users can look at or customize data from different perceptions based on their needs. They don’t need to make any changes in actual tables, rather they can get filtered columns from multiple tables in a single VIEW.
- VIEWs are useful if you don’t want to allow users to access the database tables. You can create a VIEW based on the user's need and ask them to use that View as a table for their business need. It also improves security and secure table data.
- VIEWs are also useful in a backward compatible interface to a table that used to exist, but its schema has changed over time.
There are several types of VIEWs in SQL Server.
- User-defined view
- System view
- Indexed view
- Partitioned view
User-defined View is a standard view that a user can create either using query or using GUI through SQL Server Management studio.
System View is an inbuilt system created catalog view using which we fetch various details of SQL Server instances like sys.databases, sys.database_files, etc.
Next is Indexed View, if you create an index on a view then it means the view definition will be computed, and the resulting data will be stored in the database, unlike standard view. Indexed views are created by creating a clustered index on a view. It also improves database performance and is best suited for queries that aggregate more rows.
The last one is Partitioned View which is used to join horizontally partitioned data from a set of member tables across one or more servers.
Now, we will learn how to create a VIEW in SQL Server. We can create a view using T-SQL as well as using GUI through SQL Server Management Studio. Let’s start with the T-SQL statement.
-- Create View Syntax
CREATE VIEW ViewName AS
SELECT ColumnName1, ColumnName2, ColumnName3,..
FROM TableName
WHERE condition;
I have a test database named TESTDB as shown in the below image. You can see the list of all views in the Views folder of the database. You need to connect to your SQL Server instance and then expand the Databases folder. Expand your target database in which you want to create a view or you want to see a list of views of a database.
I have expanded the Views folder of database TESTDB and we can see there is no user-defined view in this database. You can get a list of all system views by expanding the System Views folder shown under the Views folder of the database TESTDB.

Create SQL Server View using T-SQL
We will use CREATE View T-SQL statement to create a view in SQL Server. The syntax of view creation is already given in the above section.
Now, I want to create a view named ProductSalesVW in the TESTDB database where I will include 3 columns PersonName, Price, and InvoiceMonth from table OrderDetails to display the list of product sales each month.
-- Create a View to display month wise product sales
CREATE VIEW ProductSalesVW AS
SELECT ProductName, Price, InvoiceMonth
FROM OrderDetails
We can execute the above T-SQL statement to create the view. The above statement was successfully executed as shown in the below image.

You can also verify whether a view has been created in your database or not by expanding the Views folder of the database TESTDB as shown in the below image. You can use system object sys.views to get a similar list. I will show you later how to use this system object to get the list of all views.

Now, you can fetch data from the newly created View. You just need to simply run the SELECT statement the way you run on any table to fetch its data.
Here, I have executed a simple SELECT statement to return all data from this view and we can only see 3 columns that we have chosen to create this view.

If you want to apply specific conditions to filter the output then you can also do it by using the WHERE clause in the CREATE VIEW statement.
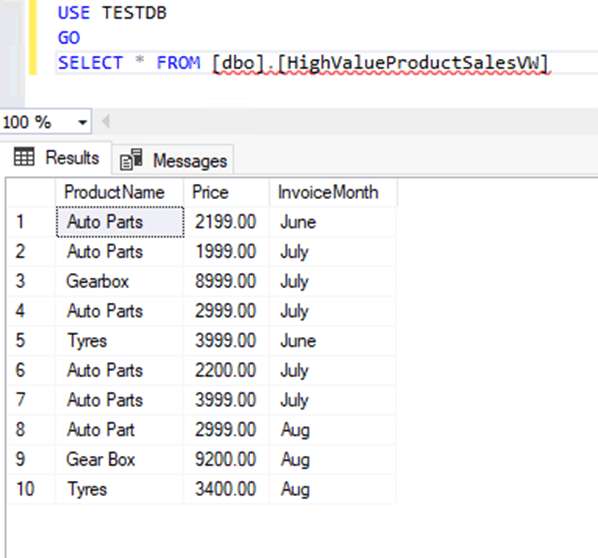
Next, let’s create a new view named HighValueProductSalesVW which will display a list of all products for which invoice cost is more than $1000.
-- Create View to display month wise product sales where the invoice is more than $1000
CREATE VIEW HighValueProductSalesVW AS
SELECT ProductName, Price, InvoiceMonth
FROM OrderDetails
WHERE Price >=1000
Once you will execute the above statements, a new view will be created. Let’s fetch the data using this newly created view. The below image is showing the output of the newly created view and we can see only products whose price is more than $1000.
Next, let’s create a view named EmpProductSalesVW using which we will fetch data from more than one table. We will take an extension of the above example where we will add additional table Associates to fetch employees’ details who have sold these high-value products.
-- Create View to display month wise product sales where the invoice is more than $1000
CREATE VIEW EmpProductSalesVW AS
SELECT o.ProductName, o.Price, o.InvoiceMonth, a.Name, a.Designation
FROM OrderDetails o INNER JOIN Associates a
ON o.PersonID=a.ID
WHERE Price >=1000
The above view has been successfully created in the below image.

Next, we will run this newly created view to fetch its output and we can see employee names and their designation is showing in its output.

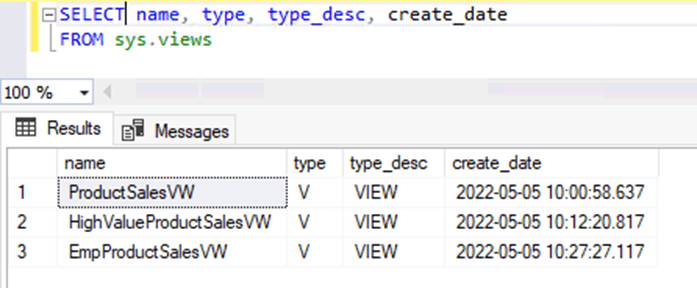
Till now, we learned how to create SQL Server views with different requirements in the above steps. Next, we will learn how to validate or check these newly created views using the T-SQL statement. If you want to display a list of all user views then you can simply run the below T-SQL statement to get this list. I have executed the below statement and got the list of views that we have just created in this article. I don’t had any views created in this database earlier.
-- Get a list of all Views
SELECT name, type, type_desc, create_date
FROM sys.views
Have a look at the output of the above query. It is showing all 3 views which we created in the above steps.
You can also use another system view sys.all_views to display the list of all views created for your target database including all system views as well.
Create SQL Server View using GUI through SQL Server Management Studio
This section will demonstrate step by step process to create a SQL Server View using GUI through SQL Server management studio. There are various tools or add-ins also available in market for database development like dbforge SQL autocomplete which you can use for this activity.
First, you need to connect to your SQL Server instance in SQL Server management studio on which your target database is hosted under which you will create a view. Expand the Databases folder in the management studio and finally target the database in which we will create the View. I will create another view in my test database TESTDB.
Right click at the Views folder and click on the New View… option as shown in the below image.

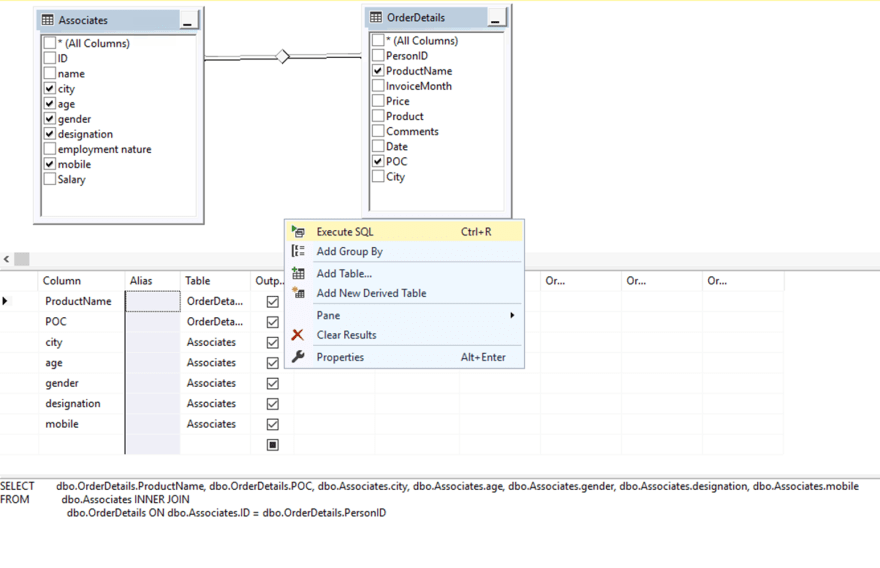
You will get the below window to add tables from which you want to select columns that will be included in the view. I have selected 2 tables as highlighted in the below image and then clicked on the Add button. I will get the product name and POC (point of contact) from one table OrderDetails and details of each POC from another table named Associates.

Once you will click on the Add button post selecting all your desired tables from which columns will be selected in the View, another popup window will be displayed for each table containing their column names as shown in the below image. This section is known as the Diagram pane. Now click on the Close button from Add Table window to close that window.

The relation between tables will be displayed as per their relationships or you can also join both tables based on their relation key. You can see the link between both tables on column Associates.ID and OrderDetails.PersonID.
The next step is to select columns that will be part of View. Click at the check box to select or uncheck the check box to deselect the columns. You can also see the T-SQL statement based on your selection in the query pane.
The next option is to choose criteria for your view and that is why we call it the Criteria pane. Here, you can choose sort type, sort order, filter output based on a specific condition, or add an alias for your column names. You will notice a T-SQL statement showing just below the criteria pane will keep on changing based on your selection or deselection criteria.

Once you have designed your View then you can execute it to display the result in the same window. Right click anywhere on the screen and click on the Execute SQL option as given in the below image.
You will get its output in the output section as shown in the below image. Here you can understand the data whether it is adequate and as per your need or not. You can make changes based on your needs to change the data perspective. We can see all data returned from this View in the below screen and it is absolute as per our expectation.

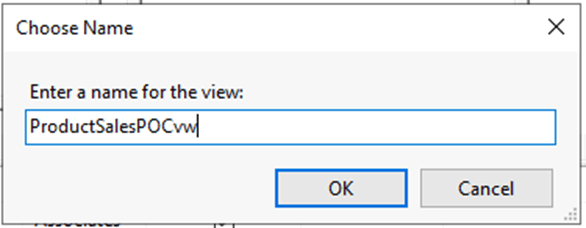
Next, we will save this View. Click on the Save button, you will get the below screen to name this view. Enter the appropriate name under which you want to save this view.
You can validate it by either expanding the Views folder or by accessing the sys.views system object to ensure this view has been created or not. New View is shown in the below image during our validation.

If you want to access the data from this newly created view, you can run it SELECT statement as I have executed in the below image to display its data.

Conclusion
Today, I have explained the basic understanding of SQL Server View and its step-by-step process to create it, check it or access it to get its data. Please share this article and comment with us your feedback in the comment section so that we can improve in a better way.

Top comments (0)