
React-Django-Heroku Web App Deployment
Introduction
This is a simple Todo web application built using React.js (front-end) and Django (back-end).
There are mainly two ways you can deploy this kind of web app:
Separating Back-end and Front-end:
In this method, you serve your back-end and front-end apps separately and they connect to each other with their respective URIs. One major overead of this approach is you have to configure CORS yourself. More about CORS will be explained later in the guide.Serving from the same host:
In this method you will be serving the app from the same URI so it removes the CORS overhead. Also, it makes it easier to maintain smaller-medium sized apps. You don't want to create two separate repositories for some simple sites like a blog, to-do etc.
This method requires building the React app first (npm run build) and update both the Django views (views.py) and urls (urls.py) to render the index.html template directly.
For this guide, we will be demonstrating this longer, more complex but more flexible approach for a simple todo app. I will try out this second, easier method in the future.
Technology Stack
Front-end
- react@17.0.1
- axios@0.21.0
- bootstrap@4.5.3
-
reactstrap@8.7.1
Back-end
- Django==3.1.3
- djangorestframework==3.12.2
- django-cors-headers==3.5.0
- dj-database-url==0.5.0
- django-heroku==0.3.1
- gunicorn==20.0.4
- whitenoise==5.2.0
- python-dotenv==0.15.0
- psycopg2==2.8.6
- psycopg2-binary==2.8.6
Prerequisites
1. Install Node.js
Download Node.js and Node Package Manager (NPM) here.
2. Set up Virtual Environment
a. Using venv (preferred)
-
To create virtual environment:
$ python3 -m venv venv -
To activate virtual environment (Linux/Mac OS):
$ source venv/bin/activate
b. Using pipenv
-
Install pipenv:
$ pip install pipenv # Python 2 $ pip3 install pipenv # Python 3 -
Enter virtual environment shell:
$ pipenv shell
Deployed Web Application
Click here to view the deployed todo web application!
Click here to visit the GitHub repository.
Method 1: Separating Back-end and Front-end
Setting up the Backend
1. Create new project directory
$ mkdir (DIR_NAME)
$ cd (DIR_NAME)
2. Install dependencies
Run the following command inside your virtual environment:
-
Using pipenv:
$ pipenv install -r requirements.txt # (Python 2) $ pipenv3 install -r requirements.txt # (Python 3) -
Using venv:
$ pip install -r requirements.txt # (Python 2)
$ pip3 install -r requirements.txt # (Python 3)
3. Create new Django project
Run the following command inside your virtual environment:
$ django-admin startproject backend
4. Extract all Django project files to root directory (recommended)
The directory should look as follows:
.
├── README.md
├── backend
│   ├── __init__.py
│   ├── __pycache__
│   ├── asgi.py
│   ├── settings.py
│   ├── urls.py
│   └── wsgi.py
├── db.sqlite3
├── manage.py
5. Create new Django app
First, navigate into the newly created backend folder. Then, start a new Django app, in this case called todo since we want to create a todo app. We will also run migrations and start up the server:
$ cd backend
$ python manage.py startapp todo
$ python manage.py migrate
$ python manage.py runserver
If everything works well, we should see an instance of a Django application running on this address — http://localhost:8000

6. Register new Django app
Open the backend/settings.py file and update the INSTALLED_APPS section as so:
# backend/settings.py

# Application definition
INSTALLED_APPS = [
    'django.contrib.admin',
    'django.contrib.auth',
    'django.contrib.contenttypes',
    'django.contrib.sessions',
    'django.contrib.messages',
    'django.contrib.staticfiles',
    'todo' # Add this
]
7. Set up the APIs
In order to allow for API CRUD operations between both front and back end, we need to utilise the Django REST Framework as well as Django CORS Headers.
Django REST framework is a powerful and flexible toolkit for building Web APIs, while Django CORS Headers is a Django app for handling the server headers required for Cross-Origin Resource Sharing (CORS).
The image below essentially sums up the application architecture of a React-Django stack web app:

- Django exports REST APIs using Django REST Framework and interacts with Database using Django Model.
- React Client sends HTTP Requests and retrieve HTTP Responses using axios, shows data on the components.
After installing all the necessary requirements in Step 2, we need to add rest_framework and corsheaders to the list of installed applications, so open the backend/settings.py file and update the INSTALLED_APPS and MIDDLEWARE sections accordingly:
# backend/settings.py

# Application definition
INSTALLED_APPS = [
    'django.contrib.admin',
    'django.contrib.auth',
    'django.contrib.contenttypes',
    'django.contrib.sessions',
    'django.contrib.messages',
    'django.contrib.staticfiles',
    'corsheaders',                              # add this
    'rest_framework',                           # add this
    'todo',
  ]

MIDDLEWARE = [
    'corsheaders.middleware.CorsMiddleware',    # add this
    'django.middleware.security.SecurityMiddleware',
    'django.contrib.sessions.middleware.SessionMiddleware',
    'django.middleware.common.CommonMiddleware',
    'django.middleware.csrf.CsrfViewMiddleware',
    'django.contrib.auth.middleware.AuthenticationMiddleware',
    'django.contrib.messages.middleware.MessageMiddleware',
    'django.middleware.clickjacking.XFrameOptionsMiddleware',
]
At the bottom of the backend/settings.py file, you need to choose to add either the following:
# # Whitelist localhost:3000 because that's where frontend will be served

# Option 1
CORS_ORIGIN_WHITELIST = [
    'https://localhost:3000',
]

# Option 2
CORS_ORIGIN_ALLOW_ALL = True
-
CORS_ORIGIN_ALLOW_ALL: If True, all origins will be accepted (not use the whitelist below). Defaults to False. -
CORS_ORIGIN_WHITELIST: List of origins that are authorised to make cross-site HTTP requests. Defaults to [].
8. Creating serializers for the Django model and views
We need serializers to convert model instances to JSON so that the frontend can work with the received data easily. We will create a todo/serializers.py file:
touch todo/serializers.py
Open the todo/serializers.py file and update it with the following code:
# todo/serializers.py
from rest_framework import serializers # This is important
from .models import Todo

class TodoSerializer(serializers.ModelSerializer):
    class Meta:
        model = Todo
        fields = ('id', 'title', 'description', 'completed')
For any type of Django app, you can configure its own model as long as serializers are imported and serializers.ModelSerializer model class parameter is defined.
For the views in todo/views.py:
# todo/views.py

from django.shortcuts import render
from rest_framework import viewsets          # add this
from .serializers import TodoSerializer      # add this
from .models import Todo                     # add this

class TodoView(viewsets.ModelViewSet):       # add this
    serializer_class = TodoSerializer          # add this
    queryset = Todo.objects.all()              # add this
The viewsets base class provides the implementation for CRUD operations by default, what we had to do was specify the serializer class and the query set.
Finally, we need to update the backend/urls.py:
# backend/urls.py

from django.contrib import admin
from django.urls import path, include                   # add this
from rest_framework import routers                      # add this
from todo import views                                  # add this

router = routers.DefaultRouter()                        # add this
router.register(r'todos', views.TodoView, 'todo')       # add this

urlpatterns = [
    path('admin/', admin.site.urls),
    path('api/', include(router.urls))                   # add this
]
The router class allows us to make the following queries:
-
/todos/- This returns a list of all the Todo items (Create and Read operations can be done here). -
/todos/id- this returns a single Todo item using theidprimary key (Update and Delete operations can be done here).
Setting up the Frontend
1. Create a new React application
Once Node.js is installed, you can quick start creating your first React app by using the following commands:
$ npx create-react-app frontend
$ cd my-app
$ npm start
In this case, the app we are creating is called frontend to compliment the Django's backend project name. This will take a few minutes to complete.
When everything is done, a new folder will be created with the following directory tree:
.
├── README.md
├── backend
│   ├── __init__.py
│   ├── __pycache__
│   ├── asgi.py
│   ├── settings.py
│   ├── urls.py
│   └── wsgi.py
├── db.sqlite3
├── manage.py
└── frontend
    ├── README.md
    ├── node_modules
    ├── package.json
    ├── .gitignore
    ├── public
    │   ├── favicon.ico
    │   ├── index.html
    │   └── manifest.json
    └── src
        ├── App.css
        ├── App.js
        ├── App.test.js
        ├── index.css
        ├── index.js
        ├── logo.svg
        └── reportWebVitals.js
        └── setupTests.js
2. Extract all React project files to root directory (recommended)
In order to make things much easier later in the process, you are advised to move all the files inside
 to the **root directory** (same level as

  ```backend/```

 folder) as follows:


```shell
.
├── README.md
├── backend
│   ├── __init__.py
│   ├── __pycache__
│   ├── asgi.py
│   ├── settings.py
│   ├── urls.py
│   └── wsgi.py
├── db.sqlite3
├── manage.py
├── node_modules
├── package-lock.json
├── package.json
├── public
├── requirements.txt
├── runtime.txt
├── src
└── todo
3. Develop your React application
For this step, it is entirely up to you on how you are going to develop your React application. You can refer to the React codes included inside my GitHub repository (react-dj-todoapp) as reference.
4. Connecting Django with React using axios
For us to make requests to the API endpoints on the Django back-end server, we will need install a JavaScript library called axios.
axios is a popular, promise-based HTTP client that sports an easy-to-use API and can be used in both the browser and Node.js. For more information regarding axios, you can read them here.
First, we need to install axios using NPM:
$ npm install axios
Once axios is successfully installed, head over to the package.json file and add a proxy like so:
// package.json

[...]
"name": "frontend",
"version": "0.1.0",
"private": true,
"proxy": "http://localhost:8000",
"dependencies": {
    "axios": "^0.18.0",
    "bootstrap": "^4.1.3",
    "react": "^16.5.2",
    "react-dom": "^16.5.2",
    "react-scripts": "2.0.5",
    "reactstrap": "^6.5.0"
},
[...]
The proxy will help in tunnelling API requests to http://localhost:8000 where the Django application will handle them, so we can simplify writing the requests like this in React:
axios.get("/api/todos/")
Instead of this:
axios.get("http://localhost:8000/api/todos/")
After that, you need to modify the React codes (App.js)
Here's a snippet on how to use axios:
// src/App.js

handleSubmit = item => {
    this.toggle();
    if (item.id) {
    axios
        .put(`http://localhost:8000/api/todos/${item.id}/`, item)
        .then(res => this.refreshList());
    return;
    }
    axios
      .post("http://localhost:8000/api/todos/", item)
      .then(res => this.refreshList());
};

handleDelete = item => {
    axios
        .delete(`http://localhost:8000/api/todos/${item.id}`)
        .then(res => this.refreshList());
};
For further information and example, please refer to this Digital Ocean guide.
5. Test the Web Application
You can check whether everything is working by running both React and Django concurrently at your local development server:
$ npm start
$ python manage.py runserver
Test whether both the UI and API requests are working or not.
Deploying the Web App using Heroku
1. Set up Heroku account and CLI
Here is an outline following Heroku's from-product-to-productionized instructions for a Django deployment to Heroku:
- Signup for Heroku if you don't have an existing account
-
Install the Heroku CLI. For MacOS, use
$ brew tap heroku/brew && brew install heroku: -
Log in to your Heroku account by entering your credentials using
$ heroku login: -
Create a n*ew Heroku app* either via Heroku CLI (
$ heroku create APP_NAME) or directly in the Heroku dashboard:

Add the Heroku remote via
$ heroku git:remote -a your-heroku-app.Configure the Heroku buildpacks
* The React app build process depends on NPM, so we need Node.js. We also need Python to run Django.
* Heroku uses **buildpacks** to **transform deployed code into slugs** which can be executed by Dynos (server instances on Heroku). We’ll be needing two buildpacks. One for Node and another for Python.
* Our app would run on a Python server, even though we will use Node/NPM to build/bundle the React frontend. So the Python buildpack will be the main one in our config. The main buildpack determines the process type of the Heroku app. You can read about multiple buildpacks to understand how they work.
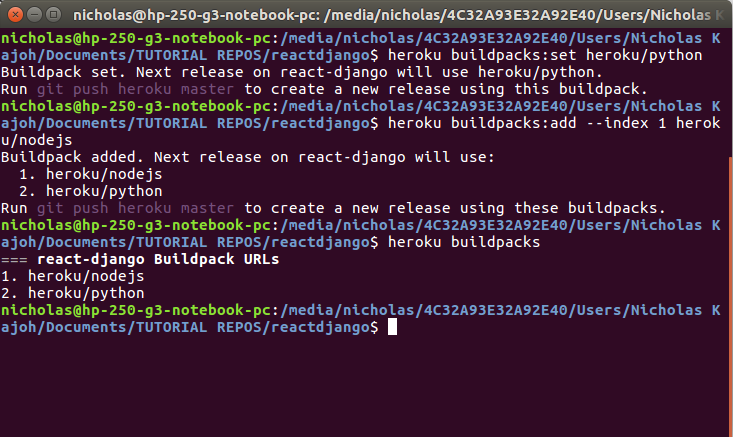
* You can add buildpacks via the Heroku CLI. Head back to your terminal and run the following to set/add the buildpacks we need:
```shell
$ heroku buildpacks:add --index 1 heroku/nodejs
$ heroku buildpacks:add --index 2 heroku/python
```
* Note that the buildpacks **must be added in that order**. We can see the buildpacks we’ve added by running `$ heroku buildpacks`. The **last buildpack** on the list **determines the process type** of the app.
- Configure PostgreSQL Heroku addon
* During production, Heroku will **not be using SQLite database**. Instead, we need to use **PostgreSQL** by configuring the addon to our app using `$ heroku addons:create heroku-postgresql:hobby-dev`
* You can check whether this is successful by running `$ heroku config`:
 ```shell
$ === APP_NAME Config Vars
DATABASE_URL: postgres://[DATABASE_INFO_HERE]
```
* The database info from the code snippet above refers to the URL containing your database’s location and access credentials all in one. Anyone with this URL can access your database, so be careful with it.
* You will notice that Heroku saves it as an **environment variable** called `DATABASE_URL` . This URL can and does change, so you should never hard code it. Instead, we’ll use the variable `DATABASE_URL` in  Django.
- Configure Heroku config variables
* According to Heroku, **config variables** are environment variables that can change the way your app behaves. In addition to creating your own, some add-ons come with their own.
* There are several environment variables that need to be set:
```shell
$ heroku config:set ALLOWED_HOSTS=APP_NAME.herokuapp.com
$ heroku config:set ALLOWED_HOSTS=APP_NAME.herokuapp.com
$ heroku config:set SECRET_KEY=DJANGO_SECRET_KEY
$ heroku config:set WEB_CONCURRENCY=1
```
- Import
django-herokuinsidesettings.py
* `django-heroku` is a **Django library** for Heroku applications that ensures a more seamless deployment and development experience.
* This library provides:
    * **Settings configuration** (Static files / WhiteNoise)
    * **Logging configuration**
    * **Test runner** (important for Heroku CI)
* In `settings.py`, include the following at the very bottom:
```python
# backend/settings.py

# Configure Django App for Heroku.
import django_heroku
django_heroku.settings(locals())
```
2. Configure the Django back-end side
Database Configuration
A. Create .env
As mentioned above, the local version of the Django app is using db.sqlite3 as its database. However, when we visit the Heroku version, APP_NAME.herokuapp.com, Heroku will need to use a PostgreSQL database instead.
What we want to do is to get our app running with SQLite whenever we’re working on it locally, and with Postgres whenever it’s in production. This can be done using the installed python-dotenv library.
We will then use a file called .env to tell Django to use SQLite when running locally. To create .env and have it point Django to your SQLite database:
$ echo 'DATABASE_URL=sqlite:///db.sqlite3' > .env
Include the .env file inside our .gitignore when pushing to Heroku by running the following command:
$ echo '.env' >> .gitignore
B. Update settings.py
First, import the necessary libraries for deployment purposes:
# backend/settings.py

import django_heroku
import dotenv
import dj_database_url
Next, we need to set up the database configuration:
# backend/settings.py

# Build paths inside the project like this: BASE_DIR / 'subdir'.
BASE_DIR = Path(__file__).resolve().root.root

dotenv_file = os.path.join(BASE_DIR, ".env")
if os.path.isfile(dotenv_file):
    dotenv.load_dotenv(dotenv_file)
Since .env won’t exist on Heroku, dotenv.load_dotenv(dotenv_file) will never get called on Heroku and Heroku will proceed to try to find its own database — PostgreSQL.
We also need to configure the DATABASES setting as shown below:
# backend/settings.py

DATABASES = {}
DATABASES['default'] = dj_database_url.config(conn_max_age=600)
The idea here is to clear the DATABASES variable and then set the 'default' key using the dj_database_url module. This module uses Heroku’s DATABASE_URL variable if it’s on Heroku, or it uses the DATABASE_URL we set in the .env file if we’re working locally.
If you ran the Django application as specified above, you might get an error when working locally because the dj_database_url module wants to log in with SSL. Heroku Postgres requires SSL, but SQLite doesn’t need or expect it. Here's how to fix that:
# backend/settings.py

# This should already be in your settings.py
django_heroku.settings(locals())

# Add these at the very last line of settings.py
options = DATABASES['default'].get('OPTIONS', {})
options.pop('sslmode', None)
Test everything out by running the local Django server using python3 manage.py runserver.
Static files serve (WhiteNoise)
A. WhiteNoise settings
WhiteNoise allows your web app to serve its own static files, making it a self-contained unit that can be deployed anywhere without relying on nginx, Amazon S3 or any other external service. (Especially useful on Heroku, OpenShift and other PaaS providers.)
Since this is already installed from the requirements.txt file earlier on, we need to update settings.py:
# backend/settings.py

MIDDLEWARE = [
  'django.middleware.security.SecurityMiddleware',
  'whitenoise.middleware.WhiteNoiseMiddleware',
  # ...
]

STATICFILES_STORAGE = 'whitenoise.storage.CompressedManifestStaticFilesStorage'
B. Static files and template settings
In order to correctly serve the static files from both Django and React, we need to update the following in settings.py:
# backend/settings.py

STATIC_URL = '/static/'

STATICFILES_DIRS = [
    os.path.join(BASE_DIR, 'build/static')
]

STATIC_ROOT = os.path.join(BASE_DIR, 'staticfiles')
STATIC_ROOT points to the directory containing all the static files, while STATICFILES_DIRS refers to other directories where Django will collect the static files as well. In this case, it is pointing to React's 'build/static' directory which contains the static files for frontend when Heroku builds the React app using npm run build during deployment.
Therefore, when Heroku runs python3 manage.py collectstatic during deployment, it will automatically compile all the static files from both React and Django.
Meanwhile for Django's template directory, we need to include the React build directory which stores the index.html inside TEMPLATES as follows:
# backend/settings.py

TEMPLATES = [
    {
        'BACKEND': 'django.template.backends.django.DjangoTemplates',
        'DIRS': [os.path.join(BASE_DIR, 'build')],
        'APP_DIRS': True,
        'OPTIONS': {
            'context_processors': [
                'django.template.context_processors.debug',
                'django.template.context_processors.request',
                'django.contrib.auth.context_processors.auth',
                'django.contrib.messages.context_processors.messages',
            ],
        },
    },
]
C. Static files MIME Type issue
Upon deploying the web app in Heroku, one of the common issues that occur is the static files failing to load due to MIME type limitations. The particular MIME type (text/html) problem is related to your Django configuration.
The views.py in your React frontend needs a content_type argument in the HttpResponse.
Heroku needs to know where the static files are.
The "refused to execute script ... MIME type ('text/html')" problem stems from Django's default content_type setting for an HttpResponse, which is text/html.
This can be fixed by including a content_type='application/javascript' argument in the return statement of a new class-based view called Assets(View) inside views.py like so:
# todo/views.py

from django.shortcuts import render
from rest_framework import viewsets
from .serializers import TodoSerializer
from .models import Todo
from django.views import View
from django.http import HttpResponse, HttpResponseNotFound
import os

# The viewsets base class provides the implementation for CRUD operations by default,
# what we had to do was specify the serializer class and the query set.
class TodoView(viewsets.ModelViewSet):
    serializer_class = TodoSerializer
    queryset = Todo.objects.all()

# Add this CBV
class Assets(View):

    def get(self, _request, filename):
        path = os.path.join(os.path.dirname(__file__), 'static', filename)

        if os.path.isfile(path):
            with open(path, 'rb') as file:
                return HttpResponse(file.read(), content_type='application/javascript')
        else:
            return HttpResponseNotFound()
3. Debug and Access
During production, it is strongly recommended that DEBUG is set to False.
For ALLOWED_HOSTS, if you set CORS_ORIGIN_ALLOW_ALL to True:
# backend/settings.py

ALLOWED_HOSTS = ['*'] # Set to open for all access
Else, you need to specify the URL access permissions as follows:
# backend/settings.py

ALLOWED_HOSTS = ['react-dj-todoapp.herokuapp.com', '127.0.0.1:8000', 'localhost']
4. Configure the React front-end side
A. Configure package.json
For React deployment using Heroku, there are a few changes needed to be made inside the package.json:
// package.json

// Add homepage and engine settings

{
    "name": "frontend",
    "homepage": ".",
    "version": "0.1.0",
    "private": true,
    "proxy": "http://localhost:8000",
    "dependencies": {
        "axios": "^0.18.0",
        "bootstrap": "^4.1.3",
        "react": "^16.5.2",
        "react-dom": "^16.5.2",
        "react-scripts": "2.0.5",
        "reactstrap": "^6.5.0"
    },
    "scripts": {
        "start": "react-scripts start",
        "build": "react-scripts build",
        "test": "react-scripts test",
        "eject": "react-scripts eject"
    },
    "engines": {
        "node": "14.6.0",
        "npm": "6.14.9"
    },
    [...]
The engines part refers to the preferred version of Node and NPM.
B. Fix Django's CSRF token verification conflict
The built-in CSRF protection provided by Django is very useful to protect your server from malicious websites that can exploit your visitor browser to attack you. However, when using modern JavaScript libraries you will need to handle CSRF differently.
Referring back to the first part of the README.md, because React and Django apps use different URL and port number, Django's CSRF token verification mechanism will prevent React from executing any API requests to Django during production.
To solve this, we need to tell axios to handle CSRF tokens in React. For axios client you have three options:
- Manually attach the CSRF token in the header of each Axios call
- Use the
AxiosxsrfHeaderNamefor each call - Use a default
xsrfHeaderName (axios.defaults.xsrfHeaderName = "X-CSRFToken")
Here is how you can simply use the CSRF token with Axios without any further configuration:
// src/App.js

import axios from 'axios';

axios.defaults.xsrfCookieName = 'csrftoken'
axios.defaults.xsrfHeaderName = 'X-CSRFToken'
5. Set up Heroku-specific files
A. runtime.txt
Heroku will install a default Python version if you don't specify one, but if you want to pick your Python version, you'll need a runtime.txt file.
Create one in the root directory, next to your requirements.txt, manage.py, .gitignore and the rest. Specify your Python version with the prefix python- that you want your application to run on:
python-3.9.0
B. requirements.txt
When deploying the web app, Heroku will need to install all the required dependencies for the web app to run by referring to the requirements.txt file.
To ensure that all dependencies are included, consider freezing your dependencies using the command $ pip freeze > requirements.txt. This will make your build a little bit more predictable by locking your exact dependency versions into your Git repo. If your dependencies aren't locked, you might find yourself deploying one version of Django one day and a new one the next.
C. Procfile
Heroku apps include a Heroku-specific Procfile that specifies the processes our application should run. The processes specified in this file will automatically boot on deploy to Heroku.
Create a file named Procfile in the root level directory using $ touch Procfile command, right next to your requirements.txt and runtime.txt files. (Make sure to capitalize the P of Procfile otherwise Heroku might not recognize it!):
Then, fill in the codes below:
release: python manage.py migrate
web: gunicorn backend.wsgi --log-file -
6. Commit and Push
Once all the previous steps are completed, we are ready to finally commit and push all changes:
$ git add .
$ git commit -m "blah blah blah"
$ git push heroku master
After the build is done and your app has been released, visit YOUR-APP-NAME.herokuapp.com.
7. Database Syncing
Upon successful deployment, one of the expected problems that may arise is the 500 Server Error or the following error:
ProgrammingError at /
relation "TABLE_NAME" does not exist
This error can be resolved by running $ python3 manage.py migrate --run-syncdb using Heroku run bash:
$ heroku run python3 manage.py migrate --run-syncdb
And if everything goes well up to this point, congratulations! You have successfully deployed your first React-Django web app!
8. Debugging
If everything did not go well, you can use the $ heroku logs --tail to investigate any errors.
References
- https://www.digitalocean.com/community/tutorials/build-a-to-do-application-using-django-and-react
- https://dev.to/shakib609/deploy-your-django-react-js-app-to-heroku-2bck
- https://alphacoder.xyz/deploy-react-django-app-on-heroku/
- https://alphacoder.xyz/dead-simple-react-django-setup/
- https://blog.usejournal.com/deploying-django-to-heroku-connecting-heroku-postgres-fcc960d290d1
- https://blog.usejournal.com/serving-react-and-django-together-2089645046e4
- https://stackoverflow.com/questions/24351052/relation-does-not-exist-on-heroku
- https://stackoverflow.com/questions/53265543/sending-x-csrf-token-with-axios-request-django-reactjs
- https://www.techiediaries.com/django-cors/
- https://bezkoder.com/django-react-axios-rest-framework/

Top comments (15)
My app successfully built using the Heroku CLI, but when I went to my app on herokuapp.com, I got the message "Not Found: The requested resource was not found on this server."
After digging through the dev tools on the page, I discovered that none of the front end code was present at all. Any clues as to why this may be happening?
Hi there! My sincere apologies for the terribly late reply (was busy with studies so didn't have much time with blogging). I believe that this particular guide is outdated due to frequent updates from both Django and React that may tamper with its success. If I have the time, I will redo the project and update the guide.
In the meantime, I highly recommend you refer to other tutorials and guides as well, such as one from Digital Ocean.
Again, really sorry for the trouble!
I have the same problem. Have you fixed this ? This author's methods are NOT complete.
The author has the following line in his urlpatterns in backend/urls.py. I believe I just had to add that line to my project to get it to work.
re_path('.*', TemplateView.as_view(template_name='index.html'))
Yes, some of the methods were confusing admittedly. I recalled at the time of developing this side project, I encountered a lot of issues after deploying it on Heroku. Much time has passed since I published this, so my intuition is that the frequent updates from both Django and React will further exacerbate the issue (these 2 don't really get along well to be honest)
If I have the time, I will redo the project and update the guide ASAP. My apologies for the inconveniences caused!
What if MIME type error remains after changing view content_type. I am using Django's TemplateView, but logic should remain same. TemplateView.as_view(template_name="index.html", content_type="application/javascript"), but MIME error is still there?
Hi there! My sincere apologies for the terribly late reply (was busy with studies so didn't have much time with blogging). I believe that this particular guide is outdated due to frequent updates from both Django and React that may tamper with its success. If I have the time, I will redo the project and update the guide. In the meantime, I highly recommend you refer to other tutorials and guides as well, such as one from Digital Ocean.
Again, really sorry for the trouble!
Have you added the Assets CBV that I mentioned? I personally struggled with the MIME type issue for a long time myself.
I also found a suggestion that adding '' at the HTML head can do the trick as well. Worth a try.
P.S. I just realised that the markdown formatting for the post previously was a bit botched. Fixed it already
Have you found a solution to this? I have a similar problem..
I have followed your doc. And my app built successfully on Heroku. But it's still showing me a MIME type error. I have added Assets CBV which you mentioned.
Here is my app link: web-coders-blog.herokuapp.com/
now check the console and that error. And if you can then help here.
Hi, you mentioned at the beginning there are two ways. Sorry I might have missed it but which one did you follow in this article?
I've completely separated my django and react, hosted as 2 different apps on heruko. Local is fine, but I can't get my deployed frontend react app proxy api requests to django. Also, is there a way to display error in chrome console similar to that when you're viewing it locally?
Hi there! My sincere apologies for the terribly late reply (was busy with studies so didn't have much time with blogging). I believe that this particular guide is outdated due to frequent updates from both Django and React that may tamper with its success. If I have the time, I will redo the project and update the guide.
For your question, I'm using the first approach.
In the meantime, I highly recommend you refer to other tutorials and guides as well, such as one from Digital Ocean.
Again, really sorry for the trouble!
you can also save lot of time scaffolding your Django Rest APi with the help of github.com/Abdenasser/dr_scaffold
It is based on DRF as well
Saved!
I create a app using method 2. Can you give me a solution how to deploy this application in heroku?