If you prefer a Video Tutorial, you can watch me screencast it on youtube, otherwise read on below.
Recent world events (COVID-19) has completely turned the Developer Advocacy role on its head and many of us are scrambling to find new ways to effectively reach audiences remotely.
Many of us have been reaching for tools like Zoom for smaller groups such as Meetups and streaming platforms like Twitch / YouTube Live for reaching larger groups.
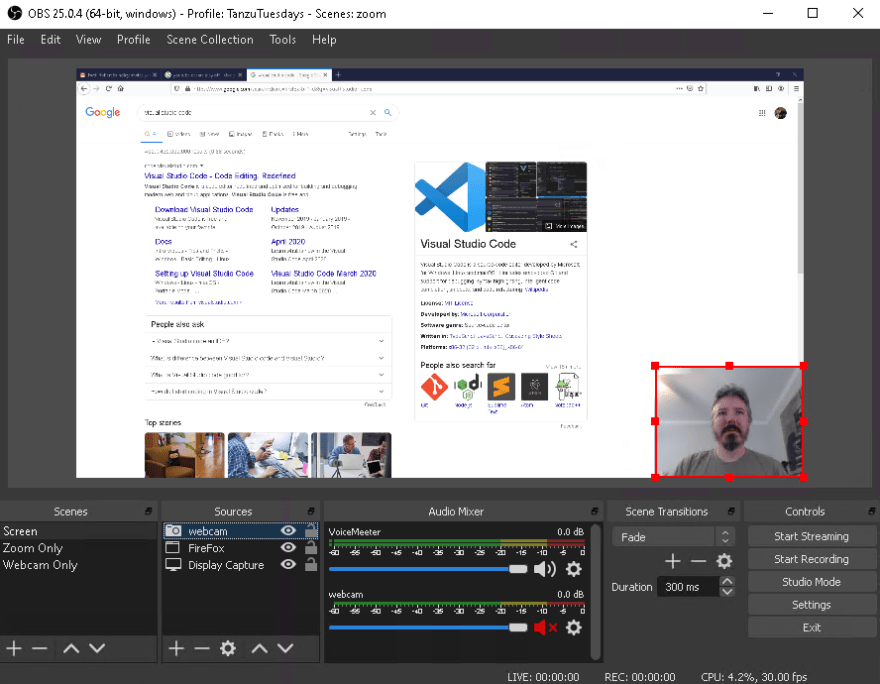
Many of us are turning to Open Broadcaster Studio (OBS) to turn our PCs into virtual production studios capable of composing multiple artifacts such as windows, audio, and webcams into layered streams. The most basic use case for OBS is to provide the ability to display onscreen code or a terminal session with a webcam image overlayed in the corner
OBS can record to a high definition video file on your local machine as well as broadcast it out to Twitch, YouTube, or any other RTSP capable platform.
It should come as no surprise that streaming high quality video from multiple sources can be quite taxing and it often makes sense to have OBS running on a separate computer (refurbished Dell desktops are perfect for this) with a video capture device (like an Elgato HD60) capturing video from your primary machine.
Using OBS its fairly simple to record and broadcast a presentation, or live coding session. However it feels more like a webinar than it does a meetup or conference presentation as the interaction is very one way.
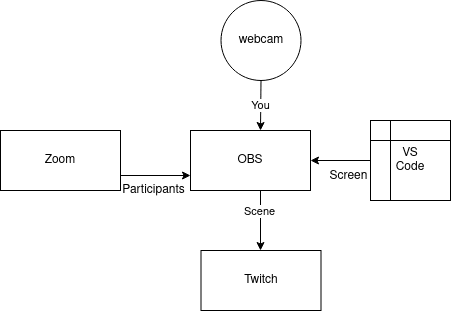
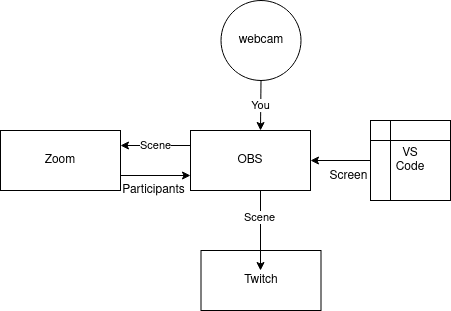
By hooking up Zoom and OBS bidirectionally you can have the reach of a streaming platform at the same time as the more interative nature of having real live people in the (virtual) room with you. Having even just a few people acting as an audience and being able to talk to them and have them talk back and see their body language and reactions makes all the difference.
Unfortunately trying to share a screen and audio through multiple systems is complicated and isn’t possible straight out of the box and we need to solve a few problems:
Rebroadcast video from Zoom through to your stream
Rebroadcast video from OBS through to Zoom
Mix audio from multiple inputs through to multiple outputs (without causing feedback loops)
1. Rebroadcast video from Zoom through to your stream
Multiple Monitors
If you have multiple monitors you can dedicate one of them to Zoom and add a Display Capture source in OBS for that whole display and set zoom to fullscreen on that monitor.
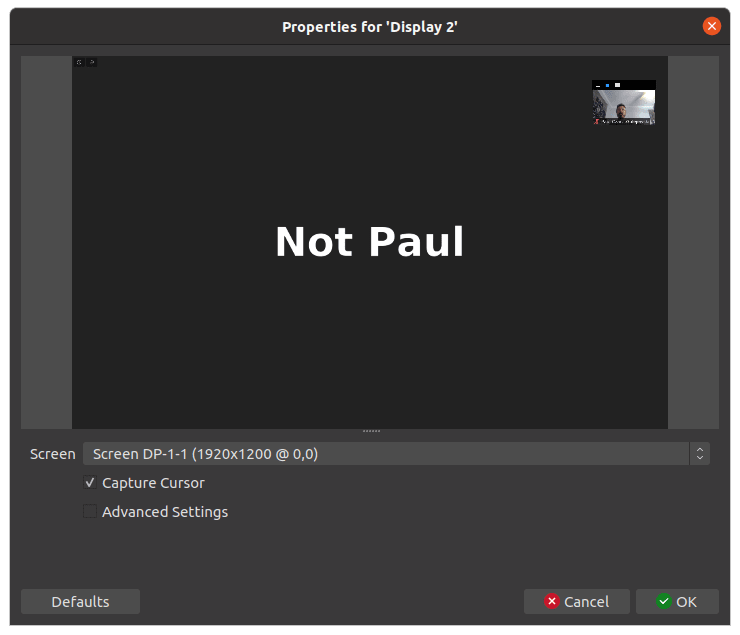
Note: I was on a Zoom between two machines and only one camera, so pretend
Not Paulis a very handsome gentleman.
I’m not a fan of the layout of fullscreen zoom calls, and I prefer the flexibility of capturing it as a window, which also makes it possible to do this with a single monitor.
Single Monitor / Window Capture
In OBS you can add a Window Capture and select your Zoom meeting. This will capture just the Zoom window itself. You can adjust the window size to suit the resolution that you’re outputting to.
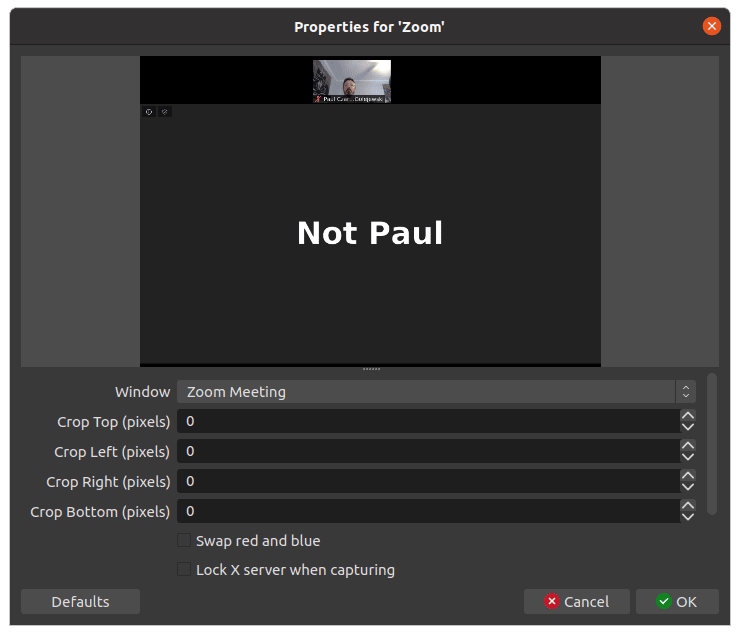
Note: The window capture settings are OS dependent, on Windows it would display the name and executable file for the window you want to share.
One Caveat is that Zoom likes to switch to fullscreen when somebody shares their screen. Make sure to deselect the Enter full screen when a participant shares screen in the Share Screen Settings to disable this behavior.
You might be tempted to try and share your screen to Zoom, however Zoom behaves painfully when you do that and you’ll most likely lose your capture of the Zoom window. Instead you should add the OBS virtual camera (see below) which lets you use the contents of your OBS scene as a camera in Zoom.
2. Rebroadcast video from OBS through to Zoom
OBS has a plugin that lets you create a virtual camera which you can use as your Zoom camera. The people in your Zoom call will see exactly the same video that you’re streaming without having to share your screen.
You can download the virtual camera plugin from here however it currently only supports Windows. (There’s a video4linux you can use if you’re on Linux) for the same effect.
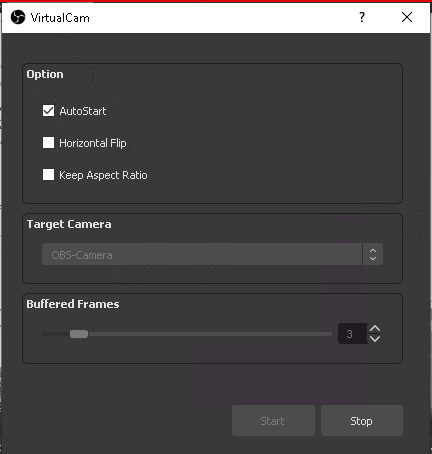
With the Virtual Camera plugin installed and enabled you can the select it as a camera in Zoom.
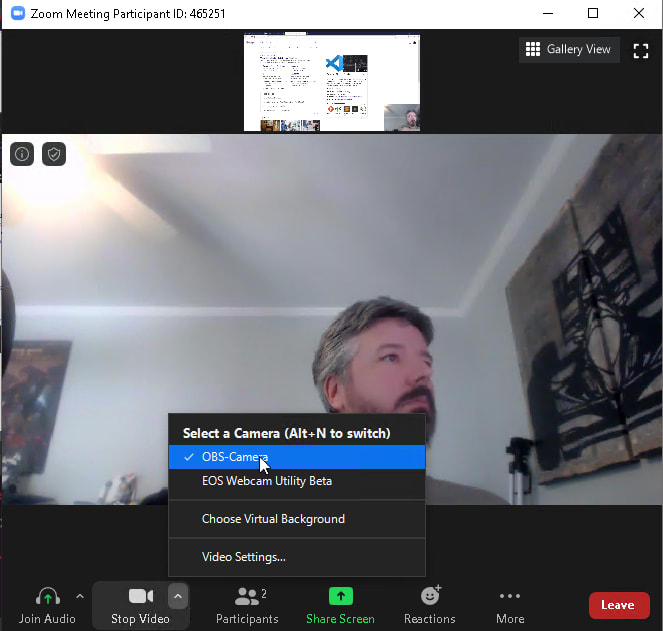
You can see the remote camera now showing the host’s OBS scene of their webcam nested with their screen share.
3. Mix audio from multiple inputs through to multiple outputs
Without causing feedback loops.
Setting up the video was relatively straight forward. Audio is the complicated beast. So far I have only solved this on Windows, but am quite certain you could solve it in Linux using the JACK Audio Connection Kit (JACK).
If you’re running a Mac you should be able to use Rogue Amoeba’s Loopback app to perform similar (and maybe even more advanced) audio filtering. Thanks Matty Stratton for the tip.
Basically we need to be able to selectively route certain inputs to certain outputs. For instance we want zoom audio to go into OBS, and we want OBS audio to go into Zoom, but we don’t want them to loop eachothers audio back and create a feedback loop.
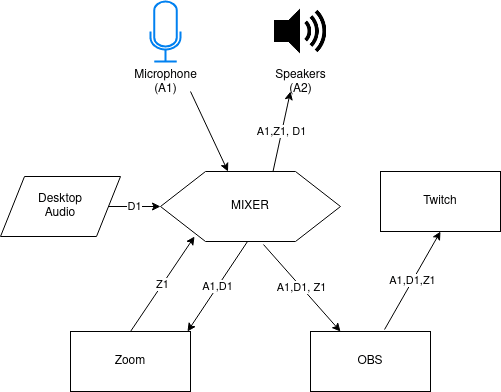
In order to solve this, you need a Mixer that can mix three discreet inputs (Zoom, Desktop, Mic) to three discreet outputs (Speakers, Zoom, OBS).
You also need virtual audio devices that can act as patch cables.
There’s likely a number of different audio solutions out there to solve this, I’ll show you what I found works really well and while not free, is extremely affordable.
This is where VB Audio comes in. It’s a website with an interesting assortment of audio software for Windows, most of which is either Free or Donationware (read the licenses carefully before using it in a commercial setting).
VB Audio offers virtual cables that we can use to patch the sound correctly. They have up to 5 cables that you can purchase via Donation. In order to wire up our sound we’ll use VB-CABLE A+B and VB-CABLE C+D which gives us 4 virtual cables.
All audio sent to VB-CABLE inputs is sent to the corresponding VB_CABLE output.
Pay for, download, and install both bundles.
You will still need a Mixer capable of mixing the inputs correctly. Thankfully VB Audio also provides VoiceMeeter. It comes in three flavors, VoiceMeeter, VoiceMeeter Banana, and VoiceMeeter Potato.
The regular VoiceMeeter does not have enough inputs and outputs, so you’ll want to use either Banana or Potato. I used Banana as it has exactly the right number of inputs.
Pay for (Donate), download and install VoiceMeeter Banana.
Now you have the Mixer and the Virtual Cables we can hook everything up together.
Configure VoiceMeeter Banana
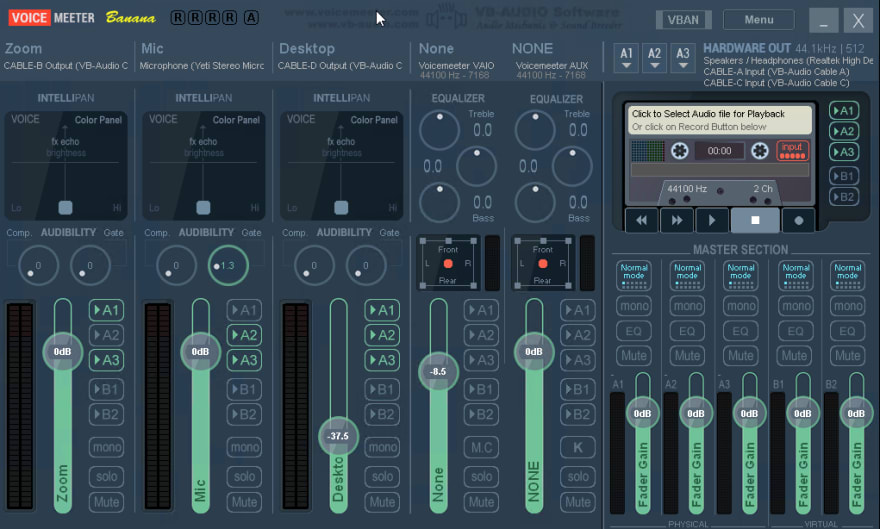
First open up VoiceMeeter Banana. You’ll see there are Three Hardware Inputs and Three Hardware outputs.
Hardware Inputs:
You can rename the Inputs by right clicking on their names, and you can select their devices underneath.
Rename Hardware input 1 to Zoom and set it to WDB: CABLE-B Output.
Rename Hardware input 2 to Mic and set it to your microphone device. Mine is Microphone (Yeti).
Rename Hardware input 3 to Desktop and set it to WDB: CABLE-D Output.
Hardware Outputs:
*Set the outputs by clicking the A1, A2, A3 dropdowns next to where it says HARDWARE OUT *
- A1 -> Speakers / Headphones
- A2 -> WDM: Cable-A Input (Zoom)
- A3 -> WDM: Cable-C Input (OBS)
Mixing:
Under the Hardware Inputs you can see a Volume selector and a sound activity bar. Beside that you can see options, the outputs to send to as well as Mute.
- Zoom -> A1 (Speakers), A3 (OBS)
- Mic -> A1 (Speakers), A2 (Zoom), A3 (OBS)
- Desktop -> A1 (Speakers), A2 (Zoom), A3 (OBS)
*I usually set the Desktop audio volume to about -33 so that random noises don’t drown out people speaking.
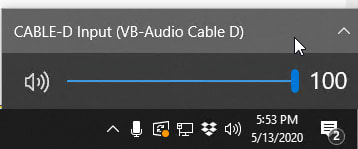
Configure Desktop Audio
In your status bar select the Speaker Icon and configure it to output to Cable-D Input
Configure Zoom audio
In Zoom, go to Audio Settings. Set Speaker to Cable-B Input and set Microphone to Cable-A Output.

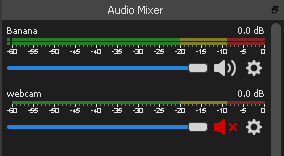
Configure OBS settings
in OBS under Settings -> Audio Disable all Audio devices. Then set Mic/Auxillary Input to CABLE-C Output.

Then in the OBS Audio Mixer rename the Mic/Auxillary Input to VoiceMeeter and mute all other devices such as webcams.
Test it out
You should now have everything wired up correctly and just need to test it out.
When you configured the Mic input in VoiceMeeter you chose to send it to all three outputs. This means that you should hear your Mic input through your speakers/headphones.
If you don’t like to listen to yourself you can deselect A1 for the Mic input. This is an easy toggle to see if the audio is working.
You can also use the volume meters in the various apps to confirm they match. For instance when you speak in the Microphone you should see the Mic meter, and the A1 , A2 , A3 meter move at the same time. You should also see activity in the OBS mixer and Zoom.
You should hit Start Recording in OBS and get on a zoom with a friend (or a second computer) and verify sound is working in both directions, and that all of the audio ends up in the OBS recording.
Conclusion
Assuming you didn’t hit any issues following this guide you now have your system configured to Stream to both Twitch (or YouTube) and Zoom at the same time, mixing their audio and video appropriately.
This gives you a powerful way to not just record content, but to stream it and share it with both intimate groups on Zoom and Larger audiences on Twitch.
One of the best parts of this setup is how I can easily host someone else on my twitch stream and have them share their desktop and do demos, live coding etc.
I can also run workshops through zoom and people on my twitch stream can also follow along.

Latest comments (0)