By Rexford A. Nyarko
Technological innovations have made it very easy to own an online shop or e-commerce business and to integrate products or services into websites or mobile apps. One thing you need to ensure if you’re an online seller is that you’re offering your customers or users a range of payment options.
The Rapyd Collect API is a service offered by Rapyd that allows you to collect payments from customers online or within your app, including one-time, recurring, subscription, or business-to-business payments.
It provides flexibility for your customers by offering access to almost any payment method in almost any country, without the need to set up or manage extra infrastructure.
In this article, you’ll learn how to integrate payments into a Flutter app using the Rapyd Collect API via their Hosted Checkout Page. The only prerequisite for the integration is having a Rapyd account.
The example app used in this tutorial is a simple Flutter mobile application that allows users to donate money to a cause, which was built using a UI design from dribbble artist Emir Abiyyu.
As your use case might be different, this article focuses mainly on the integration and not the building of the entire app from scratch. The complete source code can be found on GitHub.
Setting Up Your Rapyd Account
As stated earlier, the only prerequisite for integrating the Collect API into your application is a Rapyd account.
Sign Up
You first need to go through the simple process of setting up your Rapyd account. You’ll need to verify your email by clicking on the confirmation link sent to the email address provided and also complete multifactor authentication with a mobile number.
Enable Sandbox Mode
After you create your Rapyd account and log in, you have to enable sandbox mode. This provides a sandbox environment to explore Rapyd’s functions and products, including tests and simulations you can try without altering your account.
To enable the sandbox mode, flip the sandbox switch at the bottom of the main navigation on the left side of the dashboard as shown in this image.
Access and Secret Keys
To use any of Rapyd's APIs, you’ll need the access and secret keys as part of the authentication credentials. To find these keys, from the navigation menu, go to Developers > Credential Details on the left. Copy and save them for use later in this tutorial.
Creating and Customizing a Rapyd Checkout Page
To ensure users have a seamless transition between your website and the checkout page, you should customize your Rapyd checkout page to match the theme of your website. You may want to add your company logo or the app logo and thematic color for the buttons. Rapyd provides basic customizations to help you achieve this. These customizations can be found in the settings menu on the left navigation of the dashboard under Branding.
There are various options to customize the look and feel of your checkout page, and Rapyd has an extensive guide to customizations.
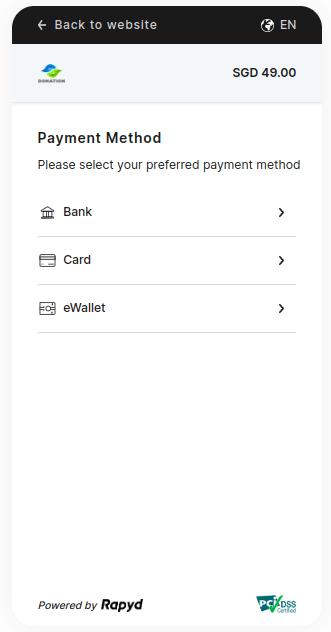
For this tutorial, a logo was added, the payment options were changed to remove “bank redirect” and “cash”, a color preference for the buttons to match the mobile app was set, and the wording for the call to action was changed from "Place your order" to "Donate".
The following image is the final mobile view after the changes.
Creating or Preparing the Flutter App for Integration
If you already have a Flutter application you want to work with, you can skip to the next section. But if you prefer to follow along with the prebuilt dummy for this tutorial, please continue reading.
Clone App
From your terminal or command prompt with Git installed, run the command below to clone the project files from GitHub:
$ git clone https://github.com/Rapyd-Samples/flutter-donation
Change Branch
The default branch for this repo is the dev branch, which contains the completed code for this tutorial, but to follow along you can switch to the basic branch, which only contains the basic app code without the Collect API integrated:
$ git checkout basic
Initial App Run
You can run the application or any supported connected device with the following command:
$ flutter run
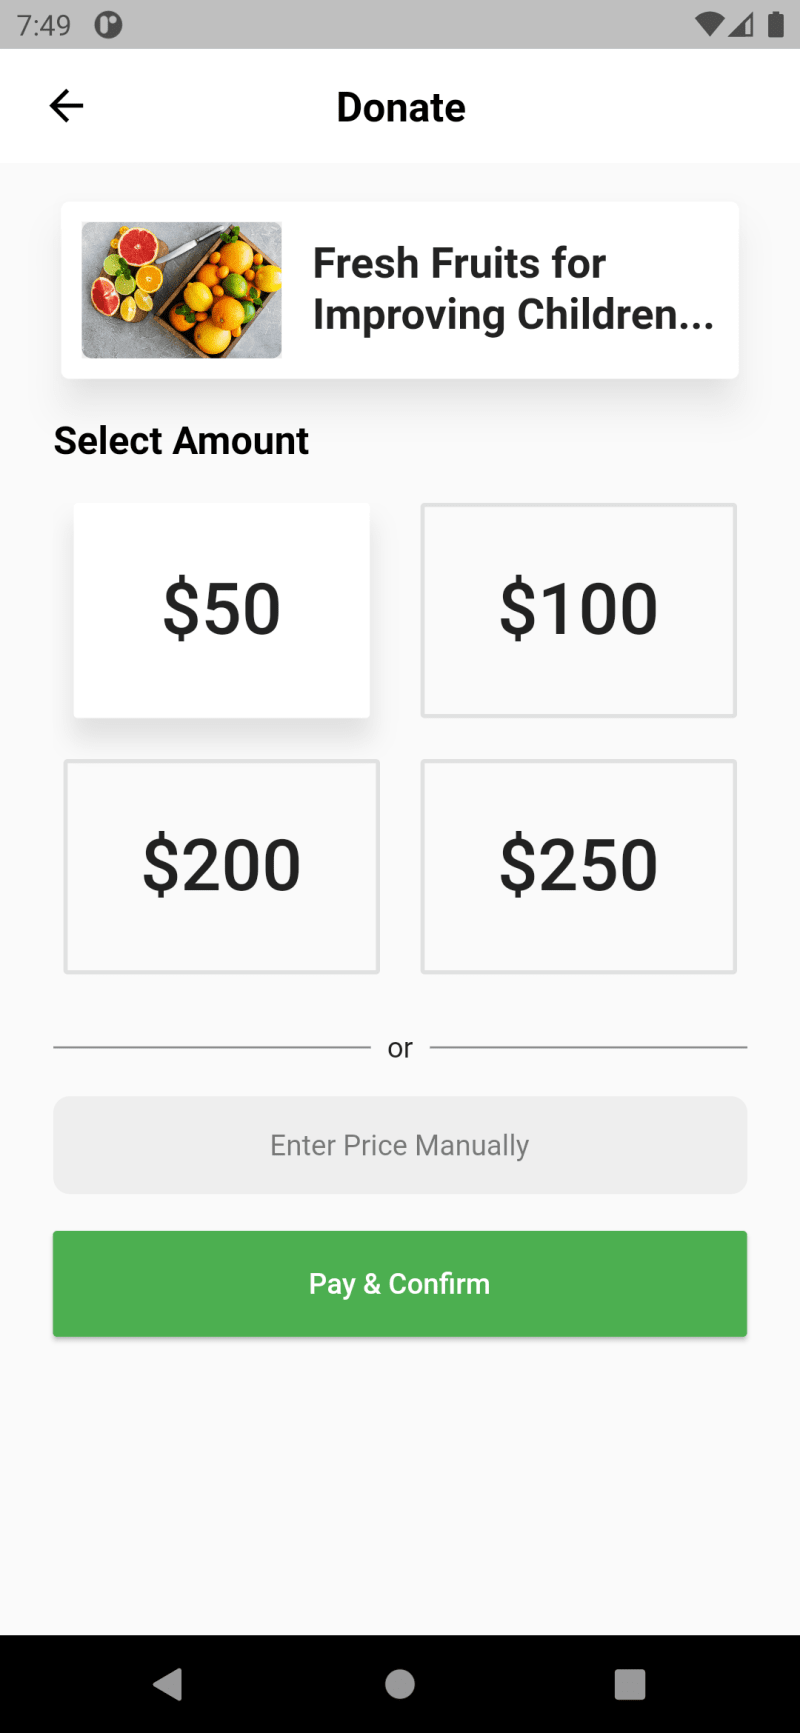
You should see a user interface identical to the one below.
Understanding the Current Basic App
As you can see from the previous screenshots, the app consists of three main screens, the main or home screen, the Details screen, and the Donate screen.The app is not dynamic or data-driven; it’s just a bunch of widgets created to build the UI as in the artwork referenced earlier. The only functionality here is the ability to navigate between screens.
From the main screen, tapping on the main widget takes you to the Details screen. The Details screen presents more information about the cause. Again, the only functional thing on this screen is the Donate Now button at the bottom, which takes you to the Donate page.
The Donate screen provides four donation value options, which you can easily select by tapping, or you can directly enter an amount in the Enter Price Manually text box below the options.
The Pay & Confirm button (currently just capturing the values) will later take you to the checkout screen where you can see the Rapyd Collect API in action; however, the checkout page has not yet been created in this part of the tutorial and is the focus of the next section.
Generating the Rapyd Checkout Page
To start with the integration, you first need to make a basic HTTP POST request to the Collect API to create the checkout page and then display it. In this section, you’ll write the necessary code to make that request.
Creating a Class
You create a directory called payment under the lib directory of your project, and in that directory, create a new file rapyd.dart. In the following lines of code, replace the keys with the respective values from your dashboard, and place the code into the file to create a class and declare some constants that are needed:
import ‘dart:convert’;
Import ‘dart:math’;

class Rapyd {
  // Declaring variables
  final String _ACCESS_KEY = "YOUR-ACCESS-KEY";
  final String _SECRET_KEY = "YOUR-SECRET-KEY";
  final String _BASEURL = "https://sandboxapi.rapyd.net";
  final double amount;

  Rapyd(this.amount);
}
The constructor of this class requires amount to be passed to it. This will be the amount selected or typed on the Donate screen of the app.
Adding the Necessary Packages
You need to add the following packages to your app: http for making the request, crypto to access and run some cryptographic algorithms, and convert for text encoding functions:
- Add the
httppackage to your application:
$ flutter pub add "http";
- Add the
cryptopackage to the application:
$ flutter pub add "crypto";
- Add the
convertpackage:
$ flutter pub add "convert";
- Add the imports for the packages to the top of the
rapyd.dartfile:
import 'package:convert/convert.dart';
import 'package:http/http.dart' as http;
import 'package:crypto/crypto.dart';
Generating Random String for Salt
According to the documentation, requests are accompanied by a random eight to sixteen character string containing digits, letters, and special characters. This is achieved with the code below, which you need to paste in the class definition right after the constructor:
  //1. Generating random string for each request with specific length as salt
  String _getRandString(int len) {
    var values = List<int>.generate(len, (i) => Random.secure().nextInt(256));
    return base64Url.encode(values);
  }
Building the Request Body
The body will hold various key value pairs that will be passed along in the HTTP request and used to configure the checkout page you're creating. You can paste the following code snippet below the previous method:
  //2. Generating body
  Map<String, String> _getBody() {
    return <String, String>{
      "amount": amount.toString(),
      "currency": "USD",
      "country": "US",
      "complete_checkout_url": "https://www.rapyd.net/cancel",
      "cancel_checkout_url": "https://www.rapyd.net/cancel"
    };
  }
Here, you specify the amount, currency, and country as required by the API. Two non-required options are also defined, cancel_checkout_url and complete_checkout_url, which determine the pages that the user will be redirected to when they either cancel or complete the transaction. You can also define this from the client portal.
Note that there’s a complete list of options that can be specified when creating the checkout page.
Generating the Signature
The Rapyd API documentation provides information about securing requests by signing them using a signature that’s generated by a number of characters, encoding functions, and cryptographic functions.
Below is the entire code snippet on each step to get this working properly:
  //3. Generating Signature
  String _getSignature(String httpMethod, String urlPath, String salt,
      String timestamp, String bodyString) {
    //concatenating string values together before hashing string according to Rapyd documentation
    String sigString = httpMethod +
        urlPath +
        salt +
        timestamp +
        _ACCESS_KEY +
        _SECRET_KEY +
        bodyString;

    //passing the concatenated string through HMAC with the SHA256 algorithm
    Hmac hmac = Hmac(sha256, utf8.encode(_SECRET_KEY));
    Digest digest = hmac.convert(utf8.encode(sigString));
    var ss = hex.encode(digest.bytes);

    //base64 encoding the results and returning it.
    return base64UrlEncode(ss.codeUnits);
  }
Building the Headers
The various values generated earlier are put together to build a set of request headers to help authenticate and securely undertake the request in the snippet below:
  //4. Generating Headers
  Map<String, String> _getHeaders(String urlEndpoint, {String body = ""}) {
    //generate a random string of length 16
    String salt = _getRandString(16);

    //calculating the unix timestamp in seconds
    String timestamp = (DateTime.now().toUtc().millisecondsSinceEpoch / 1000)
        .round()
        .toString();

    //generating the signature for the request according to the docs
    String signature =
        _getSignature("post", urlEndpoint, salt, timestamp, body);

    //Returning a map containing the headers and generated values
    return <String, String>{
      "access_key": _ACCESS_KEY,
      "signature": signature,
      "salt": salt,
      "timestamp": timestamp,
      "Content-Type": "application/json",
    };
  }
Making the Request to Create the Checkout Page
Finally, you write the function to make the HTTP request. When successful, the method is expected to return a Map with the created checkout page details. If the request fails, the function will throw an error with a Map of error details from the API service. Both are used later in this tutorial:
  //5. making post request
  Future<Map> createCheckoutPage() async {
    final responseURL = Uri.parse("$_BASEURL/v1/checkout");
    final String body = jsonEncode(_getBody());

    //making post request with headers and body.
    var response = await http.post(
      responseURL,
      headers: _getHeaders("/v1/checkout", body: body),
      body: body,
    );

    Map repBody = jsonDecode(response.body) as Map;
    //return data if request was successful
    if (response.statusCode == 200) {
      return repBody["data"] as Map;
    }

    //throw error if request was unsuccessful
    throw repBody["status"] as Map;
  }
Retrieving and Displaying the Rapyd Checkout Page
After successfully creating the checkout page, you need to display the page. This can be done by allowing the user to complete the process in a web browser on the same device running the application, or you can embed a web view in the application to provide a seamless feel and more control, as well as to keep the user in your app.
Create the CheckoutScreen Widget
In the screens directory in the lib directory of your project, there’s an empty file called CheckoutScreen.dart.
In this file, you can use the following snippet to create a stateful widget that accepts an instance of the Rapyd class and returns a Scaffold widget:
import 'package:donation/payment/rapyd.dart';
import 'package:donation/widgets/back_button.dart';
import 'package:flutter/material.dart';
import 'package:webview_flutter/webview_flutter.dart';

class CheckOutScreen extends StatefulWidget {
  final Rapyd rapyd;

  const CheckOutScreen({super.key, required this.rapyd});
  @override
  State<StatefulWidget> createState() {
    return _CheckOutScreenState();
  }
}

class _CheckOutScreenState extends State<CheckOutScreen> {

  @override
  Widget build(BuildContext context) {
    return Scaffold(
        resizeToAvoidBottomInset: true,
        appBar: AppBar(
          leading: CustomBackButton(),
          title: const Align(
            child: Text("Checkout",
                textAlign: TextAlign.center,
                style: TextStyle(
                    color: Colors.black, fontWeight: FontWeight.bold)),
          ),
          backgroundColor: Colors.white,
          actions: const [
            SizedBox(
              width: 55,
            ),
          ],
          elevation: 0,
        ),
    );
  }
}
Initialize Request to Create Checkout Page
In the _CheckoutScreenState, declare a variable of type Future<Map> and initialize it by calling the createCheckoutPage() method of the Rapyd object passed to this widget.
This means that once the CheckoutScreen is launched, the request to create the checkout page is executed and the results are stored in the created checkout page variable. This can be implemented with the following code snippet:
  ...

  late Future<Map> createdCheckoutPage;
  @override
  void initState() {
    super.initState();
    createdCheckoutPage = widget.rapyd.createCheckoutPage();
  }

  ...
Adding Navigation to the Open Checkout Page
Once you've created the basic widgets for the checkout screen, you need to modify the button on the DonateScreen widget to also navigate to the CheckoutScreen widget when clicked, passing on the value to be paid in an instance of the Rapyd class as a parameter to the CheckoutScreen widget.
To do this, first add the following lines of imports to the lib/screens/DonateScreen.dart file:
import 'package:donation/payment/rapyd.dart';
import 'package:donation/screens/CheckoutScreen.dart';
Next, in the same file, replace the proceed method of the DonateScreen widget class with the code in the following snippet:
  void proceed(context) {
    if (selected == 0) {
      selectedAmount = double.parse(controller.text);
    }
    Rapyd rapyd = Rapyd(selectedAmount);
    Navigator.push(context,
        MaterialPageRoute(builder: (context) => CheckOutScreen(rapyd: rapyd)));
  }
In the same file, you should also modify the definition of the MaterialButton widget for the Pay & Confirm button by passing the context to the proceed method call as seen below:
...
    onPressed: () {
    proceed(context);
  },
...
Using a FutureBuilder
At this point, the users see no indication of the process running to create the checkout page when the checkout screen is launched. Since the API request call may take a few seconds, it’s good practice to display a busy or loading status. You can use a future builder to show the user a progress indicator until that method call completes and returns a result.
The future builder also enables you to show an appropriate widget based on the returned result. For example, if the request is successful, a web page is loaded to continue the process, and if the request is unsuccessful, the user is directed to another widget with an error.
In the CheckoutScreen.dart file, add the following snippet for the body of the Scaffold widget:
    body: FutureBuilder(
      future: createdCheckoutPage,
      builder: (BuildContext context, AsyncSnapshot<dynamic> snapshot) {
        switch (snapshot.connectionState) {
          case ConnectionState.waiting:
            return const Center(child: CircularProgressIndicator());
          default:
            if (snapshot.hasError) {
              return const Center(child: Text('Some error occurred!'));
            } else {
              return Text("Success");
            }
        }
      },
    )
Adding the webview_flutter Package
To display a web page within the app without exiting or navigating outside the app, you use a web view plug-in, which can be added by using the following command:
$ flutter pub add "webview_flutter"
For Android builds, you’re required to set the minimum minSdkVersion in android/app/build.gradle to 19, as seen below:
android {
    defaultConfig {
        minSdkVersion 19 //previously: flutter.minSdkVersion
    }
}
Displaying Page in a Webview
Now add the WebView widget to display the checkout page by passing the redirect\_url value from the successful response of the request made earlier. This can be done by replacing the return Text("Success"); line with the following:
    return WebView(
      initialUrl: snapshot.data["redirect_url"].toString(),
      javascriptMode: JavascriptMode.unrestricted,
    );
Returning to the App Donate Page from Webview
A user may decide to complete the payment or cancel the payment. Once they cancel or complete the payment you need to return to the DonateScreen from the CheckoutScreen. To do this, you can use the onPageStarted parameter of the WebView widget to detect changes to the URL during a redirect from the checkout page.
If the URL contains the value of the cancel_checkout_url or the complete_checkout_url , the app will exit the CheckoutScreen widget. The value of the onPageStarted parameter should look like the following:
      onPageStarted: (url) {
        //Exit webview widget once the current url matches either checkout completed or canceled urls
        if (url
            .contains(snapshot.data["complete_checkout_url"])) {
          Navigator.pop(context);
        } else if (url
            .contains(snapshot.data["cancel_checkout_url"])) {
          Navigator.pop(context);
        }
      },
Running the App
Now, using either a virtual or physically connected device, you can run the app using the following command:
$ flutter run
You should now have a functioning app with Rapyd Collect API integrated and working, and a Hosted Checkout Page that looks like the following image.
Conclusion
In this tutorial, you learned how to accept payments from users in your Flutter app using the Rapyd Collect API. You also learned how to customize your checkout page with elements like your logo, color, and payment options. You saw how to generate the signature and headers needed to make secure and authenticated requests to the Rapyd API.
Finally, you learned how to display the checkout web page within your app and how to exit the web page seamlessly, and return to your app screens.
The Rapyd Collect API is a payment solution that provides a plethora of options for your customers or app users to patronize your products and services across the globe without limitations. Integration is simple, secure, and flexible.


Top comments (0)