I really like Isso. It's a free, open-source, self-hosted comment server. It's a great lightweight alternative to Disqus, which contains too many trackers.
This post will walk through adding Isso to a new project of mine, affect.blog. This is a low-cost Ghost blog, hosted on AWS Lightsail.
Pre-reqs
The process is quite easy, but requires basic familiarity with the Linux shell and editing Ghost template HTML.
If you have never edited files via the Linux command line before, I suggest using nano.
Install Isso and set PATH
From the Lightsail console, SSH into your instance:
The official Isso docs recommend using virtualenv, but I didn't bother because I have no other Python services running on the machine:
sudo apt-get install python-dev sqlite3 build-essential
pip install isso
This may install the isso executable to a non-standard directory which won't be on your PATH. You'll be notified of this location.
In my case it was /home/bitnami/.local/bin, so I added the following to my ~/.bashrc:
export PATH="/home/bitnami/.local/bin:$PATH"
If you missed the path, run pip show isso and look at the Location. The bin/isso executable should be somewhere along that path:
bitnami@ip-123-45-6-78:~$ pip show isso
Name: isso
Version: 0.12.2
Summary: lightweight Disqus alternative
Home-page: https://github.com/posativ/isso/
Author: Martin Zimmermann
Author-email: info@posativ.org
License: MIT
Location: /home/bitnami/.local/lib/python2.7/site-packages
When that's done (don't forget to source ~/.bashrc if you changed it), verify that you can run isso from the shell:
bitnami@ip-123-45-6-78:~$ isso
usage: isso [-h] [--version] [-c /etc/isso.conf] {import,run} ...
isso: error: too few arguments
Great. The Isso executable is working, and it's telling us that it expects a config file.
Make a config file
I made mine in the home directory for simplicity:
cd ~
touch isso.cfg
In isso.cfg I pasted the following:
[general]

dbpath = /home/bitnami/comments.db

host = https://affect.blog

[server]
listen = http://localhost:8080
public-endpoint = https://affect.blog/isso/
reload = off
profile = off

[guard]
enabled = true
ratelimit = 2
require-author = false
require-email = false
direct-reply = 10
reply-to-self = true
Give it a whirl:
isso -c ~/isso.cfg run
You should see:
bitnami@ip-123-45-6-78:~$ isso -c isso.cfg run
2020-12-06 20:35:48,893 INFO: connected to https://affect.blog
Great. Isso is now running in the foreground.
Move isso to a background process
More on init scripts later, but for now let's just get things working.
We don't want the Isso process to die when we close the terminal, so hit Ctrl-Z to suspend it, and then run bg to move it into the background:
bitnami@ip-123-45-6-78:~$ isso -c isso.cfg run
2020-12-06 20:35:48,893 INFO: connected to https://affect.blog
^Z
[1]+  Stopped                 isso -c isso.cfg run
bitnami@ip-123-45-6-78:~$ bg
[1]+ isso -c isso.cfg run &
We can now safely close the Lightsail terminal, and Isso will keep running at port 8080 (or your port of choice).
Setting up Apache proxy
Isso is now running at port 8080, but we need to proxy it to a public url.
The Isso documentation gives an example for Nginx, but the Lightsail Bitnami Ghost stack uses Apache. Luckily, I was able to find an example Apache config in this blog post.
Similar to this author, I wanted to serve Isso at affect.blog/isso/ instead of a new subdomain (isso.affect.blog). This is to avoid having to make a new SSL certificate.
Add the following lines to the end of /opt/bitnami/apache2/conf/httpd.conf:
# Proxy for Isso commenting
ProxyPass /isso/ http://localhost:8080/
ProxyPassReverse /isso/ http://localhost:8080/
Use sudo /opt/bitnami/ctlscript.sh restart or the bn-helper tool to stop and restart all your services. Now verify that Isso is accessible at https://affect.blog/isso/:
This is actually great! The request fails because we haven't passed a uri, but we are successfully serving up Isso. (If this URL were set up incorrectly, we would see a "404 Page Not Found" handler from Ghost.)
You can verify that the expected JS resource is available at /isso/js/embed.min.js. This should load a minified file:
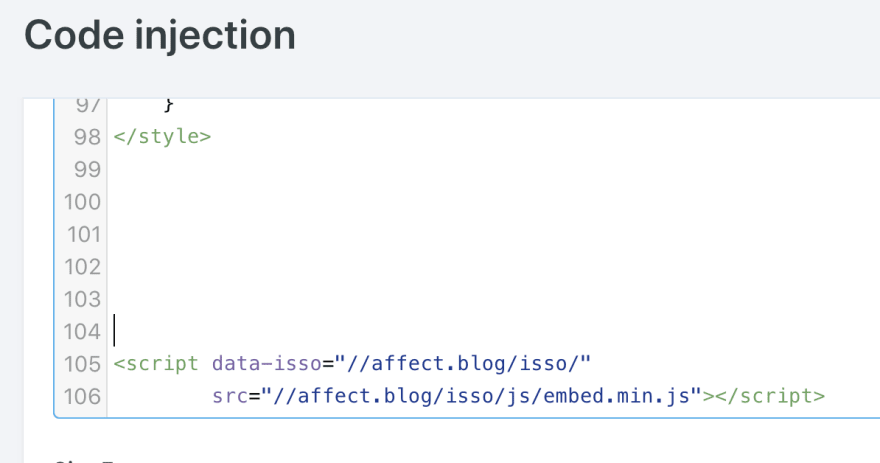
Inject Isso script to header
The quickest way to inject the Isso script into the header of your entire site is to use Ghost's Code Injection feature:
Drop your script tag in here:
<script data-isso="//affect.blog/isso/"
    src="//affect.blog/isso/js/embed.min.js">
</script>
Quick page test
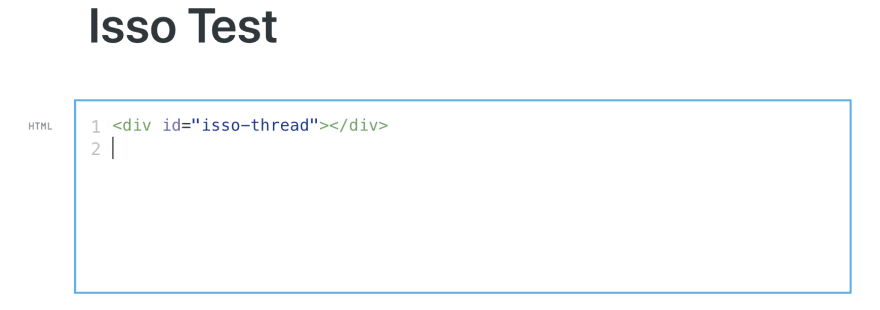
Make a new page to test and add the following HTML snippet. (We'll put this in a post template later):
<section id="isso-thread"></section>
The HTML tag won't render to anything visible in the editor, but don't worry. Save the page, publish it, and view. If all went well you should see this:
Congrats! Your Isso comment server is working.
Adding comments to a post template
Of course you don't want comments on just one page, but on all of your posts. This is achieved by adding the above tag to your post template. Ghost provides detailed instructions here.
The ideal place to do this will depend on your Ghost template. Here's how I did mine:
Download your theme to a .zip and unzip it:
Find post.hbs, make a copy, and edit
You must start the new filename with custom- in order for Ghost to pick up the template:
Insert your Isso section
I opted to remove the default Disqus section and replace it with my Isso section instead. I also placed a new CSS class on the section to make it easy to style these comments using Code Injection:
Re-upload theme, and apply custom template
Now zip up your edited theme using the same name, upload it (overwrite your current theme), and change one of your posts to use the new custom template:
Give the post a refresh, and voila - here is the result:
If everything looks good, you can either update all your current and future posts to use the new template, or apply the change to post.hbs.
Note: Isso loads and stores comments based on page URL
The slug is the portion of a post's URL after the main slash:
This means that if you add some comments to a page and then change its slug, the comments stored under the old slug will no longer appear for that page.
The comments are still in the database, however. Deleting or editing a Ghost page does not affect its Isso comments at all.
If you change the slug back, or make a new page with the same slug, the comments will re-appear.
Use a process manager to keep it running
Running Isso as one process in the background was fine to get started, but is not great for long-term use. You don't want your blog to be left comment-less if the process dies when you're not around to restart it.
The Isso docs have some suggestions. I had trouble using systemd, but supervisor did the trick. I placed the conf file my home directory:
pip install supervisord
echo_supervisord_conf > /home/bitnami/supervisord.conf
Add this [program] section to supervisord.conf (reference):
[program:isso]
command = /home/bitnami/.local/bin/isso -c /home/bitnami/isso.cfg run
directory = /home/bitnami/isso
user = bitnami
autostart = true
autorestart = true
stdout_logfile = /home/bitnami/isso/isso.log
stderr_logfile = /home/bitnami/isso/isso_err.log
And kick it all off:
supervisord -c /home/bitnami/supervisord.conf
supervisorctl start isso
To check that all is working as intended, find the process running on port 8080, kill it, and verify that it restarts immediately with a new PID:
bitnami@ip-123-45-6-78:~$ sudo netstat -lpn |grep :8080
tcp        0      0 127.0.0.1:8080          0.0.0.0:*
LISTEN      14196/python
bitnami@ip-123-45-6-78:~$ kill 14196
bitnami@ip-123-45-6-78:~$ sudo netstat -lpn |grep :8080
tcp        0      0 127.0.0.1:8080          0.0.0.0:*
LISTEN      14417/python
bitnami@ip-123-45-6-78:~$
👍
That's it!
I was really happy to find a free, open-source commenting solution, without the bloat and privacy concerns of Disqus.
If you were considering using Isso for your Ghost blog, I hope this post has helped. Please feel free to leave questions and comments below!


Latest comments (0)