This article is a guest post by Purnima Gupta. She's a web developer and wrote this blog post through the Write for the Community program.
Chat forums are awesome. They allow you to have discussions in real-time with real people, and over time they’ve started to grow in popularity. Many organizations have even considered having announcements and meaningful discussions entirely in forum software. It’s no surprise that Salesforce, a CRM platform company, acquired Slack - a very popular instant messaging and forum software - for a whopping $27 billion in 2020, making it the company’s largest acquisition to date!
And there are several other software out there like Discord, Discourse, and Telegram, which millions of people worldwide are using.
A lot goes behind building the software that powers these forums. As a programmer, I’ve always been curious to know what it takes to create one! And If you’re like me and wondered about the same thing, this tutorial is for you! In this article, I’ll teach you step-by-step how you can build your very own chat forum software that you and your friends can use!
What you will build
You’ll build a minimal real-time chat forum software built for the modern browser. It will have the following features:
- Upon visiting your forum page, a user can join a room by entering a username and the room number they wish to join. This data will be saved to our Strapi collections which we’ll create later in the tutorial.
- Upon joining the room, the user will be greeted by a welcome message. They will see a list of other users in the room who are also online and read their ongoing conversation.
- Other users in the room will be notified when a new user joins. That way, they’ll be able to start a conversation.
- Likewise, anytime a user leaves the room, other users get notified as well.
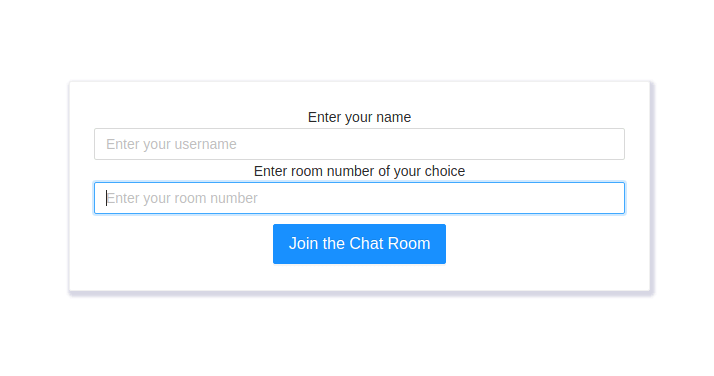
Here’s how the finished application will look like:


I hope you’re excited!
Pre-requisites:
Some knowledge of the MERN stack (MongoDB, Express, React, and NodeJS) is necessary to follow the tutorial. It’ll also help if you have some understanding of how client-server applications work.
Local Environment Set Up
| Software | Minimum version | Recommended version |
|---|---|---|
| Node.js | 12.x | 14.x |
| npm | 6.x | 6.x |
| MongoDB | 4.4.x | 4.4.2 |
What you will learn
To build the forum, you’ll learn to use the following technologies:
- Strapi: An open-source, NodeJS based content management system. You’ll use this for a lot of technical wirings, such as database related operations and exposing APIs.
- ReactJS: A component-based library for building user-interfaces
- SocketIO: A NodeJS based library for adding web-sockets support in your app, and enabling real time communication!
Let’s begin!
Strapi
Here’s the introduction to Strapi, from the official docs:
“Strapi is an open-source, Node.js-based, headless CMS to manage content and make it available through a fully customizable API. It is designed to build practical, production-ready Node.js APIs in hours instead of weeks.”
What is a Headless CMS?
If you are a software developer, it’s most likely that you must have heard of Content Management Systems or CMS in short. They enable you to quickly create and save content for the web, such as text, images, and videos. You’ll be able to add context-based information, publishing, and editing - all in one single place. One of the most popular CMS is WordPress, an open-source platform that powers over 60 million websites using the PHP programming language.
WordPress has existed since 2003 and is a traditional CMS. It couples your rendering, data layer together as a single system. But as web apps evolved over the years, organizations started to look for CMSes that provide more flexibility to create applications.
As more robust frameworks like NodeJS and React came in, there is a real need for CMSes to start supporting app development using these frameworks. That is precisely what a Headless CMS like Strapi allows you to do!
Similar to a traditional CMS, a headless CMS provides ****you with an editor interface to author content, but with few crucial differences -
- Majorly, headless CMSes also allow you the freedom to choose your own technology such as React, Angular, or VueJS to create the front-end user interface for your app. So as a developer, you have much more control!
- Once the content is ready, you can build applications that can access this content over APIs provided by the CMS platform. RESTAPIs are pretty convenient for most commonly used CRUD operations.
Feel free to download the Headless Guide made by the Strapi team.
What Strapi Offers
- Strapi provides you an editor interface to quickly write your own content
- The content can be consumed via RESTAPIs or GraphQL endpoints. Yes, strapi supports GraphQL as well!
- It also supports the most commonly used databases out-of-the-box, such as SQLite, PostgresSQL, MySQL, MariaDB, MongoDB.
- And lastly, it has a very active and thriving community support! Strapi is one of the most popular open-source CMS projects on Github - more than 32,000 stars!
How does Strapi work?
You can create data-models/collections for your application using the Strapi admin client. By default, the database that Strapi uses underneath for storing your data-models is SqLite.
If you’ve programmed in NodeJS and Express before, you most likely have written your own REST APIs using app.get, app.post and others. You likely have created data-models in MongoDB and connected them to your Express App in your code.
With Strapi, however, you can create data-models from the Strapi Admin panel itself! Once you’re done, it automatically creates the most commonly used REST APIs endpoints that can read and write to your database models! I’ll try to illustrate this with an example:
If you create a collection in MongoDB called users from your Strapi Admin Panel, it automatically adds the following endpoints that read and write to this collection:
To Fetch all the users

GET http://localhost:1337/users


To Create a new user

POST http://localhost:1337/users

{
  "id": 1,
  "name": "Purnima",
  "lastname": "Gupta",
  "country": "India"
}
You can find more examples from the Strapi documentation here.
Where does the data get stored?
Whenever you save any data to your collections, It’s saved to your database which you selected while installing Strapi. For this tutorial, you’ll use MongoDB.
Login to your mongo shell by running the command mongo in your terminal. Next,
To see a list of databases:
> show dbs

chat-backend-with-strapi 0.001GB
config                    0.000GB
local                     0.000GB
My database name is chat-backend-with-strapi. This is where all your collections will be created and data will be stored.
To switch to a database
use chat-backend-with-strapi
To see all the collections
show collections

core_store
messages
strapi_administrator
strapi_permission
strapi_role
strapi_webhooks
upload_file
users
users-permissions_permission
users-permissions_role
users-permissions_user
To see the data inside users collections.
> db.users.find({}).pretty()
{
        "_id" : ObjectId("5fdc68360d3bbc1b86e5c14b"),
        "username" : "purnima",
        "room" : "11",
        "status" : "ONLINE",
        "socketId" : "RyqPsKoBe09h2g-UAAAV",
        "published_at" : ISODate("2020-12-18T08:28:38.565Z"),
        "createdAt" : ISODate("2020-12-18T08:28:38.572Z"),
        "updatedAt" : ISODate("2020-12-18T08:28:38.572Z"),
        "__v" : 0
}
Now, since you are building a chat application, you’ll use a Socket.IO, a NodeJS library that adds web-sockets support to your app!
What are web sockets and how are they different from HTTP?
In a traditional HTTP request, the client first initiates a request in the form of a GET, POST, PUT or DELETE method. This establishes a connection, and once the server fulfills the request, the connection gets closed. The server can never initiate and push information to a client on its own - it can only serve requests that originate from a client.
For a chat application, you’ll need to provide the server the ability to push information out to a client. Let’s examine why, with an example:
If two users John and Jane are chatting with each other, this is how the flow of data might look like:
- User John writes a message “hello” and hits send. This message is sent to the server. along with the details of the sender and the intended recipient
- Once the server receives the message data, and in-turn, broadcasts it to the intended recipient (to the user Jane)
- User Jane receives the message “hello”.
For this to work, both clients must maintain a persistent connection with the server. OR in other words, the connection is kept open even when the request has been fulfilled by the server and later server can notify/send messages to other open connections(clients/browsers) without making them explicitly request for that information.
Here are a couple of excellent articles that describe web-sockets in more detail.
Now that you have a brief understanding of what web sockets are, it’s time to start building the application.
Backend set-up
#1: Install Strapi
You can either use yarn or npx to create your Strapi project.
Install using npx package:
To quickly install strapi, run the following command.
npx create-strapi-app strapi-socket-backend
Install using yarn package:
yarn create strapi-app my-project --quickstart
Once you run this command, it will ask you to choose your database. Select “MongoDB” as your database and for every other field, we’re gonna keep the default values so leave all the fields blank.
? Choose your installation type Custom (manual settings)
? Choose your default database client mongo
? Database name: strapi-socket-backend
? Host: 127.0.0.1
? +srv connection: false
? Port (It will be ignored if you enable +srv): 27017
? Username:
? Password:
? Authentication database (Maybe "admin" or blank):
? Enable SSL connection: No
Once it’s done, cd into your strapi-socket-backend directory, which by default will look like this:

Each directory has a special purpose that Strapi utilizes internally. You don’t need to know all of them, but for this tutorial, you’ll mainly use the /config/functions/bootstrap.js file. It allows you to execute any logic that you want to run immediately after starting the strapi server.
#2: Start and test the Strapi Server
You can now start strapi server by running:
npm run develop

OR

yarn run develop
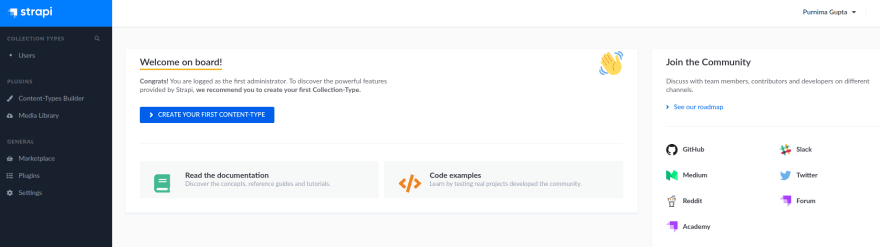
It might take a couple of seconds to build your admin UI panel. Once you run the command, it will automatically open the admin registration page like the one below.

After creating your admin account, you will see this admin panel where you would create your collections later that are needed for this tutorial.

#3: Install and configure SocketIO
Run npm i socket.io. Once it’s finished installation, you’ll need to integrate it with your strapi server. Go to the file /config/functions/bootstrap.js and write the following code:
module.exports = () => {
    var io = require('socket.io')(strapi.server, {
        cors: {
          origin: "http://localhost:3000",
          methods: ["GET", "POST"],
          allowedHeaders: ["my-custom-header"],
          credentials: true
        }
    });

    io.on('connection', function(socket) {
          socket.on('join', ({ username, room }) => {
              console.log("user connected");
              console.log("username is ", username);
              console.log("room is...", room)
          })
      });
  };
Your frontend and backend servers are running on different ports - the frontend server on port 3000, and the backend Strapi server on Port 1337. Hence, we need to configure a cors policy for our application. The origin option is used to determine what URLs are allowed to send requests to your backend. By providing our frontend server URL, we’re telling socket.io to allow the incoming request from this URL.
Frontend
For the client-side of your app, you’ll use create-react-app to bootstrap your project. Head over to this github link, clone the repository and run npm install to install all the front-end related dependencies. This will scaffold a front-end project will all the necessary React files that you’ll use to build the application.
Here are some of the major npm modules that you’ll use:
- react
- react-router-dom
- antd
- styled-components
- socket.io-client
Some of the components have already been defined for you so that you may focus more on the logic and less on the styles for the project.
#1: Add socket.io support
Go to your root folder strapi-chat-ui and create a new folder named config. Next, add a new file called web-sockets.js inside this folder:
import io from 'socket.io-client';
let STRAPI_ENDPOINT;

if (process.env.NODE_ENV !== 'production') {
    STRAPI_ENDPOINT = 'http://localhost:1337';
} else {
    STRAPI_ENDPOINT = process.env.REACT_APP_SERVER_URL
}

export const socket = io(STRAPI_ENDPOINT);
App UI Routing logic:
- Upon loading the application in the browser, you will render a
JoinRoomcomponent at the route http://localhost:3000/join. In this screen, the user shall enter their username and a room number to join. Say if they entered room number 10, the app will redirect to the URL http://localhost:3000/chat/rooms/10. - At http://localhost:3000/chat/rooms/10, you’ll render a
ChatRoomcomponent. This will be the chat screen itself, that displays other online users and the ongoing conversation.
Hopefully, this all makes sense. Next, you’ll set up the routes for rendering these components.
#2: Set-up component routes
For this, you’ll make use of react-router-dom and the history modules. Create a file /src/config/network.js and write the following code snippet. We’re exporting history object which our React Router would need.
import { createBrowserHistory } from 'history'
export const history = createBrowserHistory();
This sets up a history object and exports it. You’ll import it in the entry point of your application. Paste the following inside the src/index.js file:
import React from 'react';
import ReactDOM from 'react-dom';
import 'antd/dist/antd.css';
import 'font-awesome/css/font-awesome.min.css';
import reportWebVitals from './reportWebVitals';
import {
  Router,
  Route,
} from 'react-router-dom';
import App from './App';
import { history } from './config/network';

const router = (
  <Router history={history}>
      <Route component={App}/>
  </Router>
)
ReactDOM.render(
  <React.StrictMode>
      {router}
  </React.StrictMode>,
  document.getElementById('root')
);
Next, you’ll set-up the routes for the JoinRoom and ChatRoom components inside your main App.js component:
import React, { useState } from 'react';
import {
    Route,
    Switch,
    Redirect
} from "react-router-dom";
import JoinRoom from './screens/JoinRoom';
import ChatRoom from './screens/ChatRoom';

import { history } from './config/network';

function App() {
    const [username, setUsername] = useState('');
    const [room, setRoom] = useState('');
    const [joinData, setJoinData] = useState({});

    function onJoinSuccess(data) {
        setJoinData(data);
        setUsername(data.userData.username);
        setRoom(data.userData.room);
        history.push(`/chat/rooms/${data.userData.room}`);
    }
    return (
        <div className="App">
             <Switch>
                <Route
                    path="/join"
                    component={() => <JoinRoom onJoinSuccess={onJoinSuccess}/>}
                />
                <Redirect
                    from="/"
                    to="/join"
                    exact
                />
                <Route
                    path="/chat/rooms/:roomNumber"
                    component={() =>
                        <ChatRoom
                            username={username}
                            room={room}
                            joinData={joinData}
                        />
                    }
                />
            </Switch>
        </div>
    );
}
export default App;
This tells the App component to load the JoinRoom component when a user is in the route /join, and to render the ChatRoom component in the route /chat/rooms/:roomNumber.
#3: Create a component that allows a user to join a chat room
Now, you’ll create the JoinRoom component UI:
Create a file JoinRoom.js inside /src/screens directory and add the following code:
import React, { useState } from "react";
import styled from 'styled-components';
import { Input, Card, Button } from 'antd';
import { socket } from '../config/web-sockets';
function JoinRoom(props) {
    const [username, setUsername] = useState('');
    const [room, setRoom] = useState('');
    const [error, setError] = useState('');
    const onUsernameChange = (e) => {
        const inputValue = e.target.value;
        setUsername(inputValue);

    }
    const onRoomChange = (e) => {
        const roomNo = e.target.value;
        setRoom(roomNo);
    }
    const onClick = () => {
        if(username && room) {
            socket.emit('join', { username, room }, (error) => {
                if(error) {
                    setError(error)
                    alert(error);
                } else {
                    socket.on('welcome', (data) => {
                        props.onJoinSuccess(data);
                    });
                }
            });
        }
    }
    socket.on('welcome', (data) => {
        console.log("Welcome event inside JoinRoom", data);
        props.onJoinSuccess(data);
    });
    return (
        <StyledCard>
            <label htmlFor="username">
                Enter your name
                <Input
                    name="username"
                    placeholder="Enter your username"
                    maxLength={25}
                    value={username}
                    onChange={onUsernameChange}
                />
            </label>
            <label htmlFor="room">
                Enter room number of your choice
                <Input
                    name="room"
                    placeholder="Enter your room number"
                    maxLength={25}
                    value={room}
                    onChange={onRoomChange}
                />
            </label>
            <StyledButton
                type="primary"
                size={"large"}
                onClick={onClick}
            >
                Join the Chat Room
            </StyledButton>
        </StyledCard>
    )
};

export default JoinRoom;

const StyledCard = styled(Card)`
    width: 581px;
    height: 210px;
    margin: 30vh auto;
    box-shadow: 2px 3px 3px 2.8px #d7d7e4;
    text-align: center;
`
const StyledButton = styled(Button)`
    margin-top: 10px;
`
Run the server using npm start
Here’s how the UI logic works:
- You save the username and room information to the React state using the
onChangeevent. - When someone clicks on the “join the chat room” button, you’ll then use socket to emit a
joinevent to your Strapi server. - First, we need
usernameandroomnumber for our chat forum so that we can
send a “greeting message” to the user in that particular room.
Let’s test this out!
#4: Run the Servers
Run your backend and frontend servers, and head over to your browser at http://localhost:3000/join. This will render the JoinRoom component - a Antd Card with two input boxes and a button, as shown in the screenshot earlier. On this UI enter your username and room
number and click on the “join” button. You should see something like this on your Strapi terminal:
.....
To access the server ⚡️, go to:
http://localhost:1337

user connected
username is  purnima
room is... 11
Great! Now our frontend and backend are listening to each other.
Creating data-models using the Strapi Admin Interface
Let’s go to the admin panel http://localhost:1337/admin/. You will see this page.
For starters, you’ll just create a single collection where you can store users.
Click on CREATE YOUR FIRST CONTENT-TYPE button to create our first users collection.
Give it a name users and click next. You’ll be asked to add a field for this collection and define its data-type:

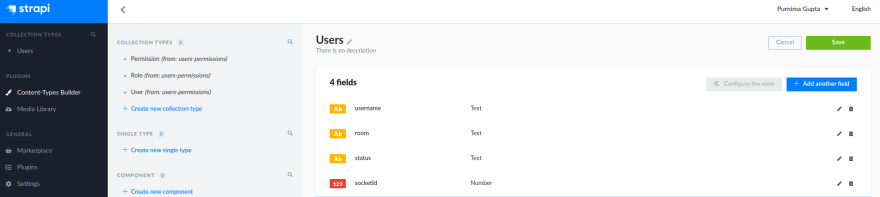
Let’s create 4 fields for the users collection:
-
username- text -
status- text -
room- text -
socketid- number
Once you’re done adding these fields, click on S*AVE.* Your collection will have four fields now:
Fetching data from Strapi APIs
Once you’ve added a collection, Strapi automatically creates the most commonly used REST APIs endpoints that read and write to you database models. So what happens if you type http://localhost:1337/users in your browser?
You will see that this request is “forbidden” with status “403”.

This is a security feature from Strapi. In order to expose the GET /users endpoint, you’ll have to modify permissions for the users collection.
- Go to Settings on the left-hand side
- Click on Roles under USERS & PERMISSIONS PLUGIN ****
- Select all the permissions

This will expose the APIs for the users collection. Now try going to http://localhost:1337/users once again. This time, you should see a JSON response returned. It’ll be an empty array since you haven’t added any data yet!
Let’s begin with the first set of features:
Feature #1: Enable a user to join a room
Here’s what you’ll do in order to make this work:
- Once the user clicks on “join” after entering their details, the front-end emits a socket event to the backend server with the username and room details.
- The backend server, upon receiving the socket event, checks if the username already exists in your MongoDB
userscollection. If it doesn’t, you’ll add a new entry in theuserscollection, or you’ll throw an error. - Upon adding a new entry, you’ll send a success response to the front-end. The front-end will then join the room using SocketIO’s
joinapi. - Once the user has landed into the chat-room, you’ll use SocketIO to emit a
welcomeevent. - Once again, the backend-server upon receiving the
welcomeevent, will broadcast to all other connected clients in the same room informing them that a new user has joined the chat.
Next, let’s write some code to create a new user in the database. We will also send “welcome message” when the user joins the chat and notify others “user has joined”.
Backend
You’ll create a file called database.js inside /config/functions/utils. In this file, you’ll have two functions:
-
findUser()- To check if the user exists in the database or not. -
createUser()- To create a new user entry in our database. Once the new user has been created, it’ll appear in theuserscollection in your Strapi admin panel.
Database.js File
async function findUser(username, room) {
    try {
        const userExists = await strapi.services.users.find({ username, room });
        return userExists;
    } catch(err) {
        console.log("error while fetching", err);
    }
}
async function createUser({ username, room, status, socketId }) {
    try {
        const user = await strapi.services.users.create({
            username,
            room,
            status: status,
            socketId
        });
        return user;
    } catch(err) {
        console.log("User couldn't be created. Try again!")
    }
}
module.exports = {
    findUser,
    createUser
}
Next, you’ll import the above functions within /config/functions/bootstrap.js file. Modify the file with the following code:
bootstrap.js
'use strict';
const {
    findUser,
    createUser
} = require('./utils/database');

module.exports = () => {
    var io = require('socket.io')(strapi.server, {
        cors: {
          origin: "http://localhost:3000",
          methods: ["GET", "POST"],
          allowedHeaders: ["my-custom-header"],
          credentials: true
        }
    });
    io.on('connection', function(socket) {
        socket.on('join', async({ username, room }, callback) => {
            try {
                const userExists = await findUser(username, room);

                if(userExists.length > 0) {
                    callback(`User ${username} already exists in room no${room}. Please select a different name or room`);
                } else {
                    const user = await createUser({
                        username: username,
                        room: room,
                        status: "ONLINE",
                        socketId: socket.id
                    });

                    if(user) {
                        socket.join(user.room);
                        socket.emit('welcome', {
                            user: 'bot',
                            text: `${user.username}, Welcome to room ${user.room}.`,
                            userData: user
                        });
                        socket.broadcast.to(user.room).emit('message', {
                            user: 'bot',
                            text: `${user.username} has joined`,
                        });

                    } else {
                        callback(`user could not be created. Try again!`)
                    }
                }
                callback();
            } catch(err) {
                console.log("Err occured, Try again!", err);
            }
        })
    });
};
Note: When user refreshes the page, socket’s disconnect event gets fired. Keep that in mind for now. We’ll discuss it more later. One more bit that we need to keep in mind is that whenever you restart the backend server, your previous socket connection will be lost. And if you try to send messages after restarting your server, your messages will not be sent since there’s no socket connection is established. This is why we need to ask the user to log in again for this tutorial.
Frontend
Next, you’ll build the ChatRoom component. The ChatRoom page consists of the following components:
- A
Headercomponent that displays the Room number, a green icon that indicates you’re online, and a close icon that will log-out the user upon clicking it. - A
Listcomponent on the left that displays a list of other users who are also currently present in the room - A
Messagescomponent that displays the conversations between the users. - An
Inputcomponent to type in a message - A
Sendbutton.
Let’s first display messages. You’ll write the core logic for this inside /src/screens/ChatRoom.js. Some of the components have already been defined and imported for you to use so that you may focus more on the logic and less on the presentation.
ChatRoom/index.js
import React, { useEffect, useState } from 'react';
import styled from 'styled-components';
import { socket } from '../config/web-sockets';
import Header from '../components/Header';
import Messages from '../components/Messages';
import { history } from '../config/network';
import {
  ChatContainer,
  StyledContainer,
  ChatBox,
  StyledButton,
  SendIcon
} from './styles';

function ChatRoom(props) {
    const {username, room, joinData } = props;
    const [messages, setMessages] = useState([]);
    const [users, setUsers] = useState([]);

    useEffect(() => {
        if( Object.keys(joinData).length > 0) {
            setMessages([joinData])
            socket.on('message', (message, error) => {
                setMessages(msgs => [ ...msgs, message ]);
            });
        }
        else {
            history.push('/join')
        }
     }, [joinData])

       return (
        <ChatContainer>
            <Header room={room} />
            <StyledContainer>
                <ChatBox>
                    <Messages
                        messages={messages}
                        username={username}
                    />
                </ChatBox>
            </StyledContainer>
        </ChatContainer>
    )
};
export default ChatRoom;
Next, you’ll write the logic to render each individual message in the UI inside the Messages component. You’ll iterate over the messages array and display the message along with the user who sent it:
Messages/index.js
import React from 'react';
import ScrollToBottom from 'react-scroll-to-bottom'
import Message from './Message';
import styled from 'styled-components';

function Messages(props) {
    const { messages, username } = props;
    return (
        <StyledMessages>
            <ScrollToBottom>
                {
                    messages.map((message, i) =>
                        <div key={i}>
                            <Message
                                message={message}
                                username={username}
                            />
                        </div>
                    )
                }
            </ScrollToBottom>
        </StyledMessages>
    );
}
export default Messages;
const StyledMessages = styled.div`
    padding: 5% 0;
    overflow: auto;
    flex: auto;
`
Now try opening two different tabs on your browser on http://localhost:3000/join. Enter 2 different usernames on each of those tabs on the Join page, (with a common room number). You should then see this displayed on your screen:


Feature #2: Conversations
Here’s what you’ll do in-order to make this work:
- On the
ChatRoompage, once the user types a message and hits SEND, you’ll emit asendMessageevent using SocketIO along with the user’s ID and the message. - On the backend, the server listens for a
sendMessageevent. When it receives one, it’ll check if the user exists in the collection. - If the user exists, then it broadcasts the message to the room that the user belongs to. Else, it throws an error message.
Sounds straight-forward right?
Backend
- See if the user already exists in our database:
Begin by first writing the function that checks for the user based on their ID. On your backend code, open database.js and add a userExists method and export it:
database.js
...
...
async function userExists(id) {
    try {
        const user = strapi.services.users.findOne({ id: id });
        return user;
    } catch(err) {
        console.log("Error occured when fetching user", err);
    }
}

module.exports = {
    findUser,
    createUser,
    userExists,
}
- Listening for “sendMessage” Event
Next, you’ll import this method within the bootstrap.js file. You’ll then write the logic to listen for any sendMessage events:
io.on('connection', function(socket) {
  ......
  ......

  socket.on('sendMessage', async(data, callback) => {
            try {
                const user = await userExists(data.userId);
                if(user) {
                    io.to(user.room).emit('message', {
                        user: user.username,
                        text: data.message,
                    });
                } else {
                    callback(`User doesn't exist in the database. Rejoin the chat`)
                }
                callback();
            } catch(err) {
                console.log("err inside catch block", err);
            }
  });

})
The “sendMessage” event will be emiited when user clicks on the send button inside the ChatBox Page.
Frontend
- Adding Input and Send button:
On the UI, you’ll add an Input component and a Send button. Add the following code inside the ChatRoom component, right after the Messages component:
<Input
  type="text"
  placeholder="Type your message"
  value={message}
  onChange={handleChange}
/>

<StyleButton
  onClick={handleClick}
>
  <SendIcon>
    <i className="fa fa-paper-plane" />
  <SendIcon>
<StyledButton>
- Save message and add logic when someone clicks on a “Send”button:
Next, you’ll add the handleChange function and the handleClick function that will in-turn call a method sendMessage. Add the following right after useEffect:
const handleChange = (e) => {
  setMessage(e.target.value);
}

const handleClick = (e) => {
  sendMessage(message);
}

 const sendMessage = (message) => {
        if(message) {
            socket.emit('sendMessage',{ userId: joinData.userData.id, message }, (error) => {
                if(error) {
                    alert(error)
                    history.push('/join');
                }
            });
            setMessage('')
        } else {
            alert("Message can't be empty")
        }
}
....
....
You should now be able to send and receive messages between 2 different users on the Tabs that you opened earlier!
Moving on to the final feature -
Feature #3: Show which users are online
Here’s the flow:
- In the backend, when a new user joins a room, you’ll fetch a list of users belonging to the room from the
userscollection. Then, you’ll use SocketIO to broadcast aroomInfoevent to all the users within that room, and send all the users info. - On the UI, your
ChatRoomcomponent will listen forroomInfoevent, and once it receives the user list, you’ll save it in the state and display them using aListcomponent. ### Backend
- Get all the users in a particular room:
Add a method getUsersInRoom that returns a list of users for a given room:
async function getUsersInRoom(room) {
    try {
        const usersInRoom = await strapi.services.users.find({ room })
        return usersInRoom;
    } catch(err) {
        console.log("Error.Try again!", err);
    }
}

module.exports = {
    findUser,
    createUser,
    userExists,
    getUsersInRoom,
}
- Sending users data in a particular room
Next, you’ll import this method inside bootstrap.js. Add the following right after the part where you broadcast the message event:
io.to(user.room).emit('roomInfo', {
    room: user.room,
    users: await getUsersInRoom(user.room)
});
Frontend
- Emitting “roomInfo” event when the component mounts:
This will get us all the existing users in the room as soon as page loads.
Add the following code inside your ChatRoom component, right inside the useEffect method:
socket.on("roomInfo", (users) => {
    setUsers(users);
});
This adds the list of users in the users state upon receiving the roomInfo event. Now you just need to display them. Add the following code, right before ChatBox:
<List users={users.users}/>
And that’s it!
We just have one final thing to do:
Feature #4: Notify users if someone leaves the chat room
Backend
SocketIO has an inbuilt disconnect event that gets called automatically when someone leaves the room, or if they close their browser window or refresh the page. You’ll use the user’s socketId to delete the user from the database, and then notify all the other users in the room that the user has left the chat!
Add a method deleteUser that removes a user using their socketId:
database.js
async function deleteUser(socketId) {
    try {
        const user = await strapi.services.users.delete({ socketId: socketId });
        return user;
    } catch(err) {
        console.log("Error while deleting the User", err);
    }
}
module.exports = {
    findUser,
    createUser,
    userExists,
    getUsersInRoom,
    deleteUser
}
Next, import this method in bootstrap.js file and add the following:
io.on('connection', function(socket) {

  // earlier code ...

  // ...

  socket.on('disconnect', async(data) => {

            try {

                console.log("DISCONNECTED!!!!!!!!!!!!");

                const user = await deleteUser( socket.id);

                console.log("deleted user is", user)

                if(user.length > 0) {

                    io.to(user[0].room).emit('message', {

                        user: user[0].username,

                        text: User ${user[0].username} has left the chat.,

                    });


                    io.to(user.room).emit('roomInfo', {

                        room: user.room,

                        users: await getUsersInRoom(user[0].room)

                    });

                }

            } catch(err) {

                console.log("error while disconnecting", err);

            }

    });

}
And we’re done. Watch your app in action!
I hope this tutorial helped you understand how you can integrate and use Strapi in your own application.
Next Steps
What if a new user wanted to see ongoing conversations in a room as soon as they joined?
Hint: We aren’t storing really saving user messages in the database!
I leave this feature for you to implement as an exercise. Feel free to comment in-case you have any questions!
Thanks for reading!

Top comments (0)