
Kubernetes needs no introduction in this cloud-native world. It was born when I was a middle-aged man. Years later, I am still as young as earlier (take with a pinch of salt) while Kubernetes grew out to be a fine tool that outperformed other platforms in enabling operational efficiency and application resilience.
In the past, I wrote several articles and guides on Kubernetes and supported platforms. But then, in the pursuit of appyness, there is no end to innovation.
In this article today, I take up another interesting use-case of Devtron as an open-source platform that refactors the Kubernetes ecosystem into an easy-to-use AppOps model.
First, a few basics.
What Are We Trying to Achieve?
Exploring the Devtron platform to validate its capabilities to build, deploy and manage apps on a K8s cluster.
What is Devtron?
Devtron is an open-source, GUI based platform to deploy and manage Kubernetes applications. The platform allows you to manage an entire application ecosystem through a single control pane that spans across multiple cloud service providers with varying environments. While doing so, efficient collaboration and security sits at its core to naturally enable a DevOps model.

Let's get a hands on.
Stage 1: Creating an Amazon EKS Cluster
We will start with configuring an AWS EKS cluster (you may also use a GKE or AKS cluster as per your choice). In case you already have a cluster setup, you may skip over to Stage 2.
Part One: Installing the AWS CLI
To work with AWS on the command line, you need to install the AWS CLI, that enables the creation and management of AWS services from a Linux, macOS, or Windows console. If you’re logged into the AWS console, you can spin up the AWS CloudShell, which comes preinstalled with the AWS CLI.
To install AWS CLI on Linux, log into your Linux operating system and access the console.
1 . Fetch the latest AWS CLI version for Linux-x86(64-bit) platform.
$ curl "https://awscli.amazonaws.com/awscli-exe-linux-x86_64.zip" -o "awscliv2.zip"
Quick Tip: The URL above is different for the ARM platform-based Linux. More details can be found here.
2 . Unzip the fetched zip file.
$ unzip awscliv2.zip
3 . Run the install script with admin privileges.
$ sudo ./aws/install
4 . Finally, validate the version of the AWS CLI installed.
$ aws --version
Output of the command above shows the current version of the AWS CLI installed. Once confirmed, we are ready to proceed with the next steps.
Part Two: Installing the eksctl command-line tool.
To create the Amazon EKS Cluster from the command line, install the eksctl command-line tool on the Linux operating system. Note that this is also possible on macOS and Windows. The following commands will cover how to install the tool on 64-bit Linux.
1 .Fetch the latest version of eksctl.
$ curl --silent --location "https://github.com/weaveworks/eksctl/releases/latest/download/eksctl_$(uname -s)_amd64.tar.gz" | tar xz -C /tmp
2 . Move the extracted files to /usr/local/bin.
$ sudo mv /tmp/eksctl /usr/local/bin
3 . Then confirm your eksctl version. In my case, it was 0.40.0 and might be different for you.
$ eksctl version
0.40.0
Part Three: Deploy an EKS Cluster with Active Nodes.
- The next step is to deploy an Amazon EKS cluster. To do so, use the
create clustercommand, that sets up all the required resources.
$ eksctl create cluster \
--name devtron-darwin-cluster \
--region us-east-2 \
--nodegroup-name devtron-darwin-nodegroup \
--node-type t2.micro \
--nodes 4 \
--nodes-min 1 \
--nodes-max 5 \
--managed
The command above creates an EKS Cluster with -
- a given name,
- region,
- nodegroup-name,
- node-type, nodes,
- minimum nodes and maximum nodes of the node group,
- and then deploys the cluster on a managed node group type.
You may also change the values of the above to those as desired for your environment.
2 . When the command execution completes, you should have your EKS cluster ready with a similar message as shown below. Don’t worry about the message “kubectl not found”, that is what we will install in the next part.
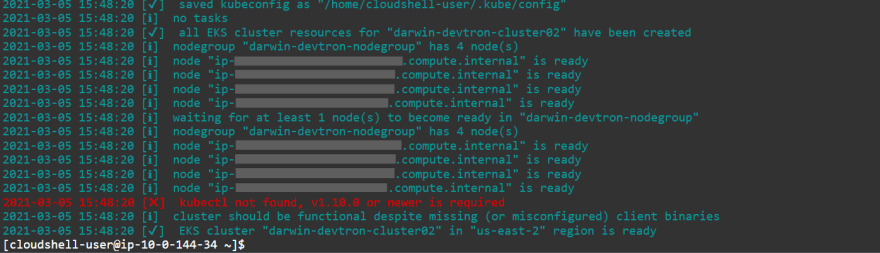
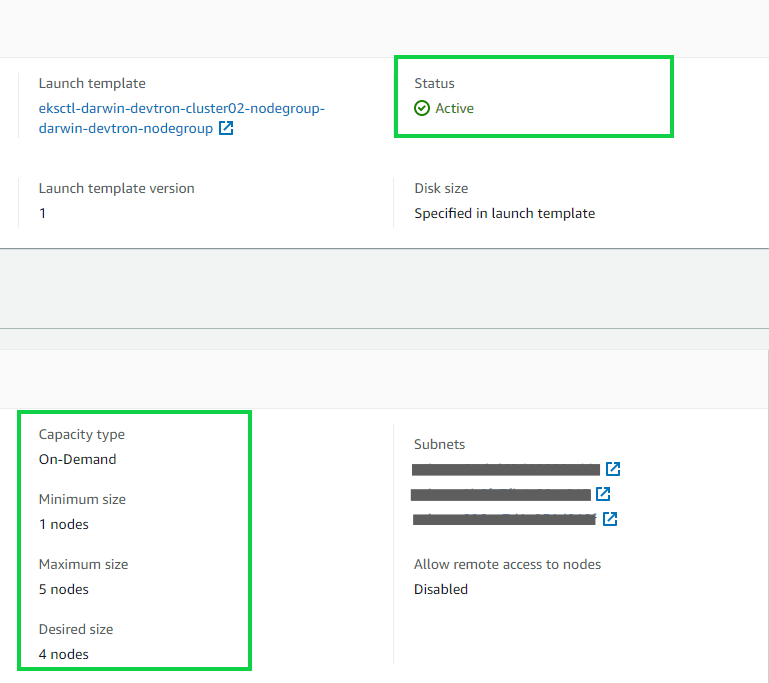
You can then confirm your created EKS cluster and node configuration on the AWS portal as shown below.
Part Four: Installing kubectl
To work with our new EKS cluster, we need to install kubectl, an open-source command-line tool used to interact with Kubernetes clusters.
1 . Fetch the kubectl tool for Kubernetes version 1.18. Note that there are different links available for lower or higher versions, however, to use Devtron, version 1.18 or above is recommended.
$ curl -o kubectl https://amazon-eks.s3.us-west-2.amazonaws.com/1.18.9/2020-11-02/bin/linux/a
md64/kubectl
2 . Change the permissions to allow execution on the kubectl binary fetched.
$ chmod +x ./kubectl
3 . Copy the binary in the current path to your home directory.
$ mkdir -p $HOME/bin && cp ./kubectl $HOME/bin/kubectl && export PATH=$PATH:$HOME/bin
4 . Check the version of kubectl installed to confirm the installation has been successful and as intended.
$ kubectl version --short --client

Client Version: v1.18.9-eks-d1db3c
5 . Next, you should be able to run the command below to see your active Kubernetes cluster.
$ kubectl get service

NAME         TYPE        CLUSTER-IP   EXTERNAL-IP   PORT(S)   AGE
kubernetes   ClusterIP   10.100.0.1   <none>        443/TCP   33d
Stage 2: Installing Devtron
Installing Devtron is supported through three ways, installation using kubectl, Helm 2, or Helm 3.
For the purpose of this article, we shall cover installing Devtron using Helm 3 with default configurations that use Minio to store build cache and logs.
1 . Start by changing the Kubernetes context to the EKS cluster that you want to use, change the region and cluster name values to those specific to your environment.
$ aws eks --region us-east-2 update-kubeconfig --name
darwin-devtron-cluster02
2 . Create a namespace to use for Devtron using devtroncd as the name.
$ kubectl create namespace devtroncd
3 . Fetch Helm 3 from the official helm repo using the curl command.
$ curl -fsSL -o get_helm.sh https://raw.githubusercontent.com/helm/helm/master/scripts/get-helm-3
4 . Change the permissions on the helm script to allow execution.
$ chmod 700 get_helm.sh
5 . Execute the helm script.
$ ./get_helm.sh
Quick Tip: For Helm to install, you need the OpenSSL library on your Linux operating system. For this article, we are using a RedHat-based Linux operating system so we will use the yum package manager to install OpenSSL.
$ sudo yum -y install openssl
6 . To confirm the Helm installation, type the command below to receive the output as shown.
$ helm version

WARNING: Kubernetes configuration file is group-readable. This is insecure. Location: /home/cloudshell-user/.kube/config
WARNING: Kubernetes configuration file is world-readable. This is insecure. Location: /home/cloudshell-user/.kube/config
version.BuildInfo{Version:"v3.5.3", GitCommit:"041ce5a2c17a58be0fcd5f5e16fb3e7e95fea622", GitTreeState:"dirty",
GoVersion:"go1.15.8"}
7 . After installing Helm, add the Devtron Helm chart repo that uses the Helm installation method. (Source: https://docs.devtron.ai/)
$ helm repo add devtron https://helm.devtron.ai
8 . Next, use the command below to navigate to the Devtron installation directory, set the namespace for Devtron, the password for PostgreSQL, and start installing Devtron. (Source: https://docs.devtron.ai/)
$ helm install devtron devtron/devtron-operator --namespace devtroncd --set secrets.POSTGRESQL_PASSWORD=new-password-here
9 . To monitor the Devtron installation’s progress, access the pods within the devtroncdnamespace and take note of the pod that begins with inception-849d647c4d.
$ kubectl get pod -n devtroncd
10 . Type the command below to monitor the logs that show the installation progress.
$ kubectl logs -f inception-849d647c4d-ldncs -n devtroncd
The installation takes about 15 to 30 minutes to complete. When that is done, use the following command to verify that the installation has been completed successfully. The command should echo a result Applied onto the console.
$ kubectl -n devtroncd get installers installer-devtron -o jsonpath='{.status.sync.status}'

Applied[cloudshell-user@ip-10-0-XX-XX ~]$
11 . You can also verify the running pods in the devtroncd namespace by typing the command shown below.
$ kubectl get pods -n devtroncd

The command output above shows us the running pods within the devtroncd namespace.
12 . Before we can access the dashboard, obtain the admin password that was created during the Devtron installation process. Use the command below to get the password.
$ kubectl -n devtroncd get secret devtron-secret -o jsonpath='{.data.ACD_PASSWORD}' | base64 -d

argocd-server-59XXXXX-XXXX[cloudshell-user@ip-10-0-XX-XX ~]$
13 . After that, type a command that gets all the services within the devtroncd namespace and choose the load balancer service, which has a public address that you can paste into your browser.
$ kubectl get svc -n devtroncd

devtron-grafana                       ClusterIP      10.100.159.169
devtron-kubernetes-external-secrets   ClusterIP      10.100.171.60
devtron-minio                         ClusterIP      10.100.230.236
devtron-minio-svc                     ClusterIP      None
devtron-nats                          ClusterIP      10.100.195.145
devtron-nats-mgmt                     ClusterIP      None
devtron-service                       LoadBalancer   10.100.204.202   a4777dd57858a4dc59afb0a4517b1748-XXXXXXXXXX.us-east-2.elb.amazonaws.com
PS: Dashboard URL above is edited for security purposes.
14 . Paste the URL of the load balancer in a browser, which then loads up the Devtron dashboard. The next step is to insert the username “admin” and the password that was provided.

Quick Tip: To access the password that was automatically generated for the default admin user account, type the below command into your console.
$ kubectl -n devtroncd get secret devtron-secret -o jsonpath='{.data.ACD_PASSWORD}' | base64 -d


That’s it, you have successfully installed Devtron on your Amazon EKS cluster and accessed the dashboard. You are now ready to start creating applications using Devtron.
Quick Tip: Once you are through with the Devtron dashboard setup, you can also enable Single Sign-On for the Devtron dashboard using third-party Identity providers. To do so, you need to access the Devtron Global Configurations page and then apply settings under the SSO Login Services tab.
Stage 3: Deploying an Application using Devtron
The following steps will cover how to deploy an application using Devtron. To get started, we need to set up a few prerequisites for successful deployment.
Part One: Setting the Host URL
1 . In the Devtron dashboard, click on the Global Configurations button at the bottom left and select the option Host URL.


2 . Update the URL with that of the Devtron Service Load Balancer.
Quick Tip: You can use a custom domain within AWS Route 53 that points to the Devtron service load balancer to avoid using the long URL.
Part Two: Adding a GitOps account
For successful Continuous Integration and Continuous Deployment (CI/CD) using Devtron, the tool needs to access a GitOps account that holds different parameters and configurations (Helm charts) for your Devtron applications. A repository will be automatically created once CI is initiated, as we shall see in the following steps.
1 . To add a GitOps account, click on the GitOps tab on the left of your global configurations screen and add the Github organization and access credentials.
2 . Add the Git Host, the Github organization name, Git access credentials, and then click Save.

Part Three: Adding a Git Account
After adding a GitOps account, the next step is adding a Git account.
1 . Click on add git account, Name to your Git provider, set the URL, Authentication type, the Git Username, Password, and then click Save.

Part Three: Adding a Docker Registry
The next step is adding a docker registry that we shall use to build, push, and pull our images to the designated Docker Repo using the Devtron CI/CD pipeline.
1 . Click Add docker registry, set the Registry name, the Registry type (in our case its ECR), add the Registry URL, the AWS region, the Amazon IAM role access Id, Secret access key, and then click Save.

Part Four: Adding a New App
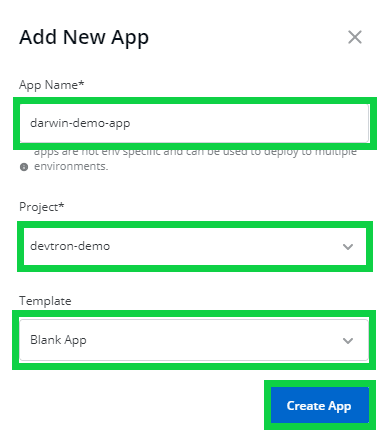
1 . On the Devtron dashboard, click on the Applications tab; this will bring up a display with a button Add New App at the top right of the screen, click on the button.


2 . The next step is to give the Application a Name, select the Project for the Application, and set the Applications Template. In this demo, we are using a Blank App template.
Quick Tip: You can create multiple projects and groups for your applications across different projects. This enables ease of management of deployments. To create new projects, access the projects tab under the global configuration menu.
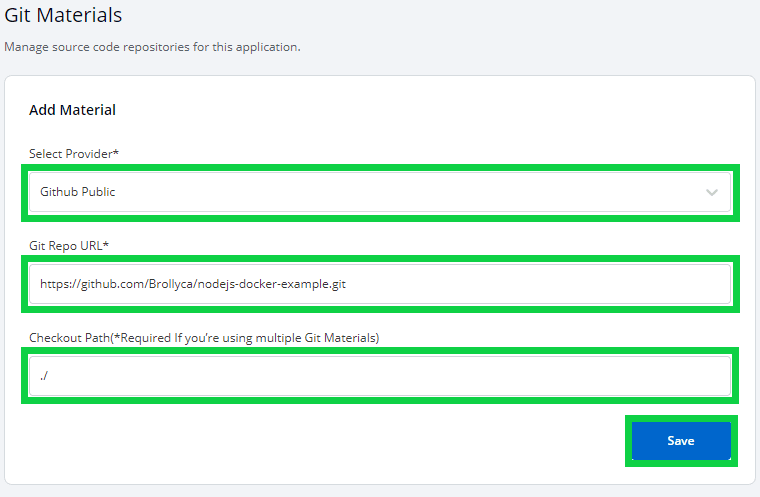
3 . After clicking Create App, a new screen will add the Git Provider, Git Repo URL, and Checkout Path. In this demo, we are using the Github public provider, add the Git repo URL for our application, set the checkout path to its defaults, and click Save.
4 . Next, the Git Materials configuration will appear, where you are ready to move on to the next step. Click Next at the bottom right of the screen, which takes you to the Docker Build Configuration page.

5 . Set the Dockerfile’s Relative Path for the application, select the Container Registry, set the Docker Repository, click Save Configuration, and then click Next.

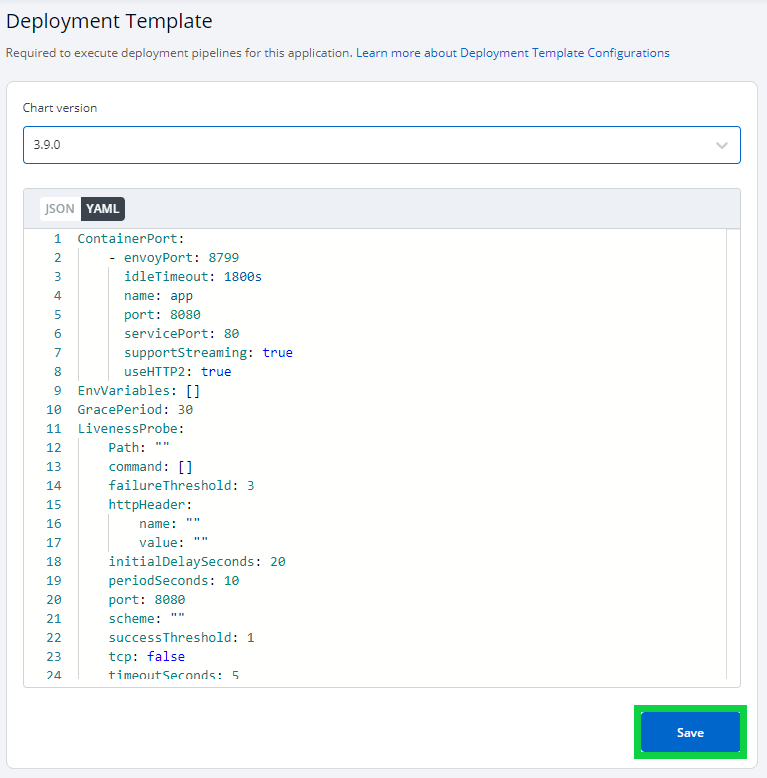
6 . The next page allows us to set the Deployment Template parameters. For this demo, we shall leave all the settings with their defaults and click Save.
7 . Once you click Save, you should see the Devtron Application’s Helm chart repo automatically created in the Github organization specified. Then, click Next to proceed to the workflow editor page.

Stage 4: Triggering Continuous Integration & Delivery (CI/CD)
In this section, we will build and deploy our containerized application to a Kubernetes cluster using Devtron.
Part One: Triggering Continuous Integration
1 . To enable Continuous Integration, we need to add a new workflow to our application. Click add a New Workflow, give the workflow a Name and click Save.

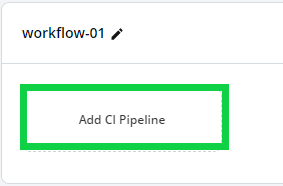
2 . Once that is done, click Add CI Pipeline to start setting up Continuous Integration.
Then, select the Continuous Integration option to build a docker image from the Git repo that contains the Dockerfile.

3 . Next, assign the CI pipeline a name, set the Git branch name to build the image, click create pipeline and leave the other settings with their defaults for demo purposes.


Quick Tip: You may select the Manual pipeline execution method in a situation where you want to maintain complete control over the builds and deployments of your workload.
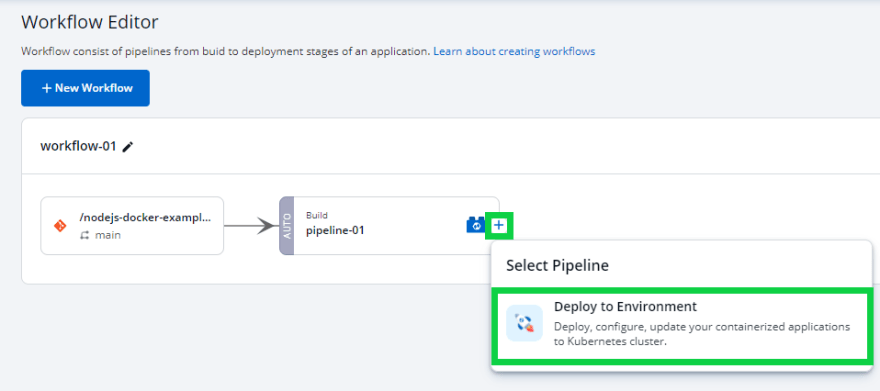
4 . After creating the pipeline, click the + button and then select the Deploy to Environment option.
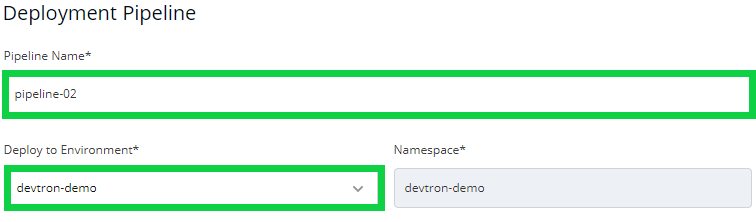
5 . Next, assign the Name to the deployment pipeline, click Create pipeline, and leave other settings with their defaults unless required specifically.

Quick Tip: You can select Rolling, Canary, or Blue-green deployment strategies for your applications within the deployment pipeline and can change any time with just a single click.
After setting the configurations, the new Workflow should appear as shown below.

6 . Next, click on the Trigger tab, and select the build material step button to initiate the Continuous Integration pipeline.
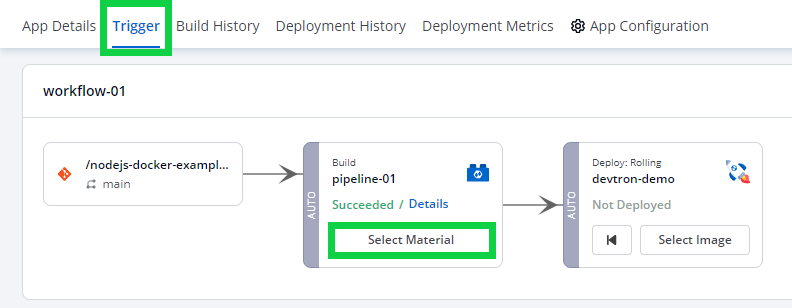
7 . Once you Select Material, a popup shows a list of previous commits to build the application from.

Select the commit and click Start Build. You can also monitor progress by selecting the Build History tab and select the Logs section.

The screenshot displays the build logs, the build and push process of the container image, and the container registry.
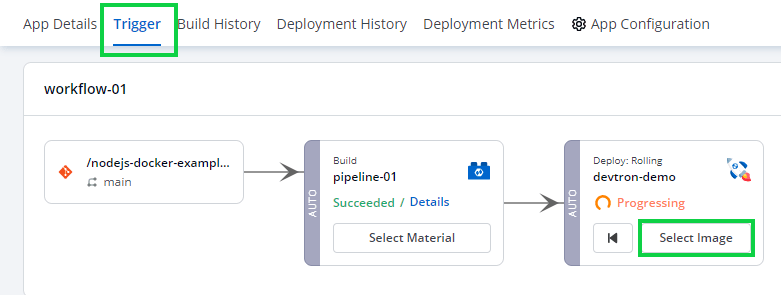
Part Two: Triggering Continuous Deployment
The final step is to deploy the application to the EKS cluster using the deployment pipeline step.
1 . Select the Trigger tab to view your available workflows. Click Select Image on the deploy step to trigger the deployment using the deployment strategy that we defined, and the pipeline will display as Progressing.
2 . To confirm that the deployment is done, click on the Deployment Metrics tab, and select your environment.

And we are done! The Devtron platform is now all setup with your workload. Below I have also captured a few troubleshooting steps in case you face any of the issues.
Stage 5: Troubleshooting Typical Setup and Deployment Issues
Issue 1: Re-installation of Devtron freezes or returns errors.
1 . If an earlier Installation of Devtron failed on the cluster, you might receive errors in case you try to re-install Devtron. Make sure to look at the errors that are being thrown from the inception pod. You can quickly check the logs using the command below.
$ kubectl logs -f inception-d95bc9478-7blw6 -n devtroncd
2 . Change the name of the inception pod to that of your environment. The command below also produces similar output on any cluster.
$ pod=$(kubectl -n devtroncd get po -l app=inception -o jsonpath='{.items[0].metadata.name}')&& kubectl -n devtroncd logs -f $pod
3 . Then run the following commands to clean up the previous installations.
$ cd devtron-installation-script/
$ kubectl delete -n devtroncd -f yamls/
$ kubectl delete -n devtroncd -f charts/devtron/templates/devtron-installer.yaml
$ kubectl delete -n devtroncd -f charts/devtron/templates/install.yaml
$ kubectl delete -n devtroncd -f charts/devtron/crds
$ kubectl delete ns devtroncd
4 . Additionally, you can also run the command below to make sure that all components of the past installation are removed.
$ cd devtron-installation-script/
$ kubectl delete -n devtroncd -f yamls/
$ kubectl -n devtroncd patch installer installer-devtron --type json -p '[{"op": "remove", "path": "/status"}]'
Issue 2: Initial Devtron Application build error using CI pipeline.
You may get a build error as shown in the screenshot below just after logging in to the Devtron dashboard while creating your first application, and then triggering Continuous Integration. This may also occur when the previous installation was set to Store Build and cache logs initially set to AWS S3 storage and then later changed to the default storage configuration.

1 . To resolve the issue, run the commands below to upgrade your Devtron installation.
$ helm repo update
$ helm upgrade devtron devtron/devtron-operator -n devtroncd
2 . Then, monitor the status of the upgrade and confirm completion by running the command below.
$ kubectl -n devtroncd get installers installer-devtron -o jsonpath='{.status.sync.status}'
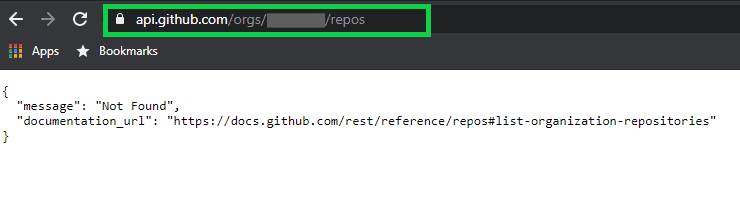
Issue 3: Devtron fails to connect to Github for GitOps
Often, this might not be a Devtron issue, but the Github API’s connection might be broken. The solution to this is to make sure that you can call Github to get your organization’s repository.
The screenshot below shows a failed call.
The screenshot below shows a successful API call to the organization’s (Brollyca) repo.

Additionally, you can monitor the logs for all your Git operations by checking the activity within the git-sensor pod that runs all the Git operations.
$ kubectl logs -f git-sensor-0 -n devtroncd
Verdict?
Straightforward and simple!
The concept of an AppOps model has been in theory since a long time. Several other platforms including GitLab, Azure DevOps, Harness, etc. tried this in the past but had their own set of limitations to be considered for a wider adoption. It is interesting to note that Devtron has held the bull by its horn by making itself platform agnostic, where collaboration is the key.
In a set of forthcoming articles, I wish to dig deeper on Devtron’s claimed features which aren’t covered in this article, such as - scanning Docker images for vulnerabilities, writing config maps, storing application secrets, and defining an application deployment strategy.
I am sure the platform has much in store to explore, make use of and review.
Till then, happy coding with masks on. 😷

Top comments (0)