This article was originally posted on the Adam the Automator blog. If you enjoy this article, be sure to come and check out this and hundreds of other sysadmin, cloud and DevOps posts!
No one product will ever provide all of the built-in tools you need to get the job done. Scripts are like the glue that brings workflows together and the shims that make solutions work. in Azure DevOps (AzDo) Pipelines, PowerShell and Bash scripts are your best friends.
But how do you invoke scripts in an Azure Pipeline? What are all of the little gotchas and ways to best run scripts in a pipeline? You'll find out in this article.
In this article, you're going to get hands-on with scripts in pipelines. You'll learn to do all the things with both PowerShell and Bash scripts in pipelines. If you're just joining us and want to learn a little more backstory on running scripts in pipelines, be sure to check out the first article in this two-article series.
Before You Start
This article will be a combination of teaching and hands-on tutorial. If you intend to try out any of the examples for yourself, be sure to have a few prerequisites set up ahead of time.
- An existing AzDo pipeline created linked to a repo - Learn how to create a pipeline via the web interface or using the Az CLI in this Azure Pipelines article.
What You're Going to Learn
In this hands-on tutorial, you're going to learn everything there is to know about running PowerShell and Bash scripts in AzDo Pipelines. Using the PowerShell and Bash tasks, you'll see how to invoke scripts, pass parameters to them, control errors and how to fail a task in the pipeline should a problem arise in the script.
You're also going to learn how to use AzDo pipeline variables in scripts and also how to set them using AzDo logging commands.
The PowerShell Task is Your Friend
To run a PowerShell script in a pipeline requires using the PowerShell task. The PowerShell task takes a script or PowerShell code from the pipeline and runs it on a pipeline agent. Depending on the options chosen, the pipeline agent will either be on Windows or Linux.
You can also use more specific use case tasks like the Azure PowerShell task too but those won't be covered here.
PowerShell Task Schema
The PowerShell task is called PowerShell@2 and has a schema that looks like below. You can see you've got a few options at your disposal for running scripts under the inputs section.
- task: PowerShell@2
  inputs:
    targetType:
    filePath:
    arguments:
    script:
    errorActionPreference:
    failOnStderr: true
    ignoreLASTEXITCODE: true
    pwsh: true
    workingDirectory:
Each attribute you decide to use in inputs affects the behavior of how the PowerShell code/script runs.
| Name | Mandatory | Options | Used with | Default Value | Description |
| targetType | No | filePath, inline | All | The PowerShell task allows you to add PowerShell code directly within the YAML pipeline or execute an existing script in the source repo. Here you can specify either filePath providing the path to the script to run or use inline which indicates that you'll be adding the PowerShell code directly int the YAML pipeline. | |
| filePath | Yes | targetType: filePath | This attribute is where you specify the path of the script to execute. This path typically points to a script in your source repo that the pipeline checks out when it runs. For example, to tell the PowerShell task to execute a script called script.ps1 in the root of the source repo, you'd use a predefined variable like $(System.DefaultWorkingDirectory)\script.ps1. | ||
| arguments | No | targetType: filePath | If you've provided a script via the filePath attribute and that script is built with parameters, this is where you would pass in values to those parameters. Note that when using inline code, this option is not used. You should specify named parameters like `-Name someName -Path -Value "some value"` | ||
| script | Yes | inline | Enclosed in quotes, this is where you provide the PowerShell code to execute. | ||
| errorActionPreference | No | SilentlyContinue, Continue, Inquire, Stop | All | Stop | Use this to set $ErrorActionPreference in the script if you haven't done so already. |
| failOnStderr | No | true | All | false | Setting this value to true will fail the PowerShell task in the pipeline is an error is thrown via PowerShell. Otherwise, the task will only fail if the scripts exits with a non-zero exit code. |
| ignoreLASTEXITCODE | No | true | All | false | If set to false, the line `if ((Test-Path -LiteralPath variable:\\LASTEXITCODE)) { exit $LASTEXITCODE }` is appended to the end of the script. This will cause the last exit code from an external command to be propagated as the exit code of PowerShell. |
| pwsh | No | true | All | false | If the pipeline agent is running on Windows, this will force the code/script to be executed using pwsh.exe (PowerShell Core). If not set to true, the task will default to Windows PowerShell on Windows pipeline agents. |
| workingDirectory | No | All | $(Build.SourcesDirectory) | The working directory to execute the script in. This affects paths in the script like _.\command.ps1_. | |
| env | No | All | A list of additional items to map into the process's environment. By default, pipeline variables are mapped but secret variables are not. Here is where you would specify them like `MySecret: $(Foo)`. |
Now that you have an idea of what's possible, let's dive into each attribute and see what's possible.
Running Simple One-Liners
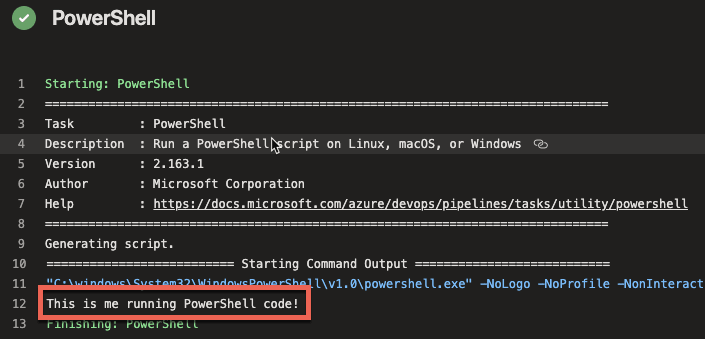
In the PowerShell task's most simplest form, you can run a single line of PowerShell using a targetType of inline and by specifying the code to run via the script attribute as shown below.
- task: PowerShell@2
    inputs:
            targetType: 'inline'
      script: 'Write-Host "This is me running PowerShell code!"'
When the pipeline is run, you'll then see the output shown in the log.
If you'd like to take a shortcut to this approach, you can save yourself a few lines but using the optional powershell shortcut task too.
To perform the exact same function as above, you can also simply use the powershell term followed by the code to run as shown below.
- powershell: 'Write-Host "This is me running PowerShell code!"'
If you'd like to learn more about running PowerShell code inline, check out this the Inline Code vs. Scripts section of the first article in this series.
Sidenote: Windows PowerShell vs. PowerShell (Core)
Before you get too much farther, it's important to point out some behavioral differences in Windows PowerShell vs. PowerShell (Core) and how to control what version of PowerShell your scripts run on.
In the example above, the version of PowerShell that the code executed on completely depended on the pipeline agent the code was running on. The pipeline is smart enough to handle this for you but you will get caught by this at some point.
For example, what if you have a Windows PowerShell-specific code and use the powershell task assuming that it will run on Windows? It might but what if you've got a big pipeline defined and you forgot you added a pool: ubunbu-latest line for that job? The task will still run on Linux but it has no choice but to run PowerShell (Core).
Using the task above as an example, let's now say you've specifically defined the pipeline agent to run on Linux like below. The tasks are exactly the same but the pipeline agent is not.
pool:
  vmImage: "ubuntu-latest"

steps:
  - task: PowerShell@2
    inputs:
      targetType: 'inline'
      script: 'Write-Host "This is me running PowerShell code!"'
    - powershell: 'Write-Host "This is me running PowerShell code!"'
You'll then see in the job log, the pipeline automatically chose pwsh. You'll see the same in Windows where the pipeline executes powershell.exe.

Be Explicit about PowerShell Versions
If there might ever be a possibility that you're running code that depends on a specific version of PowerShell, always be explicit about the version you'd like to run on.
To run PowerShell (Core), always use the pwsh: true attribute on the PowerShell@2 task or the pwsh shortcut task. Don't assume that the pipeline will pick the right version for you. You'll probably never remember you made that "quick change to troubleshoot a thing" by changing the pipeline agent before it's too late.
- task: PowerShell@2
    inputs:
            targetType: 'inline'
      script: 'Write-Host "This is me running PowerShell code!"'
            pwsh: true

- pwsh: 'Write-Host "This is me running PowerShell code!"'
Running Scripts
If you need to run some PowerShell code longer than a few lines or need to pass parameters to your code, you'll need to step up to executing scripts. Using the PowerShell task, you can do this by setting the targetType to filePath and then specifying the path of the script to run via the filePath attribute.
For example, perhaps you have a PowerShell script called script_no_params.ps1 in the root of your source repo. Below you can see an example of calling the script.ps1 script located in the System.DefaultWorkingDirectory pipeline variable path. This is the directory where the source repo files are downloaded to when the pipeline runs.
- task: PowerShell@2
    inputs:
            targetType: 'filePath'
      filePath: '$(System.DefaultWorkingDirectory)\script_no_params.ps1'
Watch out for forward and backslash inconsistencies! If you're running a script on Linux, use forward slashes. On Windows, use backslashes when specifying the filePath.
The script contains a single line.
[CmdletBinding()]
param()

Write-Host "I'm running in a PowerShell script!!"
When the pipeline is run, you'll see that the pipeline reads the code inside of the script, creates it's own PowerShell script and then executes the code.

If you intend to run an existing PowerShell script, be sure you don't have the - checkout: none line in your pipeline. Otherwise, the script will never be downloaded to the agent.
Passing Parameters
If you have a script that has one or more parameters, you can pass parameters to those scripts using the arguments attribute.
Note that you cannot pass parameters to inline code using the arguments attribute.
The arguments attribute accepts parameters the exact same way you'd specify a named parameter within PowerShell itself using -[parameter_name] [parameter_value].
For example, perhaps you have a script called script.ps1 in the root of your source repo. That script contains two parameters called $foo and $bar as shown below.
[CmdletBinding()]
param(
  $foo,
  $bar
)

Write-Host "Value of foo is $foo and value of bar is $bar"
You can provide values to the $foo and $bar parameters via the arguments attribute in the YAML pipeline like below.
- task: PowerShell@2
    inputs:
            targetType: 'filePath'
      filePath: '$(System.DefaultWorkingDirectory)/script.ps1'
            arguments: "-foo 'foovalue' -bar 'barvalue'"
You can then see the values were passed to the script in the job output log.

Handing Errors and Warnings
When a PowerShell is invoked via a pipeline and returns an error or warning, the pipeline behavior greatly depends on how you configure it. A PowerShell script can "error out" in a few different ways such as soft-terminating, hard-terminating errors and exiting with a non-zero exit code. Also, don't forget about that warning stream!
Errors
When the PowerShell task encounters an error, it may or may not fail the task in the pipeline. If you have a script that may return an error but it's not serious enough to fail the entire pipeline task, you can manage this behavior with the errorActionPreference attribute.
By default, the pipeline sets all PowerShell scripts to an $ErrorActionPreference value to Stop. This means that all soft and hard-terminating errors will force PowerShell to return a non-zero exit code thus failing the pipeline task.
To demonstrate, perhaps you have a script that returns a soft-terminating error like Write-Error does or a hard-terminating error like throw does.
## Soft
Write-Error -Message 'This is a soft-terminating error'

## Hard
throw 'This is a hard-terminating error'
When the pipeline encounters this script, the task will fail because PowerShell didn't return a zero exit code as you can see below.

Although not recommended, if you'd like the script to fail but not fail the pipeline task, you can do so by setting the errorActionPreference attribute to SilentyContinue.
- task: PowerShell@2
    inputs:
            targetType: 'filePath'
      filePath: '$(System.DefaultWorkingDirectory)/script.ps1'
            errorActionPreference: SilentlyContinue
Modifying Exit Code Behavior
By default, the PowerShell task fails if PowerShell returns a non-zero exit code. You saw an example of this above. However, if you need to manipulate that behavior, you can do so using the ignoreLASTEXITCODE attribute.
Whenever a PowerShell script turns, it always populates a variable called $LASTEXITCODE. This exit code, coincidentally, returns the last exit code the PowerShell script returned. This is what the pipeline task reads to indicate success or failure.
Perhaps you have a situation where a command you're running inside of a script returns a non-zero exit code but you know it was successful anyway. Don't get me started on software installers! If you'd like the pipeline task to succeed, you can force your own exit code.
Let's say you have a script called script.ps1 like below that modifies the exit code the PowerShell scripts quits with. In the example below, maybe the command returns a zero exit code which typically indicates success but you know that's actually a failure.
$output = ./some-command.exe
if ($LASTEXITCODE -eq 0) {
    exit 1
}
If you'd run this task without using the ignoreLastExitCode attribute, you'd find the task still shows success. Why? Because the task doesn't care what exit code PowerShell actually returns. It uses the value of $LASTEXITCODE to determine that.
To remove the dependency on the $LASTEXITCODE variable, use the ignoreLastExitCode attribute as shown below.
- task: PowerShell@2
    inputs:
            targetType: 'filePath'
      filePath: '$(System.DefaultWorkingDirectory)/script.ps1'
            ignoreLastExitCode: true
Showing Custom Errors and Warnings in Job Logs
Although less frequently used, you can also use logging commands to write warnings and errors into the job log using PowerShell. Below is an example.
- task: PowerShell@2
    inputs:
            targetType: 'inline'
      script: |
                Write-Host "##vso[task.LogIssue type=warning;]This is the warning"
                Write-Host "##vso[task.LogIssue type=error;]This is the error"

Adding warnings and errors directly into the job log doesn't effect the success/failure status of the task itself. This feature is useful for logging information to the job log.
Managing Pipeline Variables
The final topic you're going to learn is managing pipeline variables. AzDo makes it easy to set and reference pipeline variables in PowerShell scripts.
We're not going to go deep with variables in this section. If you'd like to learn more about pipeline variables, be sure to check out Understanding Azure DevOps Variables [Complete Guide].
Reading Pipeline Variables
When you've defined variables in the pipeline, you can read the values of those variables in PowerShell scripts using environment variables.
Perhaps you've declared a variable in a pipeline like below. The project_name variable is now available throughout the YAML pipeline.
variables:
    - name: project_name
        value: "foo"
To reference this variable's value in a script, simply reference the same name but as an environment variable as shown below. That's all there is to it. All pipeline variables will always be mapped to environment variables in the pipeline agents.
Write-Host "The value of project_name is $env:project_name"
Setting Pipeline Variables
Perhaps you need to set a pipeline variable in a PowerShell script. Although not quite as intuitive, you can do so using logging commands. Logging commands are how the pipeline talks to the agent. By writing a specifically-crafted string to the "console", you can define variables as shown below.
## Creates a standard pipeline variable called foo and sets the value to bar
Write-Host "##vso[task.setvariable variable=foo;]bar"

## Creates an output variable called foo and sets the value to bar
Write-Host "##vso[task.setvariable variable=foo;isOutput=true]bar"
Troubleshooting
Things don't always go the way you'd like so it's important to know a few tips to troubleshoot your way out of a jam.
Watch Your Quotes!
If you're running inline code, quotes will apply two places - in the YAML pipeline and in PowerShell. It's easy to place a quote in the wrong spot making the pipeline think the quote is for it and the other way around.
One of the easiest ways to prevent this is by using multi-line inline code. Instead of invoking PowerShell code in a single line with quotes and having to keep something like this straight:
powershell: '"This is some code."'
Instead, you can remove the required quotes from the pipeline all together by using a pipe (|) symbol and adding the code below it. This way removes some complexity.
powershell: |

    "This is some code"
Debugging
If you'd like to dig deeper into what the pipeline agent is doing in the background, you can debug pipelines using the system.debug variable. If you set the system.debug variable to true in a pipeline, you'll see a much more verbose output in the job log as shown below.

Enumerating Environment Variables
When working with complex YAML pipelines, you'll probably come across a situation where you need to see what PowerShell is seeing as values for one or more pipeline variables.
Since the pipeline maps all pipeline variables to environment variables, you can list all of the current environment variables including their values using Get-ChildItem.
PowerShell stores all environment variables in a PS Drive called Env. You can then read all environment variables by listing out the contents of this PS drive as shown below.
Get-ChildItem -Path Env:\
Summary
In this article, you went deep with AzDo pipelines and PowerShell. You learned:
- How to invoke PowerShell code without writing scripts
- How to invoke existing PowerShell scripts
- Be aware of the differences in Windows PowerShell and PowerShell (Core)
- How to control a success/failure of a pipeline task based off of PowerShell errors and exit codes
- How to write warnings and errors to the pipeline's job log
Now get out there, apply this knowledge and make some awesome AzDo pipelines!

Latest comments (0)