A bit of intro
When I came across upgradeable contracts, I was taken aback a bit. Upgrade? Why is upgrade a topic when smart contracts are designed to be immutable by default? Once a contract is created on the blockchain, there is no way to change it. You might have the same questions/thoughts as I had or even more. While researching how to write an upgradeable contract, I had a bit of a challenge understanding and finding a well-explanatory guide which is why I will be discussing some fundamentals in this article alongside showing you how to write a simple upgradeable smart contract using the openzepplin plugin.
The Why
Some scenarios call for modification of contracts. Relating it to regular daily lives, two parties who have signed a contract can decide to change agreements, perhaps they have to remove some terms or add some more or fix mistakes. As long as they both consent to it, it can be changed. On a blockchain such as Ethereum, it's possible that a bug was found in a smart contract that has already been deployed to production or more functionalities are just required. It could be anything really. It definitely calls for an upgrade.
OpenZeppelin
OpenZeppelin is the leading company when it comes to securing products, automating, and operating decentralized applications. They protect leading organizations by performing security audits on their systems and products. They have a library of modular, reusable, secure smart contracts for the Ethereum network, written in Solidity. Thanks to the OpenZeppelin Upgrades Plugin, it's quite easy to modify a contract while still preserving important things like address, state, and balance.
The How
Smart contracts can be upgraded using a proxy. Basically, there are two contracts:
Contract 1 (proxy/point of access): This contract is a proxy or a wrapper that will be interacted with directly. It is also in charge of sending transactions to and fro the second contract that I would be talking about next.
Contract 2 (logic contract): This contract contains the logic.
One thing to note is that the proxy never changes, however, you can swap the logic contract for another contract meaning that the access point/proxy can point to a different logic contract (in other words, it gets upgraded). This is illustrated below
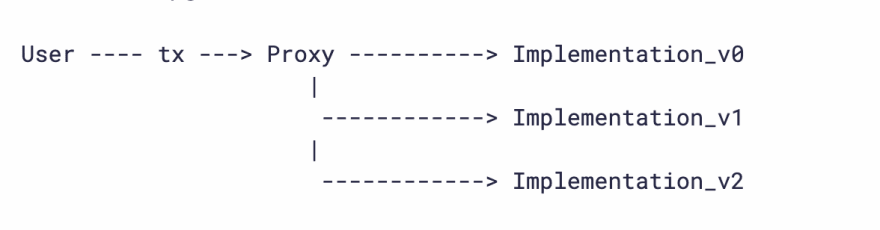
Source: https://docs.openzeppelin.com/upgrades-plugins/1.x/proxies#upgrading-via-the-proxy-pattern
To learn more about the proxy concepts, visit the openzepplin proxy upgrade pattern docs page and openzepplin proxy page
Upgradeability Patterns
We have several upgradeability patterns. Listed below are four patterns
UUPS proxy: EIP1822
Transparent proxy: EIP1967 (We would be focusing on this in this article)
Diamond Storage: EIP2355
Eternal Storage: ERC930
Transparent Proxy (EIP1967)
Transparent proxies include the upgrade and admin logic in the proxy itself. I would refer to the admin as the owner of the contract that initiates the first upgrade.
Using the transparent proxy, any account other than the admin that calls the proxy will have their calls forwarded to the implementation. In the same vein, if the admin calls the proxy, it can access the admin functions, but the admin calls will never be forwarded to the implementation.
In summary, it's best for the admin to be a dedicated account only used for its purpose which is obviously to be an admin.
Practical Steps
Prerequisite: knowledge of how to set up dev environment and how to write smart contracts. More info here
Let's write an upgradeable contract! We will be openzepplin's hardhat-upgrades plugin. To install, simply run
npm install --save-dev @openzeppelin/hardhat-upgrades @nomiclabs/hardhat-ethers ethers
In your hardhat.config file, you need to load it in
// js
require('@openzeppelin/hardhat-upgrades');
// ts
import '@openzeppelin/hardhat-upgrades';
I will be using js for this article
Your hardhat.config.js file should be similar to this
require("@nomiclabs/hardhat-ethers");
require("@openzeppelin/hardhat-upgrades");
require("@nomiclabs/hardhat-etherscan");

//Using alchemy because I intend to deploy on goerli testnet, an apikey is required
//The mnemonic is your account's mnemonic
//if you intend to verify your contracts, you need to open an account on etherscan and copy the apikey
//all important keys should not be exposed, it can be kept in a secret.json file and added to gitignore

const { alchemyApiKey, mnemonic } = require("./secrets.json");

module.exports = {
  networks: {
    goerli: {
      url: `https://eth-goerli.alchemyapi.io/v2/${alchemyApiKey}`,
      accounts: { mnemonic: mnemonic },
    },
  },
  etherscan: {
    apiKey: "YOUR_API_KEY",
  },
  solidity: "0.8.4",
};
Contract 1 (contracts/Atm.sol) (proxy contract)
In your contracts folder, create a new .sol file. In this article, I would be simulating an atm/bank. So, create Atm.sol. The code should look similar to this
// SPDX-License-Identifier: MIT
pragma solidity ^0.8.0;
contract Atm {

    // Declare state variables of the contract
    uint256 bankBalances;

    // Allow the owner to deposit money into the account
    function deposit(uint256 amount) public {
        bankBalances += amount;
    }
    function getBalance() public view returns (uint256) {
        return bankBalances;
    }
}
Test Contract
Test your contract in test/Atm-test-js as illustrated below
const { expect } = require("chai");
const { ethers } = require("hardhat");

describe("Atm", function () {
  before(async function () {
    this.Atm = await ethers.getContractFactory("Atm");
  });

  beforeEach(async function () {
    this.atm = await this.Atm.deploy();
    await this.atm.deployed();

    it("", async function () {});
    await this.atm.deposit(1000);
    expect((await this.atm.getBalance()).toString()).to.equal("1000");
  });
});
To test, run this command
npx hardhat test
Deploy Contract
!Important: In order to be able to upgrade the Atm contract, we need to first deploy it as an upgradeable contract. It is different from the deployment procedure we are used to. We are initializing that the start balance be 0. The script uses the deployProxy method which is from the plugin.
Create a deploy-atm.js script
const { ethers, upgrades } = require("hardhat");

async function main() {
  const Atm = await ethers.getContractFactory("Atm");
  console.log("Deploying Atm...");
  const atm = await upgrades.deployProxy(Atm, [0], {
    initializer: "deposit",
  });

  console.log(atm.address, " atm(proxy) address");
}

main().catch((error) => {
  console.error(error);
  process.exitCode = 1;
});
You can decide to test this as well. If you wish to test, your test file should be similar to this
Test Script
const { expect } = require("chai");
const { ethers, upgrades } = require("hardhat");
const { Contract, BigNumber } = "ethers";

describe("Atm (proxy)", function () {
  let box = Contract;

  beforeEach(async function () {
    const Atm = await ethers.getContractFactory("Atm");
    //initilize with 0
    atm = await upgrades.deployProxy(Atm, [0], { initializer: "deposit" });
  });

  it("should return available balance", async function () {

    expect((await atm.getBalance()).toString()).to.equal("0");

    await atm.deposit(1000);
    expect((await atm.getBalance()).toString()).to.equal("1000");
  });
});
After confirming tests,
Let's deploy to local first, we use the run command and deploy the Atm contract to dev network.
$ npx hardhat run --network localhost scripts/deploy-atm.js
Deploying Atm...
0xDc64a140Aa3E981100a9becA4E685f962f0cF6C9  atm(proxy) address
At this point, we have successfully deployed and have our proxy and admin address.
Contract 2
We want to add a new feature to our contract, a simple feature which is to include an add function that adds 500 to our balance.
Create contracts/AtmV2.sol
// SPDX-License-Identifier: MIT
pragma solidity ^0.8.0;

import "./Atm.sol";

contract AtmV2 is Atm{
    // adds to the balance by 500
    function add() public {
        deposit(getBalance()+500);
    }
}
Test Contract
Refer to how we tested Contract 1 and basically follow same logic.
Upgrade Contract
Now is the time to use our proxy/access point address. We would be using the upgradeProxy and 'getAdmin' methods from the plugin. Recall our proxy address from our deployment console above as we would be needing it here.
Create scripts/upgrade-atmV2.js. Your script should look similar to this
const { ethers, upgrades } = require("hardhat");

const proxyAddress = "YOUR_PROXY_ADDRESS_FROM_DEPLOYMENT";

async function main() {
  console.log(proxyAddress, " original Atm(proxy) address");
  const AtmV2 = await ethers.getContractFactory("AtmV2");
  console.log("upgrade to AtmV2...");
  const atmV2 = await upgrades.upgradeProxy(proxyAddress, AtmV2);
  console.log(atmV2.address, " AtmV2 address(should be the same)");
  console.log(
    await upgrades.erc1967.getAdminAddress(atmV2.address),
    "Proxy Admin"
  );
console.log('Atm upgraded');
}

main().catch((error) => {
  console.error(error);
  process.exitCode = 1;
});
Test script
Create a scripts/AtmProxyV2-test.js. It should look similar to this
const { expect } = require("chai");
const { ethers, upgrades } = require("hardhat");
const { Contract, BigNumber } = "ethers";

describe("Atm (proxy) V2", function () {
  let atm = Contract;
  let atmV2 = Contract;

  beforeEach(async function () {
    const Atm = await ethers.getContractFactory("Atm");
    const AtmV2 = await ethers.getContractFactory("AtmV2");

    //initilize with 0
    atm = await upgrades.deployProxy(Atm, [0], { initializer: "deposit" });

    atmV2 = await upgrades.upgradeProxy(atm.address, AtmV2);
  });

  it("should get balance and addition correctly", async function () {
    expect((await atmV2.getBalance()).toString()).to.equal("0");

    await atmV2.add();
    //result = 0 + 500 = 500
    expect((await atmV2.getBalance()).toString()).to.equal("500");
    //balance is now 500, so add 100;
    await atmV2.deposit(100);
    //result = 500 + 100 = 600
    expect((await atmV2.getBalance()).toString()).to.equal("600");
  });
});
After confirming tests,
Let's deploy our newly added contract with additional feature, we use the run command and deploy the AtmV2 contract to dev network.
npx hardhat run --network localhost scripts/upgrade-atmV2.js
Compilation finished successfully
upgrade to AtmV2...
0xDc64a140Aa3E981100a9becA4E685f962f0cF6C9  AtmV2 address(should be the same)
0xe7f1725E7734CE288F8367e1Bb143E90bb3F0512  Proxy Admin
To deploy on goerli, simply replace
npx hardhat run --network localhost
with
npx hardhat run --network goerli
There you have it, check for your addresses on Goerli Explorer and verify it.
For a view of all contracts, you can check out my contracts at
Summary
While it is a fast approach to use the openzepplin plugin and it varies across teams, a better way to understand and do upgrades is to copy the transparency proxy sol files and related sol files from openzepplin's into your project. This protects you from upstream attacks.
This comes to the end of this article. Hope you learnt a thing or two. I would appreciate feedbacks as well! Kindly leave a comment. Happy building!
References:
https://docs.openzeppelin.com/upgrades-plugins/1.x/writing-upgradeable
https://github.com/OpenZeppelin/openzeppelin-contracts/tree/master/contracts/proxy

Oldest comments (2)
Awesome! This is a little ahead of me, as I tried OpenZeppelin out the first time couple of weeks ago, but your breakdown is amazing! Using this as a guide and reference.
Yes, it’s a little above beginner level. Thank you!