ASP.NET Core Identity includes a default UI as a Razor library that enables you to quickly add users to an application, without having to build all the UI yourself. The downside is that if you want to customise any of the pages associated with the default UI, then you end up taking ownership of all the logic too. Even if all you want to do is add a CSS class to an element, you're stuck maintaining the underlying page handler logic too.
In this post I show how you can replace the Razor views for the default UI, without taking ownership of the business logic stored in the Razor Page PageModel code-behind files. I show how you can use the ASP.NET Core Identity scaffolder to generate the replacement Razor Pages initially, but customise these to use the existing, default, PageModels.
Background: ASP.NET Core Identity
ASP.NET Core Identity is a series of services that provide functionality for managing and signing in users. You can use the Identity services to (among other things):
- Create users, and provide sign-in functionality
- Secure passwords using best practice, strong, hashing algorithms
- Generate short-lived tokens for email confirmation or multi-factor authentication,
- Enable auto-lockout of users to prevent brute-force attacks.
- Allow logging in with third-party providers like Google and Facebook.
The Identity services provide APIs for achieving all these things, but you still have to arrange them all in the right order. You also have to write the UI that users use to interact with the services. Obviously, that's a huge investment, and is working with sensitive data, so you have to be very careful not to introduce any security holes.
Prior to ASP.NET Core 2.1, your best bet for implementing this was to use the UI generated from the Visual Studio templates. Unfortunately, using templates means that your UI is fine initially, but you then have a lot of code to maintain. If a bug is found in the templates, you have to go and update it yourself. What are the chances of people doing that? Slim to none I'd wager.
Luckily, ASP.NET Core 2.1 introduced a default UI Razor Class Library that meant you could benefit from the same UI, without having dozens of Razor Pages in your application to maintain. If a bug is found in the UI, the NuGet package can be updated, and you seamlessly get the bug fix, and all is great.
Customising the default UI
Of course, using the default UI means: you have to use the default UI. I think it's generally unlikely that users will want to use the default UI in its entirety, unless you're building internal apps only, or creating a "throwaway" app. For a start, the login and register pages include references to developer documentation that most people will want to remove:

Even though the UI is contained in a Razor Class Library, you can "overwrite" individual pages, by placing your own Razor Pages in a "magic" location in your project. For example, to override the register page, you can create a Razor Page at Areas/Identity/Pages/Register.cshtml:

A valid concern would be "how do I know which pages I can override?". Luckily there's a .NET Core tool you can use to scaffold pages from Identity in the correct locations, along with supporting files.
Scaffolding Identity files with the .NET CLI
The documentation for scaffolding Identity pages is excellent, so I'll just run through the basics with the .NET CLI here. You can also use Visual Studio, but be sure to follow steps 1-3 below, otherwise you get weird random errors when running the scaffolder.
- Add all the required packages to your application. If you're already using EF Core in your app, then you may already have some of these, but make sure they're all there, as missing packages can cause frustrating errors locally
dotnet add package Microsoft.VisualStudio.Web.CodeGeneration.Design
dotnet add package Microsoft.EntityFrameworkCore.Design
dotnet add package Microsoft.AspNetCore.Identity.EntityFrameworkCore
dotnet add package Microsoft.AspNetCore.Identity.UI
dotnet add package Microsoft.EntityFrameworkCore.SqlServer
dotnet add package Microsoft.EntityFrameworkCore.Tools
Also make sure that the installed package versions match your project version, for example .NET Core 3.1 projects should use packages starting 3.1.x.
- Confirm your project builds without errors. If it doesn't you'll get errors when scaffolding files.
- Install the code generator tool globally using
dotnet tool install -g dotnet-aspnet-codegenerator. Alternatively, you could install it as a local tool instead. - Run
dotnet aspnet-codegenerator identity -lffrom the project folder (not the solution folder), to see the list of files you can scaffold:
> dotnet aspnet-codegenerator identity -lf
Building project ...
Finding the generator 'identity'...
Running the generator 'identity'...
File List:
Account._StatusMessage
Account.AccessDenied
Account.ConfirmEmail
Account.ConfirmEmailChange
Account.ExternalLogin
Account.ForgotPassword
Account.ForgotPasswordConfirmation
Account.Lockout
... 25 more not shown!
In this case, I'm going to scaffold the Account.Register page, and remove the external login provider section completely.
You can create a Razor Pages app using the default UI by running
dotnet new webapp -au Individual -uld
If you're scaffolding into a project that's configured to use the default UI, you will already have an EF Core IdentityDbContext in your application. Pass the fully namespaced name of the context in the following command, using the -dc switch, when scaffolding your files:
dotnet aspnet-codegenerator identity -dc TestApp.Data.ApplicationDbContext --files "Account.Register"
After running this command, you'll find a bunch more files in the Areas/Identity folder:
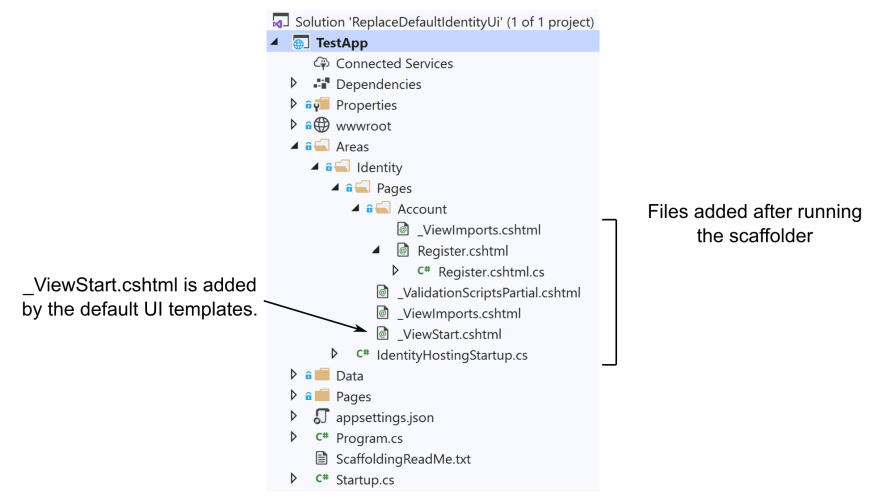
The generated pages override the equivalents in the default UI package, so any changes you make to Register.cshtml will be reflected in your app. For example, I can delete the external login provider section entirely:

The downside is that I'm now maintaining the code-behind file Register.cshtml.cs. That's 100 lines of code I'd rather not be maintaining, as I haven't changed it from the default…
Remove your liabilities - deleting the scaffolded PageModel
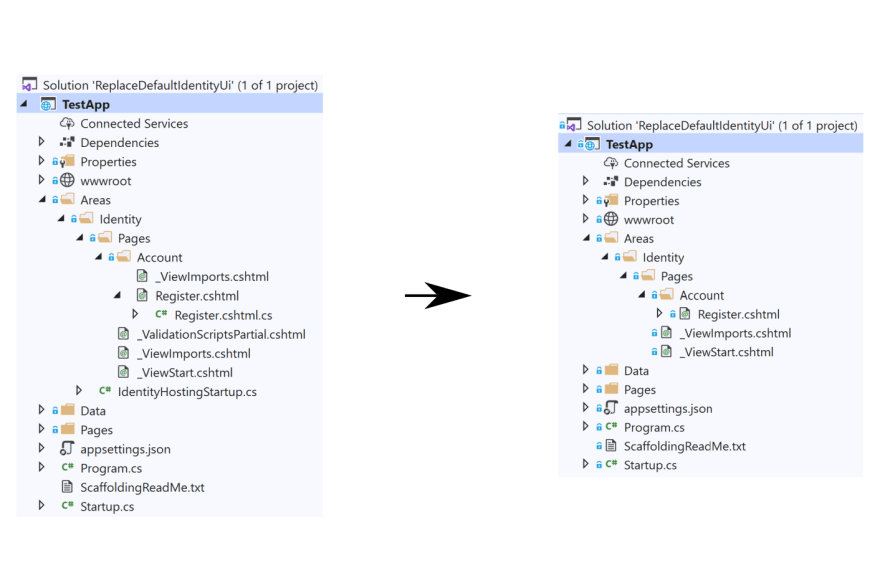
I don't want that code, so I'm just going to delete it! As I'm only going to make changes to the Razor views, I can delete the following files:
-
Areas/Identity/Pages/Account/Register.cshtml.cs — this is the
PageModelimplementation I don't want to have to maintain - Areas/Identity/Pages/Account/ViewImports.cshtml — No longer necessary, as there's nothing in the namespace it specifies now
- Areas/Identity/Pages/_ValidationScriptsPartial.cshtml — A duplicate of the version included in the default UI. No need to override it
- Areas/Identity/Pages/IdentityHostingStartup.cs — Doesn't actually configure anything, so can be deleted
Additionally, you can update Areas/Identity/Pages/ViewImports.cshtml to remove the project-specific namespaces, to leave just the following:
@using Microsoft.AspNetCore.Identity
@addTagHelper *, Microsoft.AspNetCore.Mvc.TagHelpers
At this point, your app won't compile. The Register.cshtml page will complain that you've specified a now non-existent RegisterModel as the PageModel for the Razor Page:

The final step is to update the @page directive to point to the original RegisterModel that's included with the default Identity UI, referenced in full in the example below:
@page
@model Microsoft.AspNetCore.Identity.UI.V4.Pages.Account.Internal.RegisterModel
@{
    ViewData["Title"] = "Register";
}
This is the magic step. Your application will now compile, use your custom Razor views, but use the original Razor Pages PageModels that are part of the default UI! That's much less code to maintain, and less chance to screw something up in your Identity pages

What are the downsides?
So what are the downsides of this approach? The only one I can really think of is that you're very tightly tied to the PageModels in the original Identity UI, so you have to be sure that any updates that are made to the Identity UI are reflected in your Razor Page templates as appropriate. The big advantage is that if the default UI package is updated and it doesn't make any breaking changes to the Razor templates, then you get the updates with no friction at all.
Another danger is that the inability to customise the PageModel may encourage you to do slightly janky things like @inject-ing services into the Razor views that shouldn't be there, and adding additional logic into the Razor views. I'm not suggesting you should do this. If you _do_ need to change the behaviour of the page handlers, then you should just go ahead and take ownership of that code. The point is that this technique is useful when you don't need to change the page handler logic.
Summary
In this post I gave some background on ASP.NET Core Identity and the default UI Razor Class Library that provides over 30 Razor Pages "for free". I then showed how you could use the scaffolder tool to override one of these pages when you want to change the Razor template.
The downside of this default approach is that you now have to maintain the page handlers for the scaffolded pages. That's 100s of lines of code per page that you must keep up to date when a new package version is released.
I showed how you can avoid that burden by deleting the scaffolded PageModel file, and point your Razor template to the original PageModel that comes as part of the default UI. This lets you update your Razor templates without having to take ownership of the page handler logic, potentially giving you the best of both worlds.

Top comments (0)