
by author Catalin Pit
The article aims to teach you the fundamentals of Vue using Vue 3. But, do not worry! If you learn these fundamental building blocks of Vue, you can create applications using any Vue version.
Before going further, I want to outline what you will learn by following the tutorial. You will learn how to:
- Create a simple Vue application
- Render lists
- Render DOM elements conditionally
- Handle events
- Use attribute binding
- Use computed properties
- Use methods
- Decide whether to use methods or computed properties
- Use components and props
Create the Vue app
If you are familiar with the command line/terminal, you can follow the steps below to create the directory and files needed.
mkdir vue3-intro

cd vue3-intro

touch index.html
touch app.js
Alternatively, you can use the GUI to create the folder and files. Create the following:
- a folder named
vue3-intro -
index.htmlinside "vu3-intro" -
app.jsinside "vu3-intro"
Create the HTML file
After creating the application folder and files, open the index.html file and add the following HTML code:
<head>
    <meta charset="UTF-8">
    <meta http-equiv="X-UA-Compatible" content="IE=edge">
    <meta name="viewport" content="width=device-width, initial-scale=1.0">
    <script src="https://unpkg.com/vue@next"></script>
    <title>Vue 3 Intro</title>
</head>
<body>
    <div id="app"></div>

    <script src="./app.js"></script>
</body>
</html>
There are three important lines in the above code:
-
<script src="https://unpkg.com/vue@next"></script>- with this line, you import the Vue library from a CDN. Using the CDN link is the easiest way to import Vue into your application and fiddle with it. -
<div id="app"></div>- thisdivrepresents the application. You mount the application into the DOM by using this div with the class ofapp. -
<script src="./app.js"></script>- with this line, you import theapp.jsfile, which stores your Vue code. This is the file where you write Vue code that will manipulate your application.
Create the JavaScript file
The next step is to go to app.js and create a Vue application. Write the following code in your file:
const app = Vue.createApp({
    data() {
        return {
            course: 'Intro to Vue with Vue 3'
        }
    }
})

app.mount('#app');
In the above code, Vue.createApp creates a new instance of Vue. While creating the Vue instance, you also pass an "Options" object that allows you to configure the application. For example, you added a course field in your Vue app, which you can access in the HTML file.
However, the newly created application needs to be mounted into a DOM element. If you don't mount the application into DOM, you will not be able to use Vue. Try removing the app.mount('#app') line and then try to access the course. You'll have a surprise!
Update the index.html file
Now that you created a Vue application, you can access the course property. Let's change the index.html file to display "Intro to Vue with Vue 3". Write the following code in the #app div:
<div id="app">
        <h1>{{ course }}</h1>
</div>
You can access proprieties from your Vue app by using double curly braces. The double curly braces will be replaced with the value of the course property.
Test the application
If you open the index.js file, you should see the following page:
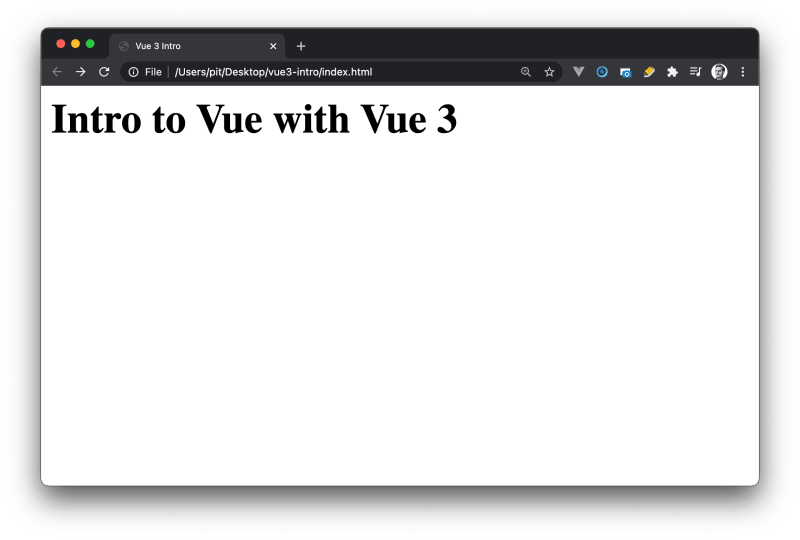
You just created your first Vue application, so congratulations to you!
List rendering
Vue allows you to loop over an array using the v-for directive. The v-for directive has the form of tag in tags. It's always easier to understand with an example. Look at the following code:
const app = Vue.createApp({
    data() {
        return {
            course: 'Intro to Vue with Vue 3',
            description: 'This is an introductory course to Vue fundamentals!',
            price: '$19.99',
            tags: ['Vue', 'Front-end', 'JavaScript']
        }
    }
})
<ul>
    <li v-for="tag in tags">
        {{ tag }}
    </li>
</ul>
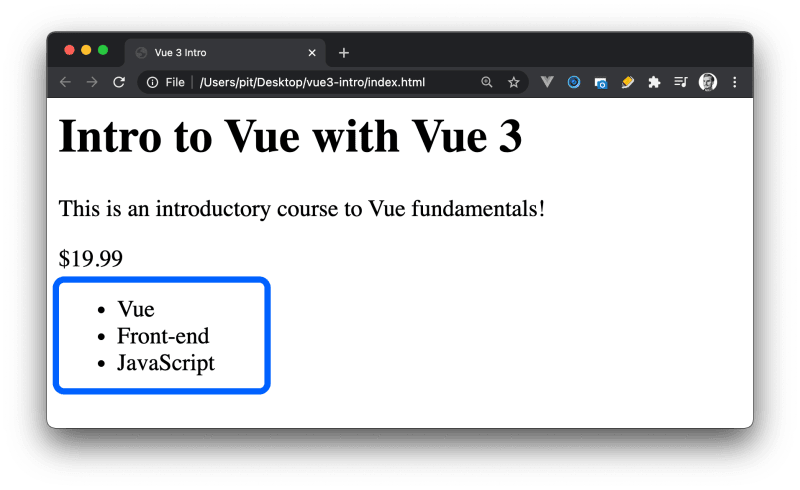
The above code loops over the "tags" array and renders each tag on the page. tags represents the array from the Vue application, whereas the tag is an individual element of the array.
This is what you see when you run the application:
Unique key attribute
Whenever you loop over arrays in Vue, you should give each DOM element a unique key. Usually, the key of each element is the element's id.
By providing the key attribute, you allow Vue to keep track of nodes' identity as things updated in the application. As a result, Vue can re-use and re-order existing elements. Besides that, it also improves the performance of the application.
Coming back to the previous example, you can modify the code to include the index field as well. The "index" field represents the position of the element in the array.
<ul>
    <li v-for="(tag, index) in tags" :key="index">
        {{ tag }}
    </li>
</ul>
However, if you have an array of objects, such as:
tags:
[
    { id: 1, name: 'Vue' },
    { id: 2, name: 'Front-end' },
    { id: 3, name: 'JavaScript' },
 ]
You can provide the id of the object as the key. The loop would look as follows:
<ul>
    <li v-for="tag in tags" :key="tag.id">
        {{ tag }}
    </li>
</ul>
:key ->:key is the shorthand of v-bind:key, and it's used to bind the item's id to the "key" attribute. That is, each item has a unique "key", which you specify in the :key field. In this example, each tag has its id as the key.
Conditional rendering
Sometimes, you want to display elements on a page based on a condition. That is, use if statements to decide whether to render an element or not. Or to render it based on a condition.
One example would be - show all the programming courses if the rating is over 4 stars. To do so, you can use the v-if directive, which renders a block only when the expression returns a truthy value. But, enough talk, let's see an example!
const app = Vue.createApp({
    data() {
        return {
            course: 'Intro to Vue with Vue 3',
            description: 'This is an introductory course to Vue fundamentals!',
            price: '$19.99',
            available: true,
            tags: [
                { id: 1, name: 'Vue' },
                { id: 2, name: 'Front-end' },
                { id: 3, name: 'JavaScript' },
            ]
        }
    }
})
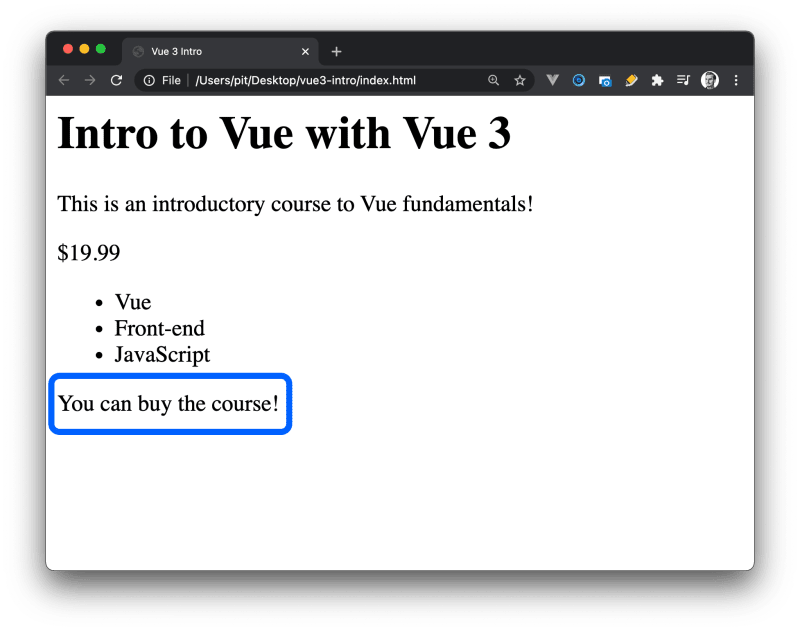
Note the new field called "available". The "available" field is set to true. However, you can keep changing it between "true" and "false" to see how the conditional rendering works.
<p v-if="available">You can buy the course!</p>
<p v-else>The course is not available to buy!</p>
The code above displays You can buy the course! if the available is true. Otherwise, it displays The course is not available to buy!.
v-if takes the field you want to evaluate. If the field evaluates to a truthy value, it displays the first option. Otherwise, it shows the second option. As an exercise, change the available field to false and see what happens!
When you run the application, this is what you see (provided "available" is set to true):
Observability for Production Vue Apps
Debugging Vue apps in production may be challenging and time-consuming. Asayer is a frontend monitoring tool that replays everything your users do and shows how your app behaves and renders for every issue. It’s like having your browser’s inspector open while looking over your user’s shoulder.

Asayer helps to quickly get to the root cause by reproducing issues as if they happened in your own browser. It also monitors your frontend performance by capturing key metrics such as page load time, memory consumption, and slow network requests.
Happy debugging, for modern frontend teams - Start monitoring your web app for free.
Handling events
In Vue, you can use the v-on directive to listen to DOM events and run a piece of code when they are triggered. The v-on directive has a shorthand value as well, which is the symbol "@".
For example, you can listen to a click event on a button as follows:
<button @click="doSomething()">Do something</button>
When someone clicks the button, Vue triggers the method you specify - doSomething in this case. Of course, you can replace the method with code directly. For instance, you could increment a variable - @click="sum = sum + 100".
Coming back to the course example:
const app = Vue.createApp({
    data() {
        return {
            course: 'Intro to Vue with Vue 3',
            description: 'This is an introductory course to Vue fundamentals!',
            price: '$19.99',
            available: true,
            tags: [
                { id: 1, name: 'Vue' },
                { id: 2, name: 'Front-end' },
                { id: 3, name: 'JavaScript' },
            ]
        }
    },
    methods: {
        purchase() {
            console.log('Course purchased!');
        }
    }
})

app.mount('#app');
You can see that now you have a methods field on the Vue instance. This field allows you to create methods and use them in your application.
In this case, you have a purchase method that outputs a text to the console each time it's called. Of course, this is a basic example. However, you can create a function that handles the purchase of a course for real!
To "make a purchase", you have to add the following line in the HTML code:
<button @click="purchase">Buy now</button>
The button listens to a click event, and when the button is clicked, it calls the function purchase. The image below illustrates what happens when you click on the button:

Aside note: You can listen to a DOM event and run a piece of code directly. That is, you do not have to write and use a method. Consider the following button:
<button @click="available = !available">Buy now</button>
This button toggles the available field. You change the value from true to false and vice-versa each time you click the button.

Inline code can be helpful for super simple tasks. However, it does not make sense to write a complex function inline.
Attribute binding
const app = Vue.createApp({
    data() {
        return {
            .........
            imgURL: 'https://catalins.tech/img',
            imgDescription: 'An image with a desktop computer',
            .........
        }
    },
    .........
})
I replaced the rest of the code with "........." for readability purposes. The code is the same as earlier, but with the additions of:
- imgURL
- imgDescription
Now, going further, there is another addition to the HTML:
<img :src="imgURL" :alt="imgDescription" width="500" height="350">
As you can see, we use the image URL and description specified in the Vue instance. You can create this reactive bond between the attribute and arguments thanks to the v-bind directive. The v-bind directive allows developers to bind an attribute dynamically to an expression. In layman terms, it enables us to use dynamic values rather than hard-coded values.
Now, you might be confused because there is no v-bind in the code. That's because there is a shorthand for v-bind, which is simply the colon symbol - :.
<img :src="imgURL" :alt="imgDescription" width="500" height="350">
can be re-written using v-bind as follows:
<img v-bind:src="imgURL" v-bind:alt="imgDescription" width="500" height="350">
Thanks to this reactivity system of Vue, you can update the image URL and description in your Vue instance, and the HTML will update too automatically! You can add an "href" attribute in the same vein and get the URL from the Vue instance. As an exercise, give it a go!

If you run the application, you can see the image being displayed! The image link is the same. The only difference is that I used my domain to mask that long URL. If you go to catalins.tech/img, you will see that it's the same image!
Computed properties
Another helpful feature from Vue is the computed properties. With computed properties, you can manipulate data and re-use the result in your Vue application.
Using the same example with the courses, let's say you want to make sure that your images always has a description. You could do that with a computed property, as follows:
const app = Vue.createApp({
    data() {
        return {
            course: 'Intro to Vue with Vue 3',
            description: 'This is an introductory course to Vue fundamentals!',
            price: '$19.99',
            available: true,
            imgURL: 'https://catalins.tech/img',
            imgDescription: 'An image with a desktop computer',
            tags: [
                { id: 1, name: 'Vue' },
                { id: 2, name: 'Front-end' },
                { id: 3, name: 'JavaScript' },
            ]
        }
    },
    computed: {
        hasImageDescription() {
            return this.imgDescription.length > 0 ? this.imgDescription : 'This is an automated image description!'
        }
    }
})
For this example, I removed the methods property from earlier, just in case you wonder where it's gone! Moving further, you can see the new method hasImageDescription.
The new method checks if there is an image description, and it returns it if there is one. Otherwise, it returns a message. To make use of the new computer property, you have to change the image tag from HTML as follows:
<img v-bind:src="imgURL" v-bind:alt="hasImageDescription" width="500" height="350">
Instead of using the property imgDescription, you use the computed property hasImageDescription. As you can see, these properties are powerful and useful!
Be aware: It's very easy to introduce bugs in your application by mutating the existing data in computed properties. You should use these computed properties for the presentation layer and not for changing your existing data.
Methods
Even though you can write and run JavaScript expressions in your templates, it does not mean you should. For expressions such as counter += 1 is fine, but what if you want to write more code? That can quickly go out of hand and create chaos in your templates!
As a result, you can extract your code logic into a separate function and re-use the function everywhere you need the code. Your Vue instance has a methods property where you can add all your methods. Going to the previous section, Handling events, you can see that you already created and used a method - purchase(). In a similar vein, you can create other functions and use them throughout your application.
Thus, I suggest you use methods for complex code logic. On the other hand, it's fine to use very basic expressions instead of creating a method.
Methods versus Computed properties
Before finishing off, let me answer a question you might have - when to use a method and when to use a computed property?
As a rule of thumb, it's better to use methods when you want to mutate existing data. On the other hand, it's better to use computed properties for the presentation layer.
Components and props
A Vue application is split into Components, which are individual pieces of the applications. For instance, you might have the following components in an application:
- Header
- Navigation
- ContentCard
- Footer
And many more. Additionally, a component might have other components nested inside. We can think of them as "parents" and "children". In other words, the components are the pillars of an application.
To create a Vue component, go into the root folder of the project and perform the following commands:
mkdir components
touch components/CourseCard.vue
These two commands create a components folder and a CourseCard component. Alternatively, you can do the same thing outside the terminal.
Create the component
The next step is to create the component, which you can do by calling the component method on the app Vue instance:
app.component('coursedisplay', {
// add the component configuration
})
The first argument is the component name, which in this case is coursedisplay. The second argument is an object with configuration details.
Now, simply copy everything from the app.js file and add it to the configuration object. Your new component should look as follows:
app.component('coursedisplay', {
    data() {
        return {
            course: 'Intro to Vue with Vue 3',
            description: 'This is an introductory course to Vue fundamentals!',
            price: '$19.99',
            available: true,
            imgURL: 'https://catalins.tech/img',
            imgDescription: 'An image with a desktop computer',
            tags: [
                { id: 1, name: 'Vue' },
                { id: 2, name: 'Front-end' },
                { id: 3, name: 'JavaScript' },
            ]
        }
    },
    computed: {
        hasImageDescription() {
            return this.imgDescription.length > 0 ? this.imgDescription : 'This is an automated image description!'
        }
    },
    template:
    /*html*/
    `
        <img v-bind:src="imgURL" v-bind:alt="hasImageDescription" width="500" height="350">
        <h1>{{ course }}</h1>
        <p>{{ description }}</p>
        <p>{{ price }}</p>
        <button @click="available = !available">Buy now</button>
        <ul>
            <li v-for="tag in tags" :key="tag.id">
                {{ tag.name }}
            </li>
        </ul>
        <p v-if="available">You can buy the course!</p>
        <p v-else>The course is not available to buy!</p>
    `
})
Now the course details are encapsulated in a component rather than sitting in the main app file. However, for the application to work again, you need to make some other modifications. Go to the main.app file and modify it as follows:
const app = Vue.createApp({
    data() {
        return {
            allCourses: 0
        }
    }
})
Also, go to index.html and modify the body as follows:
    <div id="app">
        <coursedisplay></coursedisplay>
    </div>

    <script src="./app.js"></script>
    <script src="./components/CourseCard.js"></script>

    <script>
        const mountedApp = app.mount('#app');
    </script>
What happens here?
- First of all, you imported the component in this line:
<script src="./components/CourseCard.js"></script>
- Secondly, you made use of it with this line:
<coursedisplay></coursedisplay>
- Thirdly, you mount the app in the HTML file now, rather than "main.js":
const mountedApp = app.mount('#app');
If there were too many changes and it does not make sense anymore, check the vue3-intro repository. You can see how the code is organised better.
Moving forward, well done! You created and used your first Vue component. To recap:
- You created a Vue component - "components/CourseCard"
- Imported it in the HTML file
- Used it
Props
Props is the shorter name for properties, and it allows components to communicate between them. Each component has a specific use, but sometimes it needs to access data outside its scope.
Let's modify the existing application to accept a property called paid. The purpose of this prop is to indicate whether the course is paid or free. You can do it as follows:
props: {
    paid: {
        type: Boolean
    }
},
Whenever you create a component, you can specify the props it accepts. Moreover, you can specify the type of the prop and whether it's required or not. In this example, the prop is not required, but you can make it required by adding a single line after the type - required: true.
Usually, frameworks like Vue has built-in validation. That is, it makes sure that the prop passed has the correct type.
You can see the complete Component code on GitHub - CourseCard.
Before going further, you need to go into the app.js file and return the paid property. See the code below:
const app = Vue.createApp({
    data() {
        return {
            allCourses: 1,
            paid: true
        }
    }
})
By default, all the courses are paid. However, you can set them all to be "free" by default and only set the premium courses to be "paid".
Moving further, add the following method in the computed property of the CourseCard component:
premium() {
    return this.paid
 }
You can see the complete Component code on GitHub - CourseCard. This method - premium - allows you to check if a course is paid or not and render the data in the template accordingly.
<coursedisplay :paid="paid"></coursedisplay>
Now you need to go into the index.html file and add the above line of code. It's similar to what you had before, with one exception. In this line, you pass the paid prop so you can use it in your component.
See the full code from index.html on GitHub.
The last step is to make use of the prop and render the data based on it. The below code snippet is from the "Course" component's template.
<div v-if="premium">
      <p v-if="available">You can buy the course!</p>
      <p v-else>The course is not available to buy!</p>
     <p>{{ price }}</p>
    <button @click="available = !available">Buy now</button>
</div>
If the paid prop is set to true (if the course is paid), it renders additional information that allows the users to buy the course. On the other hand, if the course is free, the information is "hidden".
Thus, in this example, you can see the simplest way of using a prop.
Conclusion
By now, you should be able to build simple Vue JS applications. All the code from the tutorial is available in the vue3-intro repository.
If you want to give Vue a go without installing it, check how to use Vue without installing it.

Top comments (0)