In this article you’ll learn how to use a custom language switcher with Transposh to build a multi-language website with WordPress.
When it comes to build a multi-language website, WordPress offers a lot of different plugins: WPML, Polyglot and so on.
All these plugins have a free version with relevant limitations: if you want a fully functional plugin you must buy the Premium version.
But this is not true for Transposh: Transposh is totally free, forever, without any limitation (in number of languages, number of websites or anything else). And it works great:
- install Transposh and activate it
- set your default language in Worpdress Settings->General section
- choose the languages you want to use in Transposh->Languages
- In Transposh->Settings set who can edit translations (tipically they will be Administrators and Editors)
- Enable url rewriting
- Set WordPress Settings->Permalink to Post name (/%postname%/)
- that’s all. Your text will be automatically translated in the selected language
In addition, Transposh let you fix any translation error in a quick and easy way! So I’ll show you How to use a custom language switcher with Transposh to build a multi-language website with WordPress.
But… Always there is a “but”  First, to use the full widget you must upgrade to fully version: no problem, is free. Go to Transposh section of the dashboard and choose Settings, then check the “Allow upgrading to full version from http://transposh.org, which has no limit on languages used and includes a full set of widgets” checkbox and click Save changes button. After some time you’ll be notified there is an update available for Transposh: update and you are ok.

Once Transposh has been updated to the full version, you finally get the widget and… As usually, it happens that the widget probably doesn’t integrate in your website design, requiring a lot of work to add custom CSS, trying to style it in a coherent way with the rest of your styles. And last but not least, English language is represented by the United States flag! Don’t know why, after all english is english and it was born in UK. So, what to do? Well, we’re going to build our custom language switcher.
What exactly we need?

Let’s see how Transposh works. When you click on the flag of a non-default language, Transposh reloads the page and changes its own aspect. As you can see, a checkbox appears immediately under the flags: checking it will reloads the page in Edit mode. Depending on Transposh settings (leave them to default if you don’t have any specific issue with this), every text in the page will have a small yellow button appended: clicking on that button will show a popup to edit the translation or just approve them (approved translations will have a green button instead of a yellow one)
So, summarizing, first we have to provide our user an easy and possibly beautiful way to switch between languages; secondly, we have to provide to administrators and editors a quick way to put the website in edit mode to fix translations’ errors. To do this will follow these steps:
- we’ll set some WordPress setting
- we’ll upload to our WordPress installation the flags’ images we need
- we’ll install a couple of plugins
- we’ll write a bit of code
Custom language switcher step by step
Step 1: WordPress settings
First, as I said before, go to Settings->Permalink and set it to Post name (%postname%).
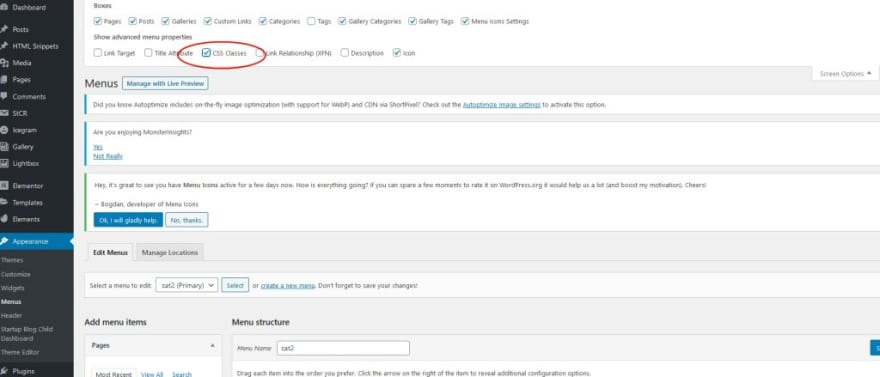
Then, go o Appearance->Menus, open Screen options clicking on the top-right tab and check the CSS Classes checkbox as shown in the image below.
Step 2: the flags
First we need to get our flag icons. Just google a bit and you’ll find a lot of free flag icons sets: choose your favorite one download it and upload the flags to your website using the Media section of WordPress dashboard. In thus article I’ll use three flags, english, spanish (because I live in Spain) and italian (because I’m from Italy), but obviously feel free to use the flags you really need to use.
Step 3: some plugins
In order to use our flags we’re going to use a couple of useful plugins (even these ones are totally free).
Plugin 1: Menu Icon by ThemeIsle
This small adorable plugin (https://wordpress.org/plugins/menu-icons/) allows you yo set any icon or image you want to associate it to a menu item. The plugin allows to choose if the menu item text must be visible or hidden, so we can add to our menu the 2 flags quickly and easily.
That’s all for now.
Plugin 2: If Menu
Now we have to add another menu item to switch on or off the option to edit the translation if we are not to happy with it. This function works out of the box with Transposh widget but since we’re not using it we’ll have to implement it manually.
Technically, the If Menu plugin is not strictly necessary: I use it because I don’t want visitors can change the website text as they want and I suppose that the majority of you will do the same. If Menu plugin just do this: it allows to add a conditional logic so you can show or hide single menu items depending on the user’s role.
Step 4: building the menu
Okay, now we’re ready to build our menu. Go to Appearance->Menus.
Settings for Menu Icon
When you are in Menus section, you’ll see a new element in Add menu items left side bar: Menu Icon Settings. Open it, uncheck the pre-selected option Dashicons (we don’t need it) and check the Images option like in the image to the left.

Then switch to the Current Menu tab and set Hide Label to Yes. Finally, just Save Settings!

Once we have completed these preliminary tasks, we can start to add menu items to our menu.
Adding the language switcher’s menu items
We’ll add 3 menu items with the flags to allow users to switch between our three supported languages. Then we’ll add a fourth item to enable/disable translation editing (for this menu item we’ll use the conditional logic offered by If Menu plugin. For each menu item we’ll use Custom links.
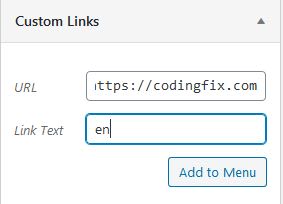
The image below shows you how to set the menu item for your default language (in our case it will be english). Choose Custom links as Menu item type, type the base url of your website as URL and ‘en’ (without quotes) as Link text.
Yes, it’s true! I’m implementing multilanguage feature for this blog writing this article: thrilling, isn’t it?
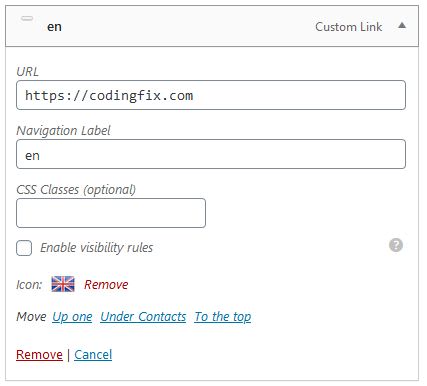
Okay, now the menu item should look like this:

Do you see? There is a row which says Icon: Select. Click on Select to upload your flag (or to select it from you Media library if you had already uploaded it).
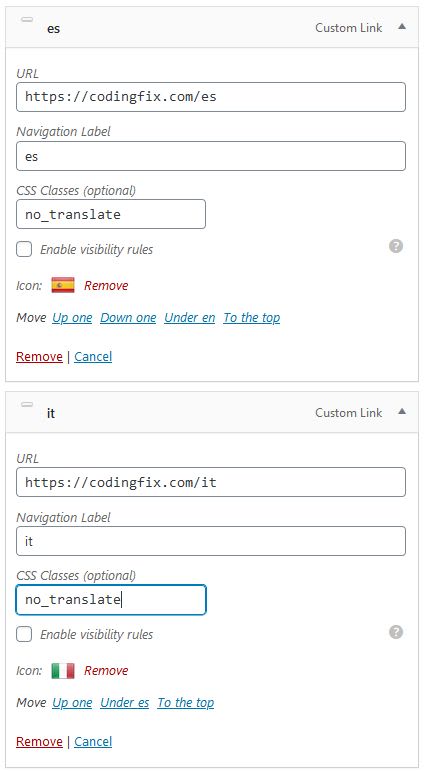
Now, in the input box CSS Classes (optional) type ‘no_translate’ (again, without quotes).

Do the same for each language you want to use. The only thing you have to change is the URL in your Custom link: add ‘/it’ for italian, ‘/es’ for spanish and so on…
Save you menu and take a look at your website: it is already a multi-language website!!!
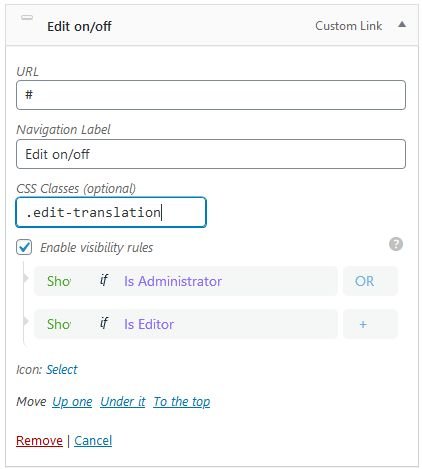
Creating the “Edit mode” menu item
But automatic translations are often poor, so we need a way to change and correct them. To do this, we’ll add a new Custom link to our menu: I called it Edit on/off. We won’t put anything in URL field and we’ll have to check the ‘ Enable visibility rules ‘ checkbox to make this item visible only to Administrators and to Editors. In addition, we have to add the class ‘.edit-translation’ which we’ll use to handle the click event and enable the edit mode.
Notice: this menu item will appear only when you browse the website in a secondary language: Transposh is smart enough to know that there is no translation to fix for the default language!
But this item has no URL, so it won’t do anything… To make it works we have to write a bit of javascript.
Step 5: a bit of coding
So we have our main menu with 3 flags (that already work fine: just give it a try) and the Edit on/off item to enable the manual editing of the translated text; this last menu item will be visible only if the user will be logged as Administrator or Editor.
But in order to make this menu item work correctly we need to add some javascript. Run your editor code of choice and create a new file; then write in this code:
    var urlParam = function (name) {
        var results = new RegExp('[\?&]' + name + '=([^&#]*)').exec(window.location.search);
        return (results !== null) ? results[1] || 0 : false;
    }

    jQuery(document).on('click', '.edit-translation', function (e) {
        e.preventDefault();
        var currentOrigin = window.location.origin;
        var currentPath = window.location.pathname;
        var param = urlParam('tpedit');
        var newUrl = ''; if (param === false) {
            newUrl = currentOrigin + currentPath + '?tpedit=1';
            jQuery(this).attr('href', newUrl);
        } else {
            newUrl = currentOrigin + currentPath;
            jQuery(this).attr('href', newUrl);
        }
        window.location.href = newUrl;
    })
Quick explanation: when the user clicks on our menu item ‘Edit on/off’, first we prevent the default event, that is reload the current page. Then the code uses window.location.origin and window.location.pathname to get current base url and current path.
For instance, if we are in https://codingfix.com/how-to-use-custom-flags-languages-switcher-with-transposh/ currentOrigin will be https://codingfix.com whereas currentPath will be how-to-use-custom-flags-languages-switcher-with-transposh/. But if we were in https://codingfix.com/es/how-to-use-custom-flags-languages-switcher-with-transposh/, currentPath would be es/how-to-use-custom-flags-languages-switcher-with-transposh/.
Once we have the components of the current url we check if the string ‘tpedit’ is present in the url as a parameter. This parameter is used by Transposh to enable edit mode for translations: when you use the widget and check the Edit translation checkbox the page is reloaded with the param ‘tpedit=1’ appended to the url. So we have to check if we are in edit mode: if we are, we create a new url using only currentOrigin and currentPath and we redirect the browser to this url (that is we reload the page removing the param ‘tpedit’); otherwise we build the new url appending the param ‘tpedit=1’ and reload the page in edit mode.
Now save the file with the name you prefer: I’ll use the name ‘myscript.js’ because I’ve no time to waste thinking to a nicer name
Now we have to upload this file into our theme folder, preferably in a subfolder called ‘js’. By the way, I strongly recommend you to use a child theme because any change you do to the theme files will be lost when the theme will be updated (if you don’t know what is a child theme you can read this: https://www.wpbeginner.com/beginners-guide/wordpress-child-theme-pros-cons/ To easily create a child theme from your current theme you can use the plugin Child Theme Configurator).
Step 6: loading our script
Now we have to modify the file functions.php in order to load our script. The code to be used is slightly different depending on wheter you use a child theme or not.
If you are using a child theme (recommended) you have to add to you functions.php the following code:
function load_custom_javascript() {
    wp_enqueue_script( 'myscript', //script name
        get_stylesheet_directory_uri() . '/js/myscript.js', //complete path to the file
        array('jquery'), //array of dependencies
        '', //version number
        true //put script in footer
    );
}
add_action( 'wp_enqueue_scripts', 'load_custom_javascript' );
If you love to live dangerously and you’re not using a child theme, just replace get_stylesheet_directory_uri() with get_template_directory_uri().
One step more…
Currently, when the user clicks on a flag to change the language, our code will load the home page in the selected language. What about if we want to reload the current page allowing our visitor to continue browsing without interruption?
To achieve this we have to make some changes to both our menu and javascript code.
a) The menu
In the Wordpress dashboard go to Appearence→Menus and expand the menu item we use for the default language. First, replace the URL with the hashtag symbol #: we’ll write some javascript code to set the new url the user will be brought to. Then we have to add a couple of classes to manage the click() event; in the CSS class box, where we had added the no_translate class, add these 2 classes: flag and flag_en. Actually, we could skip avoiding the latter for the default language, but… Okay, I love the symmetry, so I add that class to the default language item too 🙂
Do the same for any other language switcher item you have in your menu. In our example they were Spanish and Italian: to the former add the classes flag and flag_es, for the latter add the classes flag and flag_it.
Don’t forget to replace each URL with the hashtag symbol.
With the menu we have done. Let’s going on!
b) The javascript
Now we have to add an event handler to our script in order to manage the click() event on our language switchers.
Here there is the fully commented code you have to add to your script:
      jQuery(document).on('click', '.flag', function (e) {
        //first we prevent the default click event
        e.preventDefault();
        //next we declare the variable selectedLang and we give it a value accordingly to its CSS class
        var selectedLang = '';
        if (jQuery(this).hasClass('flag_es')) {
          selectedLang = 'es';
        } else if (jQuery(this).hasClass('flag_it')) {
          selectedLang= 'it'
        }
        // the variable newUrl will hold the url the user will be redirected to
        var newUrl = '';
        //in the supportedLang we put supported languages except the default language: this because for the default language no prefix is added to the URL by Transposh. We also add a final slash but don't worry: I'll explain why soon :)
        var supportedLang = ['es/', 'it/'];
        //in currentUrl variable will put the full url of the current page (e.g. https://mydomain.com/it/how-to-cook-fried-eggs)
        var currentUrl = window.location.href;
        //window.location.origin give us the base url, in our example htpps://mydomain.com
        var currentOrigin = window.location.origin;
        //window.location.pathname gives us the rest of the currentUrl, i.e. /it/how-to-cook-fried-eggs
        var currentPath = window.location.pathname;
        //the second and the third character of the currentPath will but we want event the fourth to be sure it be a slash. Why? Okay, suppose we are in our default language and we are reading an article called "estimation-of-non-liear-equation-system". The currentUrl would be https://mydomain.com/estimation-of-non-liear-equation-system and the currentPath would be /estimation-of-non-liear-equation-system; so, if we used only the second and the third character to get current language we'd get 'es' while we are in the English section of the website! So we take even the fourth character and then we'll use this value to see if it is in the supported languages array
        var currentLang = currentPath.substring(1, 4);
        //then we want to save in a variable the current page without any language prefix
        var currentPage = jQuery.inArray(currentLang, supportedLang) != -1 ? currentPath.substring(3, currentPath.length) : currentPath;
        //finally we can build the url the user will be redirected to checking currentLang and selectedLang values; this code is quite self-explanatory
        if (jQuery.inArray(currentLang, supportedLang) !== -1 && jQuery.inArray(selectedLang +'/', supportedLang) !== -1){
            newUrl = currentOrigin + '/' + selectedLang + currentPage;
        } else if (jQuery.inArray(currentLang, supportedLang) !== -1 && jQuery.inArray(selectedLang +'/', supportedLang) === -1) {
          newUrl = currentOrigin + currentPage;
        } else if (jQuery.inArray(currentLang, supportedLang) === -1 && jQuery.inArray(selectedLang +'/', supportedLang) !== -1) {
          newUrl = currentOrigin + '/' + selectedLang + currentPage;
        } else if (jQuery.inArray(currentLang, supportedLang) === -1 && jQuery.inArray(selectedLang +'/', supportedLang) === -1) {
          newUrl = currentUrl;
        }
        window.location.href = newUrl;
      });
This way, when the user will click to a flag to change the website language, current page will be reloaded in the selected language instead of redirect the user to the home page.
Finally we’ve got it!
Okay, that’s all folks! Now you can start to fix automatic translations. Me too, I fear…
The post How to use a custom language switcher with Transposh appeared first on codingfix.

Top comments (6)
Hey there. Thanks for the great tutorial on adding transposh languages to the menu. I'm so glad to have found a comprehensive resource that details how to do this with maximum ease. I was wondering if, in your implementation, the language buttons in the menu reload the home page in the selected language or whether they reload the current page in the selected language? For example, if the user is on example.com/after-hello and clicks on the ES language button in the menu, will the browser load example.com/es/after-hello or will it load example.com/es/ ?
Thanks and have a great day.
Hi ceciljchen, thank you for your kind words. I'm so glad you have found this article useful!
About your question, the buttons reload the home page in the selected language. To reload the current page, we should remove the link in the menu and add additional javascript code to our small script in order to build the correct url. Probably you can easily do it by yourself without waiting for my update to the article. :)
As I had promised I have updated the article adding what you need to do to reload current page with the new language.
Hope this help :)
Hi again. I really appreciate your follow-up and update, because as you guessed I had indeed attempted it. But it was inelegant and buggy so I continued my search after a while and actually came across the updated post on your website. I just want you to know that I have since implemented your script in my site and it has worked flawlessly. Thanks so much for for taking the time to provide all the information and help.
Glad to help you 😀
Hey there. Just to tell you I have published a WordPress plugin which avoids all that work :)
It's name is.... Language Switcher for Transposh and it is available in the official WordPress plugins repo.
Here I wrote a small post to announce it.
Hope ut helps you!