


🚀 Deploying a Scalable Web Application on AWS
In this article, we'll walk through the complete setup and deployment of a scalable, production-ready web application on AWS. We'll cover everything from architecture, networking, EC2, database, load balancers, and auto-scaling. By the end, you'll have a fully functional, auto-scaled web application deployed on AWS.
🟣 PART 1 — Architecture & Initial Setup
✅ Architecture Overview
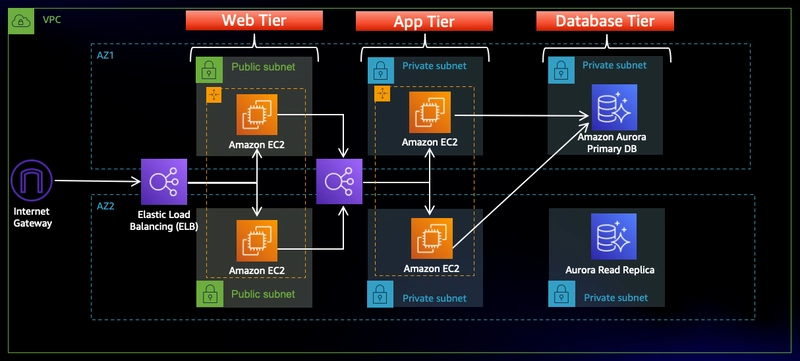
✅ 1. Download Code from GitHub
Clone the GitHub repository containing the application code.

✅ 2. Create an S3 Bucket
Navigate to S3 Service > Create Bucket.

✅ 3. IAM Role for EC2-S3 Communication
Go to IAM > Roles > Create Role.
Select EC2 and attach the following policies:
AmazonSSMManagedInstanceCoreAmazonS3ReadOnlyAccess

🟣 PART 2 — Networking & Security
✅ 1. VPC Creation
Go to VPC Dashboard > Your VPCs > Create VPC.

✅ 2. Subnet Creation
Create 6 subnets across two Availability Zones for high availability.

✅ 3. Internet Gateway
Create and attach an Internet Gateway to the VPC for public subnet internet access.

✅ 4. NAT Gateway
Create NAT Gateways in your public subnets for private subnets to access the internet.

✅ 5. Routing Configuration
Set up route tables and associate subnets properly.

✅ 6. Security Groups
Define security groups for EC2 and Load Balancers to control traffic.

🟣 PART 3 — Database Deployment
✅ 1. Subnet Group for RDS
Create an RDS Subnet Group using private subnets.

✅ 2. Database Creation
Create your RDS database instance.

🟣 PART 4 — Application Deployment
✅ 1. Launch App Instance
Launch an EC2 instance for your App Tier.

✅ 2. Connect to Instance
Use Session Manager to connect to your instance securely.

✅ 3. Configure Database Connection
Configure database credentials for the application.

✅ 4. Configure App Instance
Update your app-tier to use correct database and S3 details.

Upload your app-tier code to S3.

✅ 5. Test App
Ensure the app-tier is working correctly.

🟣 PART 5 — Internal Load Balancer & Auto Scaling
✅ 1. App Tier AMI
Create an AMI from your configured App Instance.

✅ 2. Create Target Group

✅ 3. Internal Load Balancer
Deploy an internal Load Balancer.

✅ 4. Launch Template
Create a Launch Template with the AMI.

✅ 5. Auto Scaling Group
Set up Auto Scaling for your App Tier.

🟣 PART 6 — Web Instance Deployment
✅ 1. Update Config File
In the nginx.conf, replace [INTERNAL-LOADBALANCER-DNS] with your internal load balancer DNS.

✅ 2. Launch Web Instance

✅ 3. Connect to Instance

✅ 4. Configure Web Instance
Install necessary packages and configure the web-tier.

🟣 PART 7 — External Load Balancer & Auto Scaling
✅ 1. Web Tier AMI
Create an AMI from your web instance.

✅ 2. Target Group

✅ 3. Internet-Facing Load Balancer
Deploy an Internet-Facing Load Balancer.

✅ 4. Launch Template

✅ 5. Auto Scaling Group
Configure Auto Scaling for the Web Tier.

✅ 🎉 Final Result
Congratulations! Your highly available, auto-scaled, and load-balanced Web Application is ready 🚀

💡 Feel free to drop your questions or suggestions in the comments. Happy Deploying! 🌐


Top comments (0)