PS: This is my first ever post on Dev, I appreciate your feedback and comments. Follow me on twitter @hozefam
Requirments
- Github account (Free)
- Travis account (Free)
- AWS account (Free but credit card required)
- Node is installed on your local computer
- Basic knowledge of React and Docker
What is Continous Integration (CI)? Why Travis CI?
Continuous Integration is the practice of merging in small code changes frequently - rather than merging in a large change at the end of a development cycle. The goal is to build healthier software by developing and testing in smaller increments. This is where Travis CI comes in.
As a continuous integration platform, Travis CI supports your development process by automatically building and testing code changes, providing immediate feedback on the success of the change.
Travis CI can also automate other parts of your development process by managing deployments and notifications.
Create React App
Create a simple React app using the npm package - Create-react-app
npx create-react-app docker-react-app
cd docker-react-app
Once this is done, you can open the folder docker-react-app in any code editor (like VSCode)
The following folder structure will be created

Dockerize It
We will create a Docker image of the App and will create 2 files:
- Dockerfile.dev will contain instructions to build the image and will be used to run tests.
- Dockerfile will contain instructions to build the image and run the optimized version of the application.
What is a Dockerfile?
A Dockerfile is a text document that contains all the commands a user could call on the command line to assemble an image.
Dockerfile.dev
FROM node:alpine
WORKDIR /app
COPY package.json .
RUN npm install
COPY . .
CMD ["npm", "start"]
Dockerfile
FROM node:alpine
WORKDIR /app
COPY package.json .
RUN npm install
COPY . .
RUN ["npm","run", "build"]

FROM nginx
EXPOSE 80
COPY --from=0 /app/build /usr/share/nginx/html
Checkin all changes to Github Repo
At this stage checkin all the files to github. Here is my link to github repo for the "docker-react-app"
The repo should look something like this

Travis CI
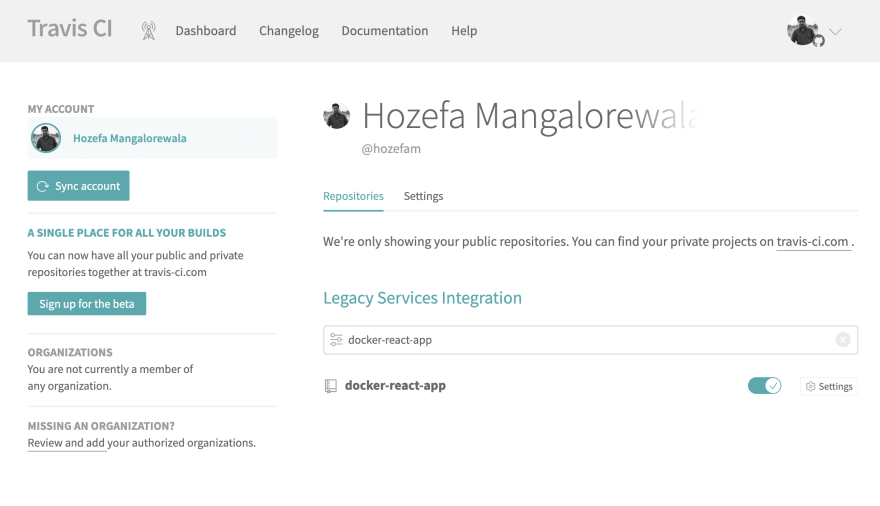
Assuming you have account in Travis CI using your Github account gives Travis CI access to the github repos. Select the "docker-react-app" from the list of repos and switch it on as shown in the snapshot.
Now that Travis CI and Github are hooked up, we need a YML file called .travis.yml to be added in the application as this would contain the instructions you want Travis to perform with the code when the build is triggered.
sudo: required
language: generic
services:
  - docker

before_install:
  - docker build -t hozefam/docker-react-app -f Dockerfile.dev .

script:
  - docker run -e CI=true hozefam/docker-react-app npm run test
AWS - Elasticbeanstalk and S3 bucket
AWS EBS - Elasticbeanstalk
AWS Elastic Beanstalk is an easy-to-use service for deploying and scaling web applications and services developed with Java, .NET, PHP, Node.js, Python, Ruby, Go, and Docker on familiar servers such as Apache, Nginx, Passenger, and IIS.
Navigate to the Elasticbeanstalk service on AWS console
Click on "Create Application", set the application name as "docker-react-app" and Platform as "Docker". Leave the other values as default and click on "Create application"
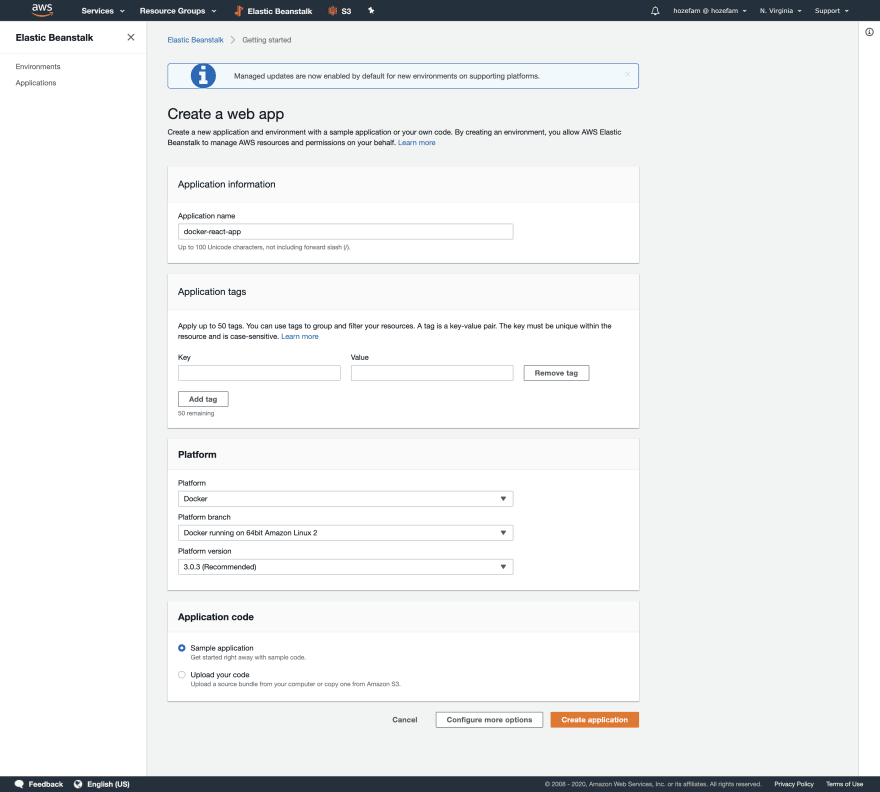
after a small pause (approximately 2-3 minutes) you should be able to see a screen like below

AWS IAM
Create a user travis-docker-react-app with programmatic access. Set permissions using Attach existing polices directly option and select AWSElasticBeanstalkFullAccess.
In the last step you will see the access key id and Secret access key. Please note these values and keep it safe, we will use it in Travis CI settings in next step.
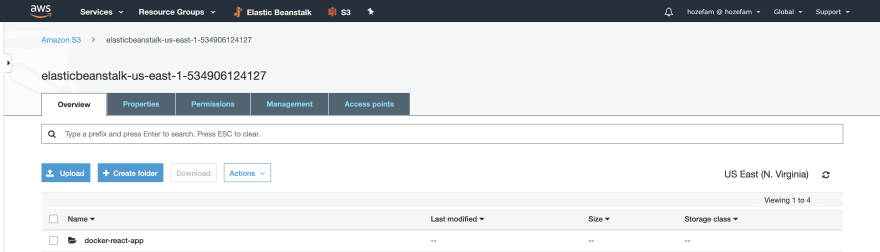
AWS S3 Buckets
Navigate to S3 Service and depending on the region of the EBS create a folder in the appropriate S3 bucket. Name of the folder should be same as the app name docker-react-app in this case.
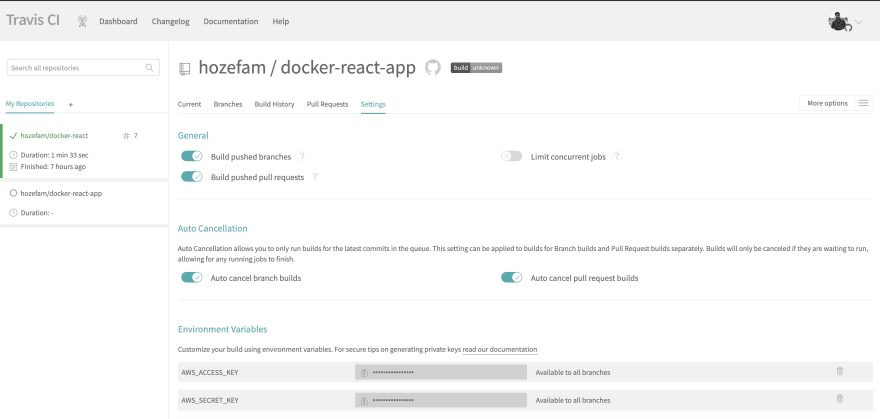
Travis CI (again)
In the Travis CI settings for the docker-react-app add the below environment keys AWS_ACCESS_KEY and AWS_SECRET_KEY with the values we stored from the AWS IAM user travis-docker-react-app
Back to .travis.yml
Add the following step at the end of .travis.yml filee
deploy:
  provider: elasticbeanstalk
  region: us-east-1
  app: docker-react-app
  env: DockerReactApp-env
  bucket_name: elasticbeanstalk-us-east-1-534906124127
  bucket_path: docker-react-app
  on:
    branch: master
  access_key_id: $AWS_ACCESS_KEY
  secret_access_key: $AWS_SECRET_KEY
The complete .travis.yml file should be as
sudo: required
language: generic
services:
  - docker

before_install:
  - docker build -t hozefam/docker-react-app -f Dockerfile.dev .

script:
  - docker run -e CI=true hozefam/docker-react-app npm run test

deploy:
  provider: elasticbeanstalk
  region: us-east-1
  app: docker-react-app
  env: DockerReactApp-env
  bucket_name: elasticbeanstalk-us-east-1-534906124127
  bucket_path: docker-react-app
  on:
    branch: master
  access_key_id: $AWS_ACCESS_KEY
  secret_access_key: $AWS_SECRET_KEY
Now checkin the file to github and ensure Travis CI build kicks off
If all goes good, the react app will be live at the EBS url like this
http://dockerreactapp-env.eba-qy3tgb3f.us-east-1.elasticbeanstalk.com/
Congrats you have successfully created a production grade workflow.
Complete Source code can be found here
References
- Travis Docs - https://docs.travis-ci.com/
- Using docker in builds - https://docs.travis-ci.com/user/docker/
- Create React App - https://reactjs.org/docs/create-a-new-react-app.html

Oldest comments (0)