
Ever want to add presence or location tracking to a project? Frustrated by the solutions (or lack thereof)?
Do not worry, you're not the only one!
In this post you'll learn how to implement a very basic tracking and notification application. We'll be using a Particle Argon and a Tile Mate.
By the end you'll be able to tell when the Tile is present or not. Plus we'll use Pushover to send push notifications to the devices of your choosing.
Let's get going!
Note before we get started, this post is lengthy. You can download the PDF version so you can download it and view it later.
Initial investigation
The idea of using a Tile wasn't obvious at first glance. Ideally, using a phone seemed to make more sense. Unfortunately, this wasn't as a viable option. It would require some more research and the creation of a Bluetooth iOS app.
So, the idea of using a phone was out.
Then I thought, "What devices do advertise all the time?"
That is what led me down the path of a tracker like Tile.
After it arrived there was some customary testing. First stop, the Tile application.

I was able to connect and use the device. I even made it play a catchy tune. 🎶
Then, I moved on to using one of the Bluetooth scanner apps. I scrolled through all the results and Bingo. There was the Tile!

I even waited a few hours and checked it again. I wanted to make sure it didn't go to sleep after a while. Turns out, it's always advertising. As far as I can tell, about every 8 seconds.
All of this testing lead to one conclusion: it could be easily used for presence detection.
The next step in the process was trying to figure out how to get it working with an Argon.
Advertising
As we had gathered in the previous step, we know that the Tile is advertising about every 8 seconds. That means it should be easily scanned for using any device including an Argon, Zenon or Boron.
For this example I suggest you use an Argon. This is because Bluetooth and Mesh share the same radio. When scanning for the Tile, the Xenon connected to Mesh would often miss the advertising packets. This would lead to false negatives (and frustration!).
Along the same lines, you'll want to make sure your Argon is connected to no mesh network. You can remove it using the CLI. Connect your device to your computer and run the following command:
particle mesh remove <device name/ID>
Make sure that you replace with your device's name or ID.
Alright, back to the good stuff.
Advertising can have a few different purposes in Bluetooth. Typically though, it marks the beginning of the pairing phase. That way other devices know that the advertising device is available.
Additionally, the advertising device will indicate what services it has. We can use this knowledge to filter out devices that don't match.
For example, here's a screenshot of the services available on the Tile device:
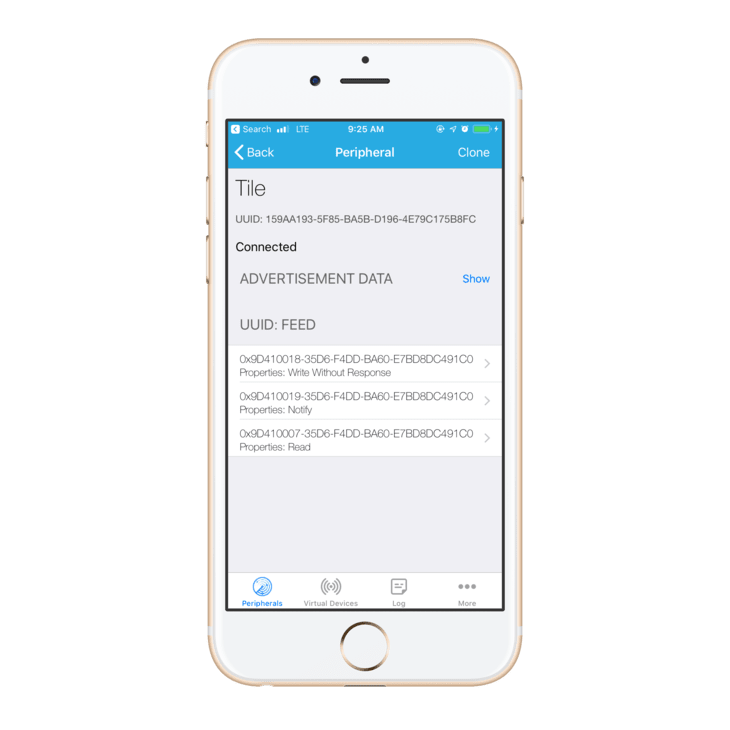
When scanning we'll double check that the device we're connecting to has the service UUID of 0xfeed.
Before we get deep into Bluetooth land though, let's set up our app for debugging using the Logger.
Logging
In this tutorial we'll be using the Logger. It allows you to display log messages from your app using particle serial monitor.
One of the cooler features about the logger is the idea of message hierarchy. This allows you, the designer, to selectively mute messages that may not be necessary.
For example, if you have messages used for debugging. You could remove them or comment them out. Or, you could increase the LOG_LEVEL so they're effectively ignored.
Here are the logging levels which are available in logging.h in Particle's device-os repository:
// Log level. Ensure log_level_name() is updated for newly added levels
typedef enum LogLevel {
    LOG_LEVEL_ALL = 1, // Log all messages
    LOG_LEVEL_TRACE = 1,
    LOG_LEVEL_INFO = 30,
    LOG_LEVEL_WARN = 40,
    LOG_LEVEL_ERROR = 50,
    LOG_LEVEL_PANIC = 60,
    LOG_LEVEL_NONE = 70, // Do not log any messages
    // Compatibility levels
    DEFAULT_LEVEL = 0,
    ALL_LEVEL = LOG_LEVEL_ALL,
    TRACE_LEVEL = LOG_LEVEL_TRACE,
    LOG_LEVEL = LOG_LEVEL_TRACE, // Deprecated
    DEBUG_LEVEL = LOG_LEVEL_TRACE, // Deprecated
    INFO_LEVEL = LOG_LEVEL_INFO,
    WARN_LEVEL = LOG_LEVEL_WARN,
    ERROR_LEVEL = LOG_LEVEL_ERROR,
    PANIC_LEVEL = LOG_LEVEL_PANIC,
    NO_LOG_LEVEL = LOG_LEVEL_NONE
} LogLevel;
Cool, log levels. But how do we use them?
We can use them by invoking one of these functions:
Log.trace, Log.info, Log.warn, Log.error.
For example:
Log.trace("This is a TRACE message.");
If we set the log level to LOG_LEVEL_INFO we'll only see messages from Log.info, Log.warn, and Log.error. LOG_LEVEL_WARN? Only Log.warn and Log.error will show up. (Hopefully you get the idea.)
To set it up, we'll set the default level to LOG_LEVEL_ERROR. We'll also set the app specific LOG_LEVEL to LOG_LEVEL_TRACE. The end result should look something like this
// For logging
SerialLogHandler logHandler(115200, LOG_LEVEL_ERROR, {
    { "app", LOG_LEVEL_TRACE }, // enable all app messages
});
This way we don't get spammed with DeviceOS log messages. Plus, we get all the applicable messages from the app itself.
By the way, if you want to set your device to a single LOG_LEVEL you can set it up like this:
SerialLogHandler logHandler(LOG_LEVEL_INFO);
As you continue your journey using Particle's DeviceOS you'll soon realize how handy it can be. Now, let's move on to the good stuff!
Setting it up

First, we'll want to make sure we're using the correct version of DeviceOS. Any version after 1.3 will have Bluetooth. You can get the instructions here.
Next we'll want to start scanning for the Tile. We'll want do do this in the loop() function at a specified interval. We'll use a millis() timer in this case:
// Scan for devices
if( (millis() > lastSeen + TILE_RE_CHECK_MS) ){
    BLE.scan(scanResultCallback, NULL);
}
Make sure you define lastSeen at the top of the file like so:
system_tick_t lastSeen = 0;
We'll use it to track the last time the Tile has been "seen". i.e. when the last time the Argon saw an advertising packet from the Tile.
TILE_RE_CHECK_MS can be defined as
#define TILE_RE_CHECK_MS 7500
This way we're checking, at the very minimum, every 7.5 seconds for advertising packets.
In order to find the Tile device we'll use BLE.scan. When we call it, It will start the scanning process. As devices are found scanResultCallback will fire.
For now, we can define scanResultCallback at the top of the file:
void scanResultCallback(const BleScanResult *scanResult, void *context) {
}
You notice that it includes a BleScanResult. This will contain the address, RSSI and device name (if available) and available service information. This will come in handy later when we're looking for our Tile device!
Remember, that BLE.scan does not return until scanning has been completed. The default timeout for scanning is 5 seconds. You can change that value using BLE.setScanTimeout(). setScanTimeout takes units in 10ms increments. So, for a 500ms timeout would require a value of 50.
For the case of this app, I'd recommend using a value of 8s (8000ms). You can set it like this:
BLE.setScanTimeout(800);
In this case, the device will scan for as long as it takes the Tile to advertise. That way it's less likely to miss an advertising packet.
Handling Scan Results

Now that we have scanResultCallback lets define what's going on inside.
We first want to get the service information inside the advertising data. The best way is to use scanResult->advertisingData.serviceUUID. We'll pass in an array of UUIDs what will be copied for our use.
BleUuid uuids[4];
int uuidsAvail = scanResult->advertisingData.serviceUUID(uuids,sizeof(uuids)/sizeof(BleUuid));
This will populate uuids that way you can iterate over them. uuidsAvail will equal the amount of available UUIDs.
On our case we're looking for a particular UUID. We'll define it a the top of the file:
#define TILE_UUID 0xfeed
Normally UUIDs are much longer. A short UUID like this means it has been reserved or is part of the Bluetooth specification. In either case we'll be checking for it in the same way we would check a 32bit or 128bit version.
For diagnostic reasons we can also print out the device information. In this case the RSSI and the device MAC address is handy:
// Print out mac info
BleAddress addr = scanResult->address;
Log.trace("MAC: %02X:%02X:%02X:%02X:%02X:%02X", addr[0], addr[1], addr[2], addr[3], addr[4], addr[5]);
Log.trace("RSSI: %dBm", scanResult->rssi);
Finally let's set up a loop to see if the device found has the UUID:
// Loop over all available UUIDs
// For tile devices there should only be one
for(int i = 0; i < uuidsAvail; i++){

    // Print out the UUID we're looking for
    if( uuids[i].shorted() == TILE_UUID ) {
        Log.trace("UUID: %x", uuids[i].shorted());

        // Stop scanning
        BLE.stopScanning();

        return;
    }
}
We can easily compare the "shorted" version of the UUID with TILE_UUID. It's a simple integer so no complicated memory compare operations are necessary. So, using if( uuids[i].shorted() == TILE_UUID ) works just fine.
You can also use Log.trace to print out diagnostic information. In this case we're using it to print out the shorted() version of the UUID.
Test It!
Let's test what we have so far!
Program the app to your Argon. Open the terminal and run particle serial monitor to view the debug messages. Heres an example of what you may see:
0000005825 [app] TRACE: MAC: 65:C7:B3:AF:73:5C
0000005827 [app] TRACE: RSSI: -37Bm
0000005954 [app] TRACE: MAC: B3:D9:F1:F0:5D:7E
0000005955 [app] TRACE: RSSI: -62Bm
0000006069 [app] TRACE: MAC: C5:F0:74:3D:13:77
0000006071 [app] TRACE: RSSI: -62Bm
0000006217 [app] TRACE: MAC: 65:C7:B3:AF:73:5C
0000006219 [app] TRACE: RSSI: -39Bm
0000006224 [app] TRACE: MAC: B3:D9:F1:F0:5D:7E
0000006225 [app] TRACE: RSSI: -62Bm
0000006296 [app] TRACE: MAC: D7:E7:FE:0C:A5:C0
0000006298 [app] TRACE: RSSI: -60Bm
0000006299 [app] TRACE: UUID: feed
Notice how the message includes TRACE and also [app]? That means it's a trace message originating from the application code. Handy right?
This code does get spammy quick, especially if you're in an environment with lots of advertising Bluetooth devices. If you're Tile is on and running eventually you'll see a message UUID: feed. That means your Argon found the Tile!
Next we'll use the onboard Mode button to "program" the Tile's address to memory. That way we can filter out all the devices we don't care about.
Add Device On Button Push

First we need to figure out how to monitor the Mode button. The best bet, according to the documentation is to use System.on.
System.on(button_click, eventHandler);
The first argument is the name of the system event. In our case it's button_click. The second argument is an event handler function. We'll call it eventHandler for now.
Now let's create eventHandler
void eventHandler(system_event_t event, int duration, void* )
{

}
Important: you can't use the Log function inside eventHandler. An easy way to test it is to toggle the LED on D7. Let's set it up!
Initialize the LED in setup()
// Set LED pin
pinMode(D7,OUTPUT);
Then we can add this inside eventHandler
if( event == button_click ) {
    if( digitalRead(D7) ) {
        digitalWrite(D7,LOW);
    } else {
        digitalWrite(D7,HIGH);
    }
}
We can then write to D7 (the onboard blue LED). We can even use digitalRead to read what the state of the LED is. It will respond with HIGH or LOW depending on the situation.
Load the firmware onto the device and we'll have nice control over the blue LED!
In the next section, we'll use the Mode button to put the device into a "learning" mode. This will allow us to do a one touch setup with the target Tile device.
Storing Address to EEPROM

In this next step we'll store the address of the Tile into EEPROM. That way when the device is restarted or loses power we'll still be able to identify the Tile later on.
There is one lingering question though. How do we get it to save the address in the first place?
By monitoring the button press, we can put the device into a "learning" mode. The device will scan for a Tile, and save the address if it finds one.
First let's add a conditional within if( uuids[i].shorted() == TILE_UUID ):
// If we're in learning mode. Save to EEPROM
if( isLearningModeOn() ) {
    searchAddress = scanResult->address;
    EEPROM.put(TILE_EEPROM_ADDRESS, searchAddress);
    setLearningModeOff();
}
We'll use the status of D7 as a way of knowing we're in "learning mode". We do this by reading D7 using digitalRead(D7). Let's create a function that makes this more clear:
bool isLearningModeOn() {
    return (digitalRead(D7) == HIGH);
}
We can also replace the digitalWrite(D7,LOW); and digitalWrite(D7,HIGH); with similar functions. That way it's more straight forward what we're doing.
// Set "Learning mode" on
void setLearningModeOn() {
    digitalWrite(D7,HIGH);
}

// Set "Learning mode" off
void setLearningModeOff() {
    digitalWrite(D7,LOW);
}
Then, we assign a global variable searchAddress as the scan result. We setup searchAddress like this at the top of the file:
BleAddress searchAddress;
Next we want to save it to non-volatile memory using EEPROM.put. TILE_EEPROM_ADDRESS is defined as 0xa. You can define TILE_EEPROM_ADDRESS to use whatever memory address tickles your fancy. Here's the full definition placed at the top of the file.
#define TILE_EEPROM_ADDRESS 0xa
Finally, we turn off the LED and "learning mode" using setLearningModeOff()
Every time a device is found we'll use millis() to set lastSeen. Additionally, we can track the last RSSI using lastRSSI. It's a cheap way to to know approximately how close the device is. We'll use scanResult->rssi to get this information and set it to the lastRSSI variable.
Overall, your changes should look something like this:
...

// Print out the UUID we're looking for
if( uuids[i].shorted() == TILE_UUID ) {
    Log.trace("UUID: %x", uuids[i].shorted());

    // If we're in learning mode. Save to EEprom
    if( isLearningModeOn() ) {
        searchAddress = scanResult->address;
        EEPROM.put(TILE_EEPROM_ADDRESS, searchAddress);
        setLearningModeOff();
    }

    // Save info
    lastSeen = millis();
    lastRSSI = scanResult->rssi;

    // Stop scanning
    BLE.stopScanning();

    return;
}
Before this function, we can filter out devices that don't match our searchAddress. Add the following before if( uuids[i].shorted() == TILE_UUID ):
// If device address doesn't match or we're not in "learning mode"
if( !(searchAddress == scanResult->address) && !isLearningModeOn() ) {
    return;
}
This will skip over devices that don't match. It will only proceed if the address matches or we're in "learning mode".
Now, in order for us to load searchAddress on startup, we'll have to load it from flash. Add this line to your setup():
EEPROM.get(TILE_EEPROM_ADDRESS, searchAddress);
Then, check to make sure the address is valid. It won't be valid if all the bytes are 0xFF:
// Warning about address
if( searchAddress == BleAddress("ff:ff:ff:ff:ff:ff") ) {
    Log.warn("Place this board into learning mode");
    Log.warn("and keep your Tile near by.");
}
We should be able to "teach" our Argon the address of our Tile. Let's test it out!
Test it.
Now if we compile and run the app, notice how there's no more log output? We have to "teach" the Tile address to the Particle Device. So, hit the mode button. The blue LED should turn on.
Once your Tile has been found the LED will turn off and you'll see some output on the command line. Similar to what we've seen before:
0000006296 [app] TRACE: MAC: D7:E7:FE:0C:A5:C0
0000006298 [app] TRACE: RSSI: -60Bm
0000006299 [app] TRACE: UUID: feed
The device has been committed to memory!
You can also check if it's still saved after a reset. Hit the reset button and check for the same output as above. If it's showing up, we're still good!
Update the Cloud

Finally let's set up a function called checkTileStateChanged. We'll use it to check for changes to the state of the Tile on a regular interval.
bool checkTileStateChanged( TilePresenceType *presence ) {

}
The main purpose of this function is to compare the lastSeen variable with the "timeout" duration. In our case, our timeout duration is TILE_NOT_HERE_MS which should be set to
#define TILE_NOT_HERE_MS 30000
near the top of your program. There's also two more conditions to look for. One where lastSeen is equal to 0. This is usually because the app hasn't found the Tile yet after startup.
The last case would be if the device has been seen and lastSeen is not 0. So within checkTileStateChanged let's put everything together.
// Check to see if it's here.
if( millis() > lastSeen+TILE_NOT_HERE_MS ) {

} else if ( lastSeen == 0 ) {

} else {

}

return false;
Now we only want this function to return true if the state has changed. So we'll need to take advantage of the TilePresenceType pointer in the agreement.
TilePresenceType is simply an enumeration of all the possible states. You can stick it at the top of your file as well. Here it is:
typedef enum {
    PresenceUnknown,
    Here,
    NotHere
} TilePresenceType;
You'll also need a global variable that we can pass to the function. Set this at the top of your file as well:
// Default status
TilePresenceType present = PresenceUnknown;
Now, we can compare at each stage. Does it meet the criteria? Is the state different than the last one? If so, return true.
Remember, we'll want to set presence to the new updated value. So each condition should update the presence value. For example:
*presence = NotHere;
Here's what the fully flushed out function looks like:
bool checkTileStateChanged( TilePresenceType *presence ) {

    // Check to see if it's here.
    if( millis() > lastSeen+TILE_NOT_HERE_MS ) {
        if( *presence != NotHere ) {
            *presence = NotHere;
            Log.trace("not here!");
            return true;
        }
    // Case if we've just started up
    } else if ( lastSeen == 0 ) {
        if( *presence != PresenceUnknown ) {
            *presence = PresenceUnknown;
            Log.trace("unknown!");
            return true;
        }
    // Case if lastSeen is < TILE_NOT_HERE_MS
    } else {
        if( *presence != Here ) {
            *presence = Here;
            Log.trace("here!");
            return true;
        }
    }

    return false;
}
We can now use this function in the main loop underneath the timer to start Ble.scan(). We can use it to send a JSON payload. In this case we'll include important information like the Bluetooth Address, lastSeen data, lastRSSI data and a message.
// If we have a change
if( checkTileStateChanged(&present) ) {

}
We'll use an array of char to get our address in a string format. You can chain together toString() with toCharArray to get what we need.
// Get the address string
char address[18];
searchAddress.toString().toCharArray(address,sizeof(address));
An example payload string could look something like this:
// Create payload
status = String::format("{\"address\":\"%s\",\"lastSeen\":%d,\"lastRSSI\":%i,\"status\":\"%s\"}",
    address, lastSeen, lastRSSI, messages[present]);
status is simply a String defined at the top of the file:
// The payload going to the cloud
String status;
You notice that there's also a variable called messages. This is a static const array of strings. They're mapped to the values from the TilePresenceType. Here's what it looks like
const char * messages[] {
    "unknown",
    "here",
    "not here"
};
That way PresenceUnknown matches to "unknown", Here matches to "here", etc. It's a cheap easy way to associate a string with an enum.
Finally we'll publish and process. This allows us to send the update immediately.
// Publish the RSSI and Device Info
Particle.publish("status", status, PRIVATE, WITH_ACK);

// Process the publish event immediately
Particle.process();
The overall function should look something like this in the end:
// If we have a change
if( checkTileStateChanged(&present) ) {

    // Get the address string
    char address[18];
    searchAddress.toString().toCharArray(address,sizeof(address));

    // Create payload
    status = String::format("{\"address\":\"%s\",\"lastSeen\":%d,\"lastRSSI\":%i,\"status\":\"%s\"}",
        address, lastSeen, lastRSSI, messages[present]);

    // Publish the RSSI and Device Info
    Particle.publish("status", status, PRIVATE, WITH_ACK);

    // Process the publish event immediately
    Particle.process();

}
Now, let's test it!
Testing it!

We can test to make sure our Publish events are occurring without event leaving Particle Workbench. Open a new terminal by going to View → Terminal. Then use the following command:
particle subscribe --device <device_name> <event_name>
Replace <device_name> with the name or ID of your device.
Replace <event_name> with the name of the event. In our case it's status.
You can then test it all by removing the battery and waiting for the "not here" alert. Plug the battery back in and you should get a "here" alert.
Here's an example of the output
> particle subscribe --device hamster_turkey status

Subscribing to "status" from hamster_turkey's stream

Listening to: /v1/devices/hamster_turkey/events/status

{"name":"status","data":"{\"address\":\"C0:A5:0C:FE:E7:D7\",\"lastSeen\":40154002,\"lastRSSI\":-82,\"status\":\"not here\"}","ttl":60,"published_at":"2019-09-07T02:29:42.232Z","coreid":"e00fce68d36c42ef433428eb"}

{"name":"status","data":"{\"address\":\"C0:A5:0C:FE:E7:D7\",\"lastSeen\":40193547,\"lastRSSI\":-83,\"status\":\"here\"}","ttl":60,"published_at":"2019-09-07T02:29:50.352Z","coreid":"e00fce68d36c42ef433428eb"}
Configuring Webhook
In the last part of this tutorial we'll set up push notifications using a webhook. As mentioned before, we'll use Pushover and their handy API to send push notification(s) to the device(s) of your choice.
Pushover has a fantastically easy API to use. Their application is a Swiss army knife for situations where you don't want to code an app to send push notifications.
The first thing that you'll have to take note is your user key. You can get that by logging into Pushover. Note: you'll need to set up an account first if you haven't already.
It should look something like this:

If you're logged in and don't see this page, click on the Pushover logo and that should bring you back.
Next we'll want to create an application. Click on the Apps & Plugins at the top of the screen.
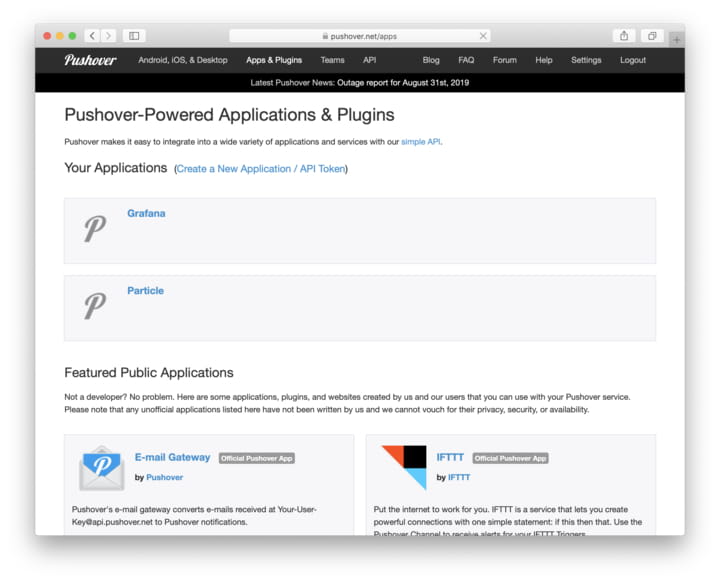
You should then click Create a New Application. This will allow us to get an API Token that will be needed in the Particle Webhook setup.

Set a name as you see fit. Fill in the description if you want a reminder. Click the box and then click Create Application.
You should go to the next page. Copy and save the API Token/Key we'll need this also in a few steps.

Now, let's setup the Webhook. Jump over to https://console.particle.io and create a new integration.

We'll set the Event Name to status.
The URL to https://api.pushover.net/1/messages.json
Also, if you want to filter by a specific device make sure you select it in the Device dropdown.
Under Advanced Settings we'll finish up by setting a few fields.

Create the following fields: token, user, title, and message. Then set token to the API Token we got earlier. Do the same for the User Key.
The title will show up as the title of your message. Make it whatever makes sense for you.
You can set the message as The Tile is currently {{{status}}}. RSSI: {{{lastRSSI}}}.
We are using mustache templates here. They allow you to use the data in the published payload and reformat it to your liking. In our case, we're using them to "fill in the blanks." The message once processed would look something like this:
The Tile is currently here. RSSI: -77
As a side note, i'll be talking more about these templates in my guide. So stay tuned for that!
Test it
Once your integration is in place, you can test doing what we did in the earlier step. Remove the battery, and wait for the "not here" message. Put it back and wait for the "here" message.
Here's what it would look like on an iPhone:
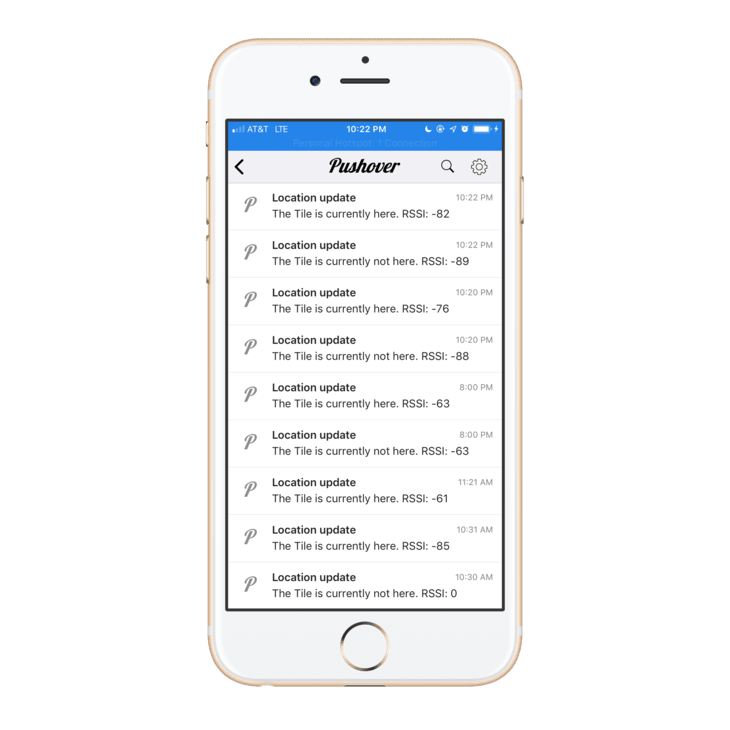
As you can see, I tested it a bunch! 😬
If you've made it this far and everything is working, great work. You now have a Tile tracker for your house, office or wherever.
The Code
Looking for the finished code for this example? I would be too! It's hosted on Github and is available here.
Conclusion
As you can imagine, the techniques and technologies used in this article can be used in many ways. Let's summarize some of the key take aways:
- Using Bluetooth Central to scan for and identify an off-the-shelf Tile device
- Storing the Tile identifying information to EEPROM. That way it can be retrieved on startup.
- Using our familiar
Particle.publishto push updates to the cloud. - Using a Particle Integration Webhook to create push notifications on state change.
Now that you have it all working, expand on it, hack it and make it yours. Oh and don't forget to share! I'd love to hear from you. hello@jaredwolff.com
Like this post? Share it with the world!
Interested in learning more? I'm writing a guide on how to get the most out of the Particle Platform. Learn more about it here.

Latest comments (0)