Ahnee! Static websites have made a comeback. Innovations in content generation, the adoption of Markdown in workflows, deployment technology, and free hosting have made static websites an attractive option for those who don’t need the capabilities of a framework or content management system.
Jekyll is a static site generator that made a big splash in the world of static website generation. And GitHub has become the defacto standard in social coding, with GitHub Pages offered as an attractive option for free static website hosting.
Jekyll is a blog-aware static site generator in Ruby
My experience in static
18 years ago, in my first job as a web developer, we generated and maintained static websites. The shop I worked for built an in-house Perl templating “engine” which recursively crawled a directory looking for files with a custom file extension to parse.
These files contained content in the form of HTML and XML-esque tags which were essentially variables that set the active section in the navigation, helped generate breadcrumbs, figure out which shared content blocks to display in the sidebars, etc… The meat of each file was the content for the page being generated. Using regex, the contents of a master template was then populated with the contents of the parsed files then output into an html file.
The websites were generally 100+ pages and the engine wasn’t great. There was no easy way to generate a single page, or a subset of pages. And it was slow. We would inevitably edit the HTML files directly when doing maintenance work. Site-wide changes ended up being a scary Perl regexp which ran independently of the engine, and our master template would quickly become obsolete.
Today we have much better tooling. Written in Ruby, Jekyll is arguably the most popular static site generator.
Why develop a static website?
Why indeed. I can think of a few pros to creating and maintaining a static website.
- No server side programming required Creating a website usually begins with a framework. The most popular software for creating websites today is Wordpress. Written in PHP, WP began as a blogging platform but has since progressed to a full fledged Content Management System. A WordPress website requires a server which supports PHP, which you can setup yourself or pay a hosting provider like https://wordpress.com/. It’s definitely possible to create a WordPress website without knowing PHP, but to customize your site, you will eventually have to get your hands dirty with a bit of coding.
- Your website will be fast A static web page is written in HTML and is served by a web server such as Apache or Nginx. Because the HTML document does not require any additional processing, it is served directly to the browser with minimal effort on the web servers part. Web servers such as Nginx are optimized for serving static assets, resulting in web pages which load near instantaneously.
- Search engines favor fast web pages Google provides us with guidelines for Search Engine Optimization. In 2012, Google revealed that speed is a factor in rankings.
Tutorial
Enough talk, let’s get down to generating our new site.
Pre-requisites
- Terminal (a command-line) — How to open Terminal on Ubuntu Bionic Beaver 18.04 Linux
- RubyGems — RVM package for Ubuntu
- Git — How To Install Git on Ubuntu 18.04
- A GitHub account — Join GitHub
Installing ‘gem’ and ‘git’ is out of the scope of this tutorial but the links provided above are great for Ubuntu 18.04. Drop me a line or comment below if you need help.
Create and Preview Your Site
To kick off, first you need to open a terminal and install the Jekyll ruby gem:
$ gem install bundler jekyll

Use jekyll to generate your awesome new site:
$ jekyll new my-awesome-site

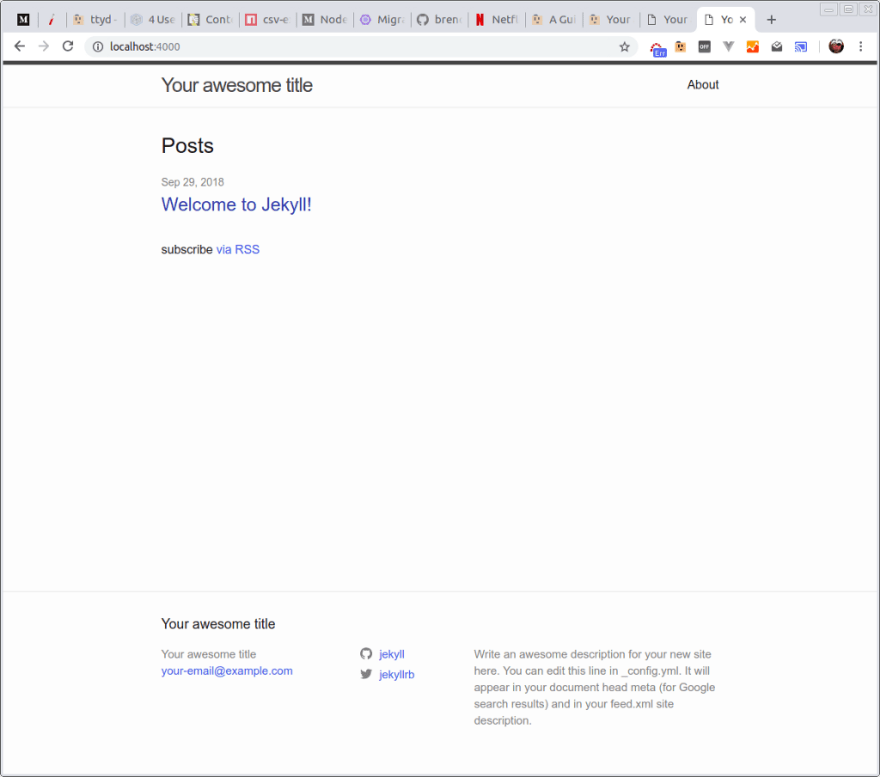
If all went well you can use jekyll to preview your new site:
$ cd my-awesome-site
$ bundle exec jekyll serve

Point your browser to http://localhost:4000.
When you are finished previewing press Ctrl-C to shut down the preview server.
Deploy to GitHub Pages
GitHub Pages is an excellent FREE web hosting service for your GitHub repositories.
Websites for you and your projects.
Hosted directly from your GitHub repository. Just edit, push, and your changes are live.
Create a New Repository
A repository (or repo for short) is a place to manage a project and track changes to project files over time.
Visit https://github.com/new
Under “Repository name” type “my-awesome-site”
Optionally fill in a “Description”:

Leave “Public” selected (“Private” repos are only available with paid GitHub plans), and leave all other options as is.
To continue, click “Create repository”. When your repo is created you will see this screen:

You now have an empty repo and may continue with configuration.
Configure Repository for GitHub Pages
To link your repository to GitHub Pages you must specify which branch will be published.
A git branch is essentially a series of snapshots of your code over time. Branching allows you, or multiple users, to modify code in an isolated work area that doesn’t affect other branches or the project as a whole.
For the purpose of this tutorial we will assign the “master” branch to be published.
From your “my-awesome-site” repository page click the “Settings” tab which brings you to https://github.com/username/my-awesome-site/settings.
Scroll down to “GitHub Pages” where you will see “Source” with a drop-down set to “None”.
Click the drop-down and select “master branch”:

With “master branch” selected, click “Save”.
Once saved scroll back down to see the message “Your site is ready to be published at https://username.github.io/my-awesome-site/.”

Configure your Gemfile
Gemfiles are used by Ruby to set the dependencies required to properly build a Ruby Gem. A Gemfile was automatically generated by Jekyll in the previous steps.
You must update your Gemfile to instruct GitHub to build your gem for deployment to GitHub Pages.
Use whichever editor you are comfortable with but here I’m using “vim”:
$ vim Gemfile
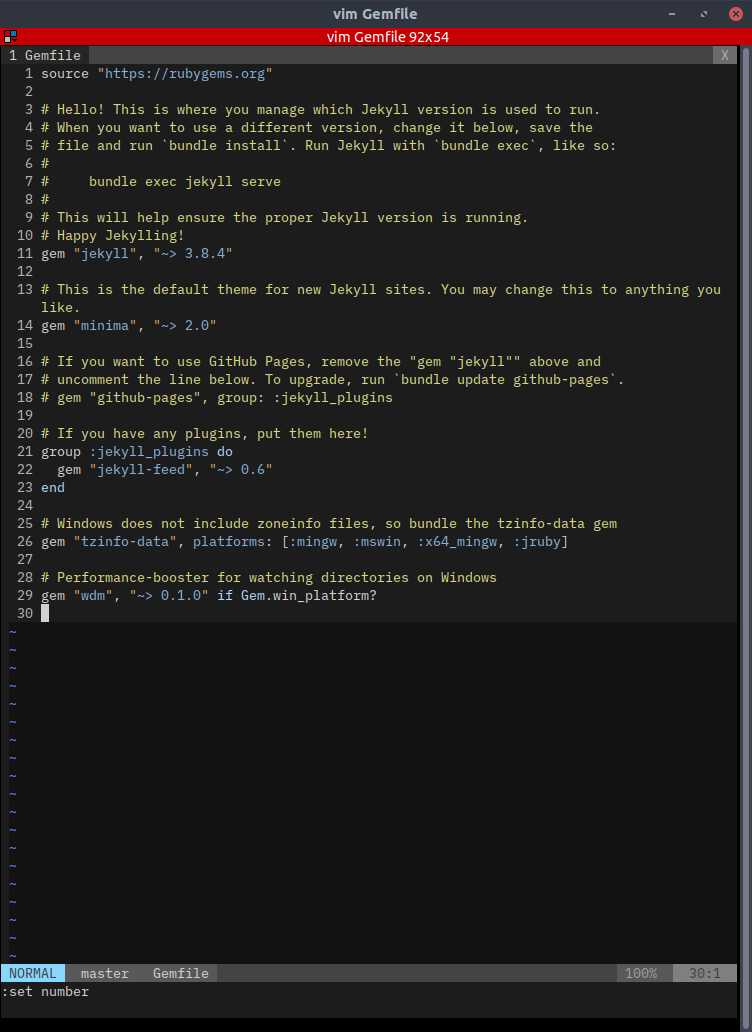
Our changes are straight-forward, simply comment out (append the line with #):
gem “jekyll”, “~> 3.8.4” (line 11 in the above screenshot; 3.8.4 is the version at the time of writing and may have changed by now)
and un-comment:
gem “github-pages”, group: :jekyll_plugins (line 18)
Your Gemfile should now look like the screenshot below. A ‘#’ has been appended to line 11, and the ‘#’ has been removed from the beginning of line 18.

Now Save and close the Gemfile (instructions for vim):
:wq
Update _config.yml
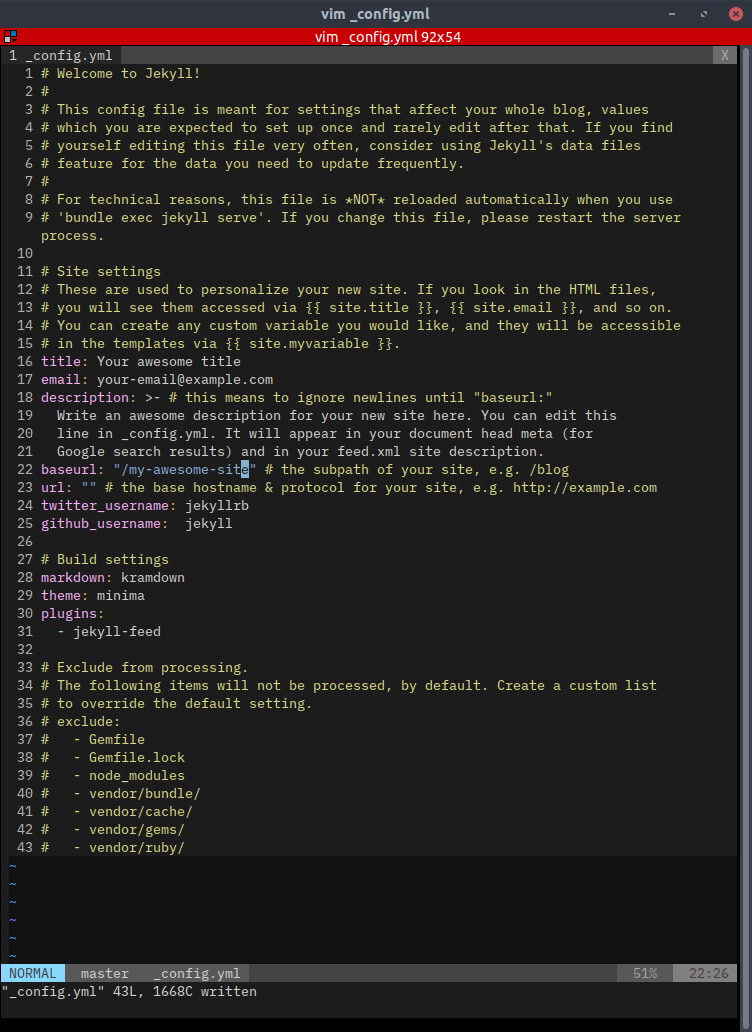
_config.yml contains variables specific to your website. Before you deploy you may want to set the title and description, and possibly your Twitter and GitHub usernames.
You must set the baseurl to ensure URLs are generated correctly, otherwise your assets and page links will not work.
$ vim _config.yml

Make whatever edits you like, but be sure to edit the “baseurl” (line 22) so it reads:
baseurl: “/my-awesome-site” # the subpath of your site, e.g. /blog
Save and close.
:wq
Commit Your Site Files
You have your site files, configured for GitHub Pages, and you have an empty GitHub repository named “my-awesome-site”.
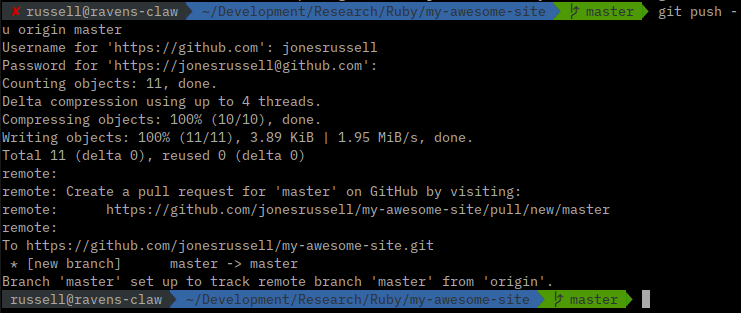
The next step is to “check-in” your files to the repo (replace username with your GitHub username):
$ git init
$ git add .
$ git commit -m “first commit”
$ git remote add origin https://github.com/username/my-awesome-site.git
$ git push -u origin master
Verify your files have been published to GitHub by visiting https://github.com/username/my-awesome-site:

Tada! Visit your site
When you committed your files to the repository, GitHub automagically built a set of HTML files and deployed to GitHub pages.
Verify your blog is deployed by visiting https://username.github.io/my-awesome-site/.

Conclusion
You are now initiated into the world of Jekyll and GitHub Pages. To create a new blog post, add a new file to the “_posts” directory and check it into your repo. Be sure to examine the default post and stick to it’s naming convention and the template it uses within. Once checked in visit your site and your new post should appear in the homepage list.
I hope this post was helpful, drop me a line or comment with any questions, corrections, or just to say Ahnee!
Gabekana!

Oldest comments (0)