One of the main objectives I had when I started building jvega.dev was to make sure it followed all the best practices in the industry. In a previous post, I explained how I aimed to get top-of-the-class security, and now, during the next few posts, I will explain which techniques or design decisions I have taken to make the website as fast as possible.
Before I enter into more details, let me say two things:
- I am sure there is room for improvement. So if you any suggestions or you see any mistakes, please let me know. The code is all public an available in this repository.
- Some of the features I am adding to the site could definitely be considered overkill. But I am using the site to learn and practices things I have learned during the last 10 years. And for self-promotion :).
From the beginning, I have tried to keep the PRPL pattern always in mind and make sure the page remains "fast". However, defining when a website is "fast" is not as easy as it might seem. Traditionally, the performance was measured using only metrics like page load time or DOMContentLoaded but these metrics are not effective for two reasons:
- They are very unreliable as a page might not be fully loaded when those events are triggered.
- And more importantly, these values might not match with the user experience of your visitors.
To explain the second point, let's take a look first to this comparison:

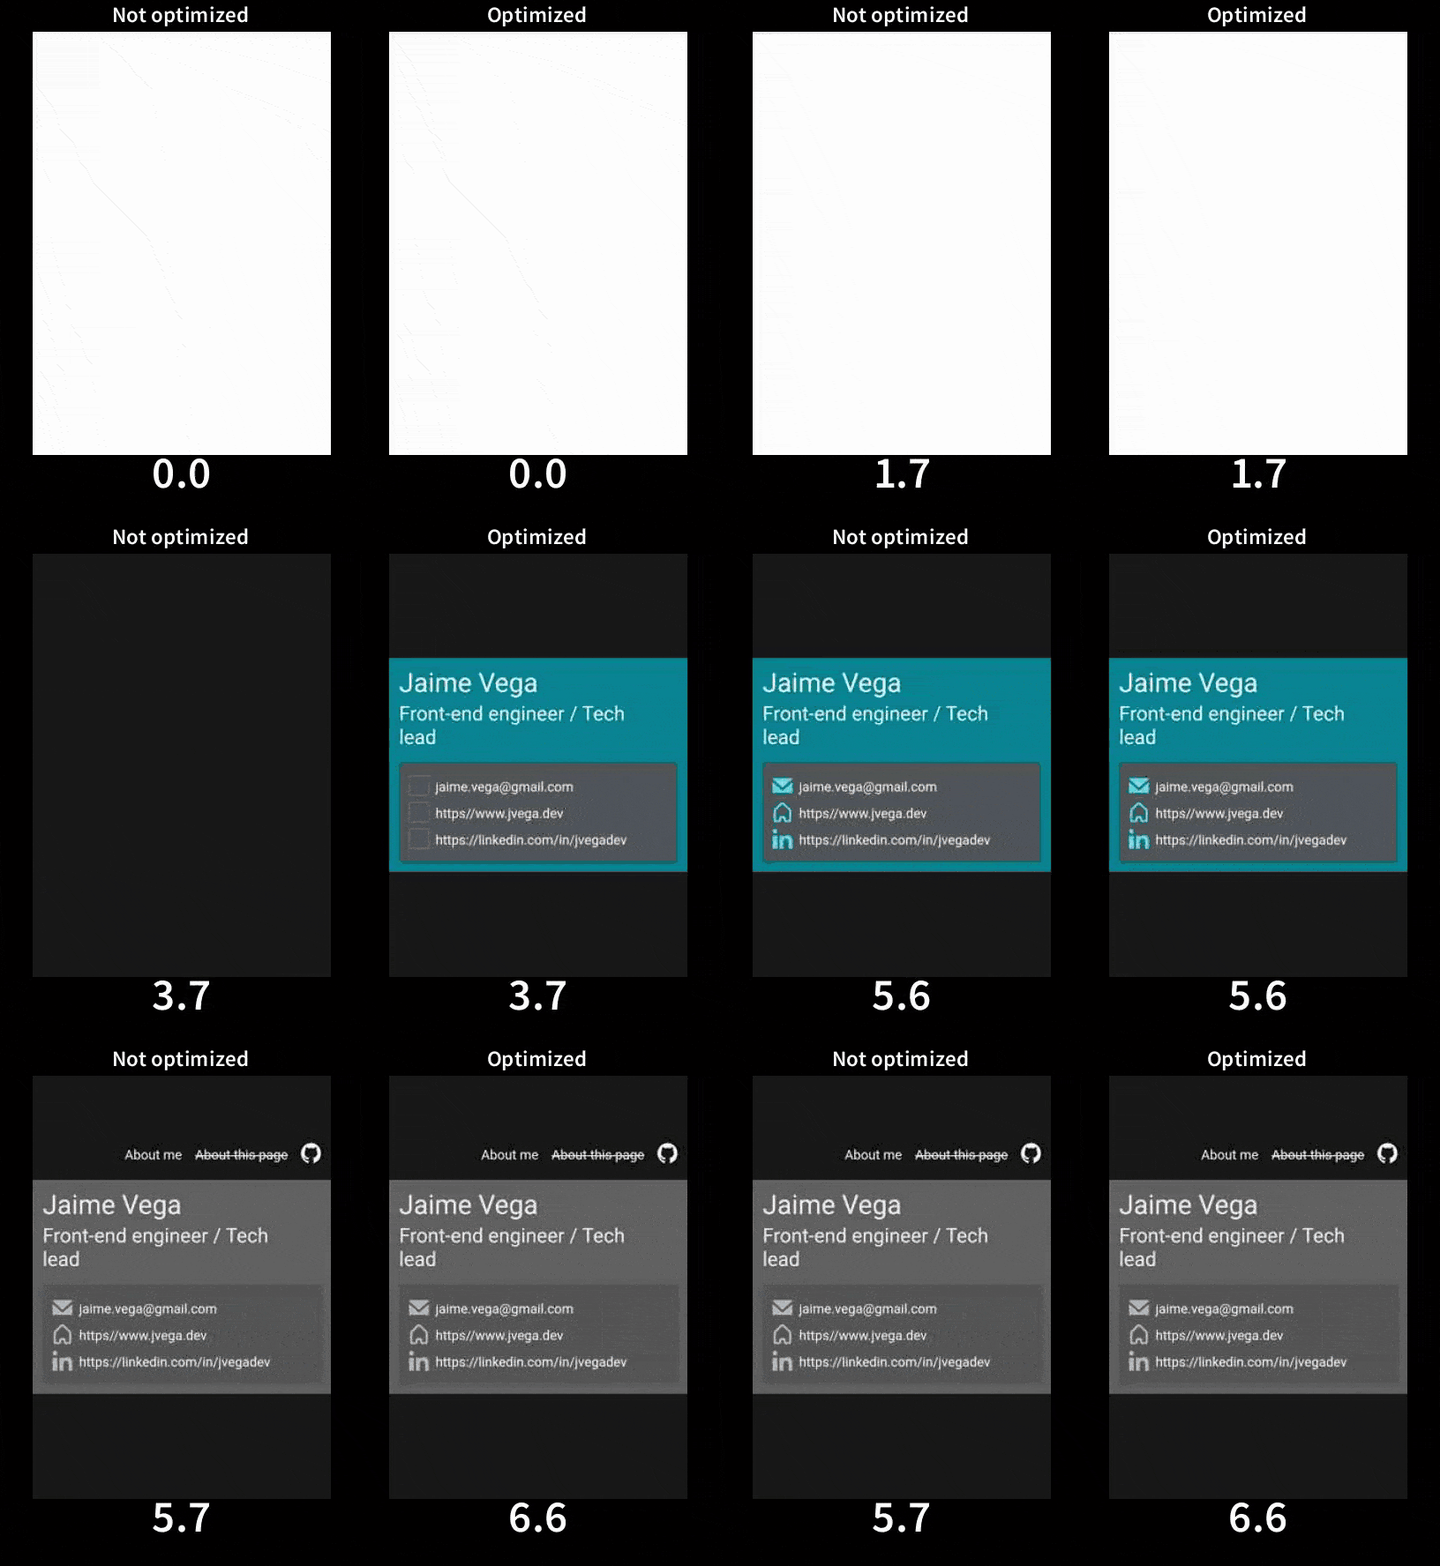
(Measured with WebPageTest.org using a Motorola G4 device)
The optimized and not-optimized version contains exactly the same amount of code and functionality. But as you can see, in the optimized version the content is progressively loaded. In the not-optimized one, even though it loads faster, it shows no progress until is fully loaded, so the perceived performance might actually be worse, as users might think that website is broken and nothing is happening.
This is the key idea behind user-centric performance metrics, make sure the user has the perception that your page loads faster.
However, measuring performance is always a hard task. But luckily, Google made Lighthouse, a tool that allows measuring the performance of any site, giving you user-centric values with just one click. It even gives you recommendations on how to improve the results.
Important!. To measure performance using Lighthouse or any other tool, make sure you use your browser in Incognito mode or use a profile with no extensions, as they can have a significant impact on the results.
My ideal goal is to keep a performance score over 80, as close as possible to 100. Now I am going to explain which process did I follow to optimize the site.
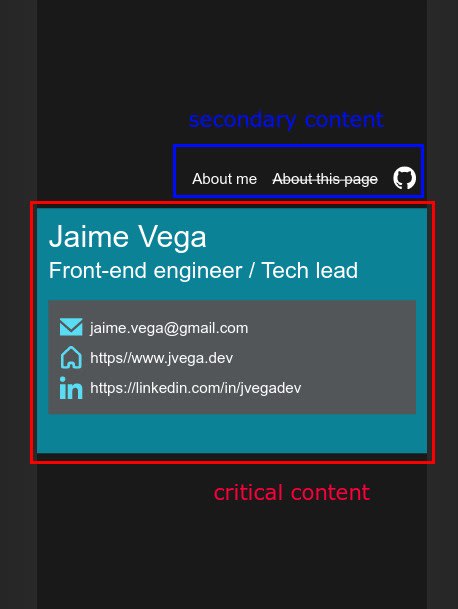
The idea is to think which content from your site is more important to your user, and try to optimize the loading of that area as much as possible (critical rendering path) to show it to the user as fast as possible. And defer the rest. To put another example, Youtube loads the video first, and the comments and other sections later.
So for my site, I made the following decision:
To optimize the critical rendering path I did the following:
- Even though the site is made with ReactJS, I made the conscious decision of building the critical section in pure HTML+CSS only. In that way, I could delay loading react and related libraries for later.
- I am also lazy loading the icons within the critical section.
- I am using Babel to compile ES6+ to ES5, but I chose to don't use async functions in the entry point so the
regenerator-runtimepolyfill is not needed.
This is an extract of the code that bootstraps the page:
import 'core-js';
import './Theme.css';
import './main.css';

function loadApp() {
  import(
    /* webpackPreload: true, webpackChunkName: 'ReactApp' */ './components/App');
}

function loadCriticalPathResources() {
  Promise.all([
    import(
      /* webpackPreload: true, webpackChunkName: 'email-icon' */ '../static/icons/email.svg'
    ),
    import(
      /* webpackPreload: true, webpackChunkName: 'home-icon' */ '../static/icons/home.svg'
    ),
    import(
      /* webpackPreload: true, webpackChunkName: 'linkedin-icon' */ '../static/icons/linkedin.svg'
    ),
  ]).then(function onSvgIconsLoaded([
    { default: emailIcon },
    { default: homeIcon },
    { default: linkedinIcon },
  ]) {
    document.getElementById('emailIcon').src = emailIcon;
    document.getElementById('homeIcon').src = homeIcon;
    document.getElementById('linkedinIcon').src = linkedinIcon;

    // Continue loading with the rest of the resouces
    setTimeout(loadApp, 100);
  });
}

// Bootstrap
// Delay loading icons as are not critical for the user experience. I aim to reduce the time to first content paint.
setTimeout(loadCriticalPathResources, 20);
I mentioned before that one easy way to evaluate that your site is fast is to use Lighthouse and make sure the score is over 80. But in addition, it is also a good idea to set up a performance budget for your site so, for example, check that the bundle size of your entry point and other assets do not go over a certain threshold.
A good value to set as maximum entry bundle and assets size is 170KB, and you can easily configure Webpack to break the build if you go over that value by setting the following settings:
module.exports = {
   // ...
  performance: {
    maxAssetSize: 170000,
    maxEntrypointSize: 170000,
    hints: 'error',
  }
}
I hope this gives you a few techniques you can use when building your next site/app. There are many more :). Make sure you check some of the reference sites that I list at the end of this post.
Ah! The current Lighthouse score for the site is...
The challenge of optimizing the critical rendering path and CSP
One important optimization I did not apply is to inline in the index.html the JavaScript and CSS that belongs to the critical path. This is important because reducing to the minimum the number of HTTP requests needed to load the site is very important.
Unfortunately, the Content Security Policy with the recommended values do not allow having inline <script> or <style> tags in the site. There are options you can use to allow that to happen in a secure way, but that requires the index.html and the HTTP headers to be dynamic values per request. And as I am hosting the site in Netlify and that makes it impossible. And between slightly worse performance and better security, I chose the latter. In a future post I will explain how.


Latest comments (0)