
This is the second article in our three-part series about using Lob APIs to build an app to create and send postcards. In part one, we set up our application in Vue and Node. We also enabled our users to generate and save ready-to-mail postcards as Lob HTML Templates. Finally, we synced those templates with the Lob API.
We’ll now improve our application by enabling our users to send physical postcards to their customers. We’ll accept addresses, verify them (on both the client and server-side), then queue our postcard for delivery.
Review the first article of this series to follow along with this tutorial. Let’s dive in!
Improving our app
We’ll build on the application we started last time. If you’re coding along, make sure you have that application ready to go.
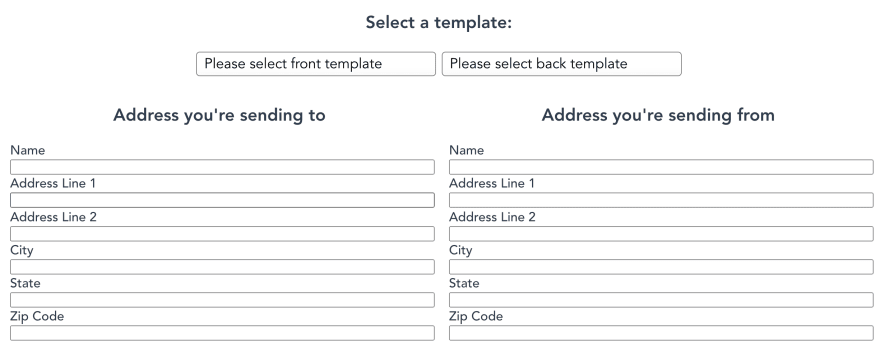
Let’s first create an AddressForm component to use in our application. We need to get the address of both our sender and our recipient to send to our server, so we’ll use this component at least twice. We’ll accept two props: a reactive address object that we can share with the parent, and a form ID. Create a new file called AddressForm.vue in the frontend/src/components folder.
We’ll destructure individual elements from our incoming prop. We need to use the toRefs function to help us do this. If we don’t, the destructured values won’t be reactive, meaning we can’t share them with the parent.
Let’s now use these values to set up our form:
Next, let’s create a parent page to use this component and select templates for our postcard’s front and back. Create a file named CreatePostcard.vue in the same folder as our previous component.
In our script section, we get our reactive variables ready. We have an object and starting values for each of our addresses, an array of templates, the ID of the front and back templates/thumbnails, and any possible error messages.
We use the onMounted lifecycle function to fetch the templates when our page first loads so our users can select from templates they have stored in Lob.
In our template, we provide selects to allow our user to pick their templates. We also render the AddressForm twice, once for the sender and once for the recipient. Notice that we use the “lang” attribute on the “style” element. Since we are referencing Sass, we need to install the vue-loader that will handle the preprocessing for us. In the terminal, at the root of the frontend folder, run the following command:
The final step is to give our new page a route, so let’s head over to the frontend/src/router/index.js file and modify this file so that looks like this:
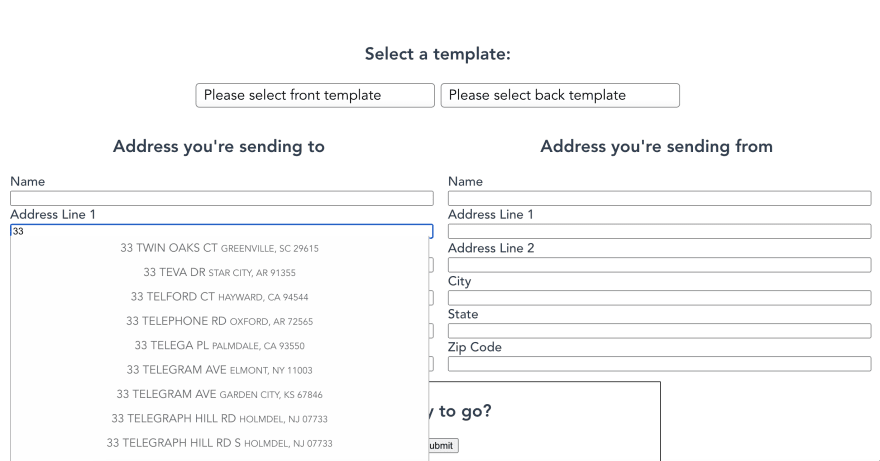
We next use Lob’s client-side library, Address Elements, to verify and autocomplete US addresses in the browser. The app needs to load this library after the forms render. Then it searches for the correct fields and allows autocompletion as necessary.
Back in our parent component, we add this script’s mounting to our onMounted function.
This function works great, updating the form as we’d expect. But, it doesn’t update the reactive variables. To handle that action, we need to subscribe to an event that the library makes available, then revise based on that event.
We will need to update the .env file that is the root of the frontend folder with the API keys that Lob provides us. For the address verification to work, we will need to use the “live” public keys as the “test” keys do not offer address completion. Add an entry that has the following format:
In our AddressForm component, we add a new ref for our subscription and an event listener to our window. We do this because we can’t guarantee that the LobAddressElements library will be ready when the app mounts this component. We’ll listen for the keydown event and return early if we have the subscription or LobAddressElements isn’t available.
In the frontend/src/components/AddressForm.vue let’s add the following pieces of code:
If we make it past that conditional, we subscribe to the elements.us_autocompletion.selection event and update our state if it’s targeting the correct form. And just like that, our address forms have autocompletion and address verification.
Next, we prepare our payload and enable our users to submit their requests to the app’s backend. Place this in the CreatePostcard component:
Note the use of .value to access the underlying value of the reference object while we’re inside our script tag. You will notice the setTimeout function that wraps the code path if the request is successful. This is because rendering thumbnails is an asynchronous task in Lob and depending on when you go to thumbnail link, the task may or may not have been completed. There's actually an webhook event that you could subscribe to called postcard.rendered_thumbnails that will let you know when the task is complete. Stay tuned for future tutorials where we will go over subscribing and ingesting events via webhooks.
We also have to add the submit button for our form, so after the “container” class we will add the following to the “CreatePostcard” component:
Building a handler
We first need to enable our server to parse the JSON that we’ll be sending in our body on our backend. Express comes with an inbuilt helper function we can use for this, so in our backend/index.js file, we will use the JSON middleware. Add this after the line that has app.use(cors()):
Now, we need to build the handler function. Before we start with the rest of the backend code, we need to install the Lob SDK via npm. In the terminal type following command (making sure, you are in the “backend” folder for the project):
Let’s create a new file at postcard/index.js. We will use the Lob SDK for Node.js to build our handler. We import the SDK then instantiate it with our API key. Add the following to postcard/create.js:
The following steps will fill in the createPostcard function. We use the Lob.postcards.create method to verify our addresses during that operation and queue our postcard for sending. This method takes two parameters: the options object, and a callback function.
We pass in our options, then in the callback function, we check if there is an error. We get helpful error messages back from the API, but they’re nested. We do some restructuring to make it easier for our front end to consume these messages. If there is no error, we return a success message and the newly created postcard object that was sent to us from the Lob API. We will use this object to show a preview of what the postcard will look like on the frontend. Place the following code inside the createPostcard function.
It’s possible to check the addresses separately at this stage if we’d prefer. The Lob.usVerifications.verify() method is powerful. The API takes a slightly different structure for the address argument so that it’ll need a little restructuring:
The response from the verification API is detailed and helpful. We get back a confidence score, a deliverability enum, and some deliverability analysis. This API doesn’t just give us a binary deliverable or undeliverable status. Instead, it summarizes the analysis into one of these values:
- deliverable
- deliverable_unnecessary_unit
- deliverable_incorrect_unit
- deliverable_missing_unit
- undeliverable
You can switch on these values to update your CRM if it’s helpful for your sales team.Now, back to our application. The last thing left to do is to add this handler to our router at backend/router.js.
Next steps
We’ve set up a form to accept addresses in our app, verified addresses, and converted our bits into atoms. Our application can now trigger physical mail delivery to a customer anywhere in the US. That’s pretty cool!
You can review the project code before reading this series’s third and final article, where we’ll adjust our application to manage the postcards we’ve sent — including canceling them — and use webhooks to follow our postcard’s journey through the system.
Try Lob’s Print & Mail API for yourself now, or continue to article three to add mail management to our app.

Oldest comments (0)