Laravel give to us a lot of different dev enviroments, from Laravel Homestead, Laravel Valet, and the newest adittion: Laravel Sail, which is the default enviroment for Laravel because it gives to us a quick and in no-time enviroment using Docker. This brings the possibility that our project works in every operative system, like:
- MacOS
- Windows
- Linux
This guide will help to you to make the proper config without any issue to develop and debug with Laravel Sail and VS Code which has a great Debugger and is so powerful.
Previous steps
At this point I'll suppose that you already have Docker installed. In case you don't you can follow this guide.
1. Create a new Laravel Sail project
We will execute the next command to create an example project, you can change the example-app with any name you want to give to your project:
curl -s https://laravel.build/example-app | bash
Wait until is ready, it will take some time if this is the first time you do this process because is downloading all the images from Docker and the project dependencies (in case you have did this before, it won't take much longer).
And to finish this step, we change to the new project with:
cd ./example-app
2. Publish all the Docker config files
Once we are inside the directory, we need to turn on the project with:
./vendor/bin/sail up -d
And then we run the next command to publish the Docker config files we need to edit:
./vendor/bin/sail artisan sail:publish
Open the project with:
code .
Now we can stop the project with:
./vendor/bin/sail down
or
./vendor/bin/sail stop
3. Config the project
Open docker-compose.yml and add the next:
services:
    laravel.test:
        build:
            context: ./docker/8.1
            dockerfile: Dockerfile
            args:
                WWWGROUP: '${WWWGROUP}'
                # add these two lines
                XDEBUG: '${APP_DEBUG:-false}'
                XDEBUG_PORT: '${SAIL_XDEBUG_PORT:-9003}'

# we need to expose the port 9003,
# so we add the line after the ports are declared.
ports:
    - '${APP_PORT:-80}:80'
expose:
    - "9003"
# Add XDEBUG_CONFIG, PHP_XDEBUG_ENABLED y XDEBUG_MODE
environment:
    WWWUSER: '${WWWUSER}'
    LARAVEL_SAIL: 1
    XDEBUG_CONFIG: ${SAIL_XDEBUG_CONFIG:-client_host=172.120.19.9}
    PHP_XDEBUG_ENABLED: 1
    XDEBUG_MODE: '${SAIL_XDEBUG_MODE:-off}'

# And in the networks section has:
networks:
    sail:
        driver: bridge

# Add after the driver configutation:
networks:
    sail:
        driver: bridge
        ipam:
            driver: default
            config:
                # In this case you can add whatever subnet you want of you can live it as this guide has.
                - subnet: 172.120.19.0/24
We are done with the docker-compose.yml config, now we go and edit ./docker/8.1/php.ini and add to the end of the file:
[XDebug]
xdebug.start_with_request = yes
xdebug.show_local_vars = on
xdebug.mode = debug
xdebug.discover_client_host = true
xdebug.client_host = host.docker.internal
xdebug.client_port = 9003
Last but not least we modify the .env add in the end of the file:
SAIL_XDEBUG_MODE=develop,debug
SAIL_XDEBUG_CONFIG="client_host=localhost"
Once we have everything set, we should turn on the project once more but rebuilding everything again (it won't take too much time, I promise!):
./vendor/bin/sail up --build -d
4. Set up VSCode to work with Laravel Sail
Open VScode and we are going to need the next:
- Install PHP Debug
- Install Docker and Remote Explorer
- Config the debugger
- Install Xdebug Helper in your browser
Install PHP Debug
We need to install the next extension, in case you don't have it:
https://marketplace.visualstudio.com/items?itemName=xdebug.php-debug
Install Docker and Remote Explorer
In case you don't have it, install: https://marketplace.visualstudio.com/items?itemName=ms-azuretools.vscode-docker y https://marketplace.visualstudio.com/items?itemName=ms-vscode-remote.remote-containers
this will help us to gain access through VS Code to the project container and we can edit the code we need while we are in the development.
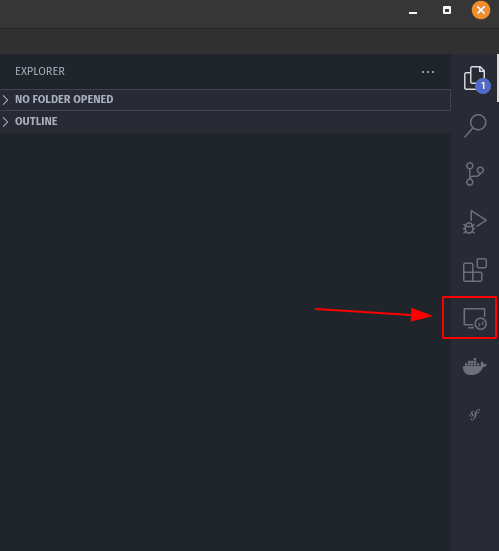
Once installed we click in here:
This button will show a list of running containers from your system, in this case we need to select the one that finished with laravel.test_1 and doing a click here:
Once the container is open in VSCode we need to open the next directory /var/www/html, the Laravel code resides here.
Note: We need to confirm that we have PHP Debug installed by navigating the extensions list, in case is not installed it will have the next label Install in Container...
Config the debugger
Finally we go the Debugger section and create a launch.json file:
This will show a list of languages we can debug, in this case select PHP. It will open a newly created file, delete all the object inside the configurations array and put this config:
{
    // Use IntelliSense to learn about possible attributes.
    // Hover to view descriptions of existing attributes.
    // For more information, visit: https://go.microsoft.com/fwlink/?linkid=830387
    "version": "0.2.0",
    "configurations": [
        {
            "name": "Listen for Xdebug",
            "type": "php",
            "request": "launch",
            "port": 9003,
            "pathMappings": {
                "/var/www/html": "${workspaceFolder}"
            }
        }
    ]
}
Install Xdebug helper
Now go to your browser and install:
- Chrome: https://chrome.google.com/webstore/detail/xdebug-helper/eadndfjplgieldjbigjakmdgkmoaaaoc
- Firefox: https://addons.mozilla.org/en-US/firefox/addon/xdebug-helper-for-firefox/
Look up for the extension and click it, it will show a list and enable Debug, this will help us to send the signal from our browser to your IDE to start the debugging when you visit a route:
And we are ready! We have our VS Code done with this config asnd ready to debug.
5. Testing
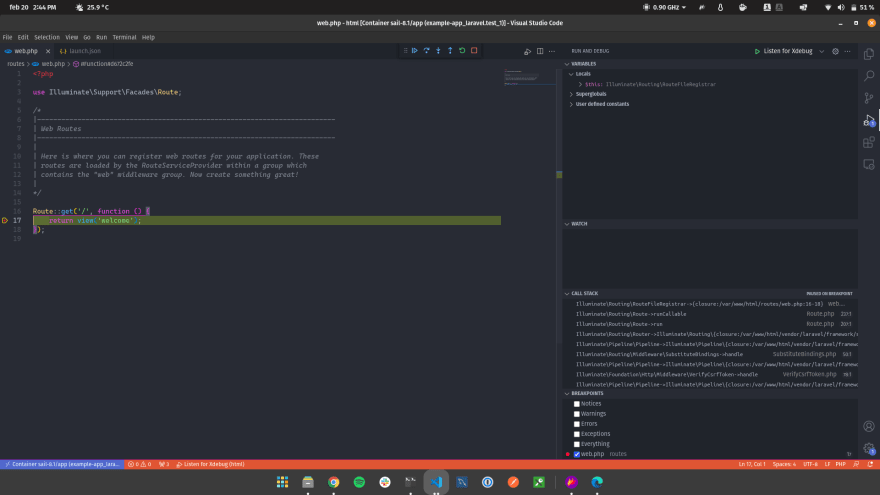
Now go to VS Code and edit routes/web.php, select a breakpoint like in the image and press F5, it will start the debug session:
Open up the browser and go to http://localhost, it should automatically execute the debugger in VSCode, like this:
And we are ready! I hope this works for you and all I have to say is:


Top comments (0)