I have been meaning to jump in here for a while and finally today I got the chance, and it was super quick to get things up and running. Especially when you get the £250 free credits as well! For a playground for learning this is a great place to get started, quick deployment.
This post is going to walk through pretty much from step 1 when you sign in for the first time and how you can easily deploy a Kubernetes cluster from both the UI portal and the Civo CLI.
When you sign up for your CIVO account and your free $250 credit balance, you need to add your credit card and then you can start exploring.
My next task was to get the CIVO CLI on my WSL instance, to get this I used arkade to install the CLI
arkade get civo
to add your newly created account to your CIVO CLI then follow these next simple steps, first you will need your API key from your portal you can find this under Account > Security and then you need to take a copy of this string I have blurred out.
On your system where you have deployed the CIVO CLI you can now take this API Key and add this using the following command.
civo apikey add MichaelCade
I called my account my name you can it seems choose the name of the account you wish it does not have to be lined up to a username. We can confirm that we added this API key with the following command:
civo apikey list
and then if you want to see the API Key and compare to what we found in the portal then you could run the following command also.
civo apikey show MichaelCade
There are many other things you can get from the CLI and obviously incorporate a lot of this into your workflows and automation. For now I am just getting things set up and ready for my first deployment. The other commands can be found here.
From the UI
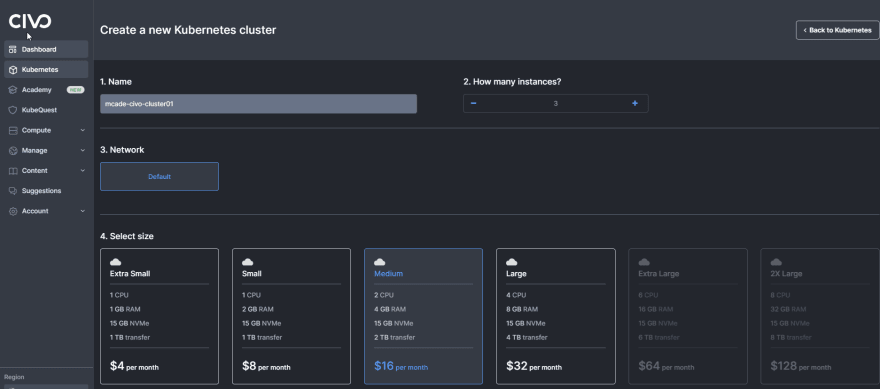
We can start by creating a Kubernetes cluster through the UI, simply select Kubernetes from the menu on the left and then create new Kubernetes cluster and then you are greeted with this simple wizard to build out your cluster with some great overview of how much your cluster is going to cost you.
We then have the option to add marketplace applications and storage to your cluster if you would like to hit the ground running, for the purpose of my walkthrough I am not going to do that just yet. But you can see there are a lot of options to choose from.
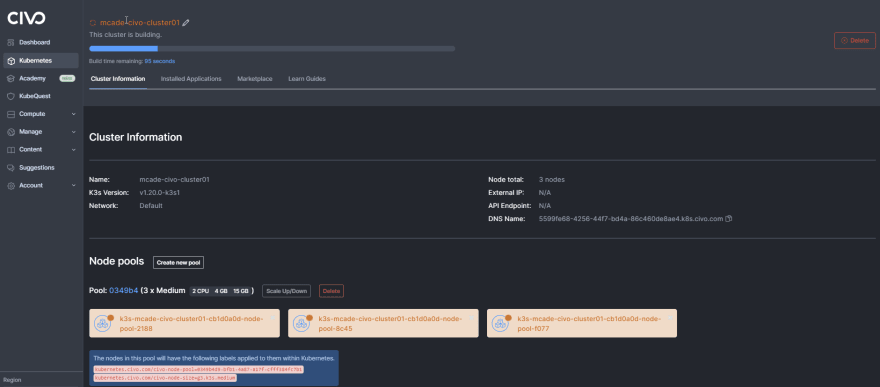
We then hit create cluster down the bottom and no joke in 2 minutes you have a cluster available to you
Now we can also go and jump back to our Civo CLI and confirm we have some visibility into that cluster by using the following command.
civo Kubernetes list
Connecting to your cluster
From the UI we can see below it is as simple as downloading the kubeconfig file to access your cluster from your local machine. I have been reading up on this approach not being so secure but for the purpose of learning and labbing I think this way to access is just fine. But we should all be aware of reasons of not exposing the kubeconfig and Kubernetes over the public internet.
I downloaded the config file and then put that in my local .kube folder and renamed to config (there might be a better way to handle this or merge this with an existing config file, point me in the right direction if you know a good resource)
Ok, so pretty quick and in less than 5 minutes I have a 3 node Kubernetes cluster up and running and ready for some applications. I am also going to show you how if you decide to use the UI to create your first cluster but you would like to use the CLI to get your kubeconfig file then carry on to the next section.
Create a cluster from the CLI
Creating the cluster through the UI was super quick but we always want to have a way of creating a cluster through the UI, maybe it’s a few lines of code that means we can have a new cluster up and running in seconds and no reason to hit a UI maybe it’s a build that is part of a wider demo, there are lots of reasons for using a CLI to deploy your Kubernetes cluster.
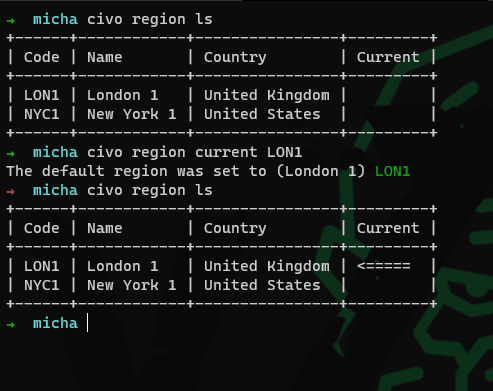
When I first installed my Civo CLI in WSL2 I did not have a region configured so I checked this using the following command. And you can see neither London or NYC are set to current.
civo region ls
To change this so that LON1 is my default I ran the following command and then ran the ls command again.
civo region current LON1
And now if I run civo kubernetes list to show the cluster created in the UI I will not see it as this was created in NYC so I would have to switch regions to see that again.
Let’s now create a Kubernetes cluster from the CLI, issue the following command this is going to create a medium 3 node cluster, obviously you can get granular on size, networking, and other detail that you wish to configure as part of your cluster.
civo kubernetes create mcade-civo-cluster02
once your cluster is created and ready you can issue this command to see your clusters, now in my account I have one cluster shown below in Lon1 and I have another in NYC1
civo kubernetes list
If you wish to save your configuration from the CLI so that you can use kubectl locally then you can do this using the following command
civo kubernetes config mcade-civo-cluster02 -s
Now I want to have access to both my London cluster and my New York via kubectl and that can be done using the following command. This will then give you access to both contexts. In order to run this, you need to be in the correct region. If you do not use the merge flag then you will overwrite your kubeconfig, if you are like me and you have several configs to different clusters across multiple environments then always make sure you protect that file as well and merge and keep tidy.
civo Kubernetes config mcade-civo-cluster02 -s –merge
Obviously this post only touches the surface of what CIVO have going on, I am planning to revisit with some applications being deployed and then getting into the data management side of things and how we can then protect these workloads in CIVO.


Oldest comments (0)