I am a big fan of Telegram because of its great bot-ecosystem. I have been planning to make a bot for a while and have been looking for some nice workflow tools that can help me accomplish handling the back-end workflow of the bots visually. Recently, I started working with n8n, a fair-code licensed tool that helps you automate tasks, sync data between various sources and react to events all via a visual workflow editor.
It's springtime in Berlin and the weather is unpredictable. One day it's 6°C and the next day, it's 21°C 🤯 A good first use-case for me would be to create a bot that can send me the weather information whenever I ask for it. In this tutorial, I will teach you how to create your very own Telegram weather bot with n8n.
To accomplish this, we’ll go through five steps:
- Creating the Telegram bot
- Adding commands to the bot
- Creating a Telegram trigger node on n8n
- Creating a weather node on n8n
- Creating a Telegram node on n8n
Creating the Telegram bot
To create the Telegram bot, I downloaded the Telegram application for macOS. However, you can also use the web client or the mobile app for this. We have to use the master of all bots that the team at Telegram created, aptly called BotFather. You can open a chat with BotFather by clicking here. You can get a list of all the commands that you can issue with /help.
First of all, issue the /newbotcommand. It will ask you to name your bot. I named it ‘n8n bot’, cause why not? You will then be asked to choose a username for the bot. This has to be a unique username which has to end in ‘bot’. I went with n8n_weather_bot.
This created my bot, gave me the link to access it (you can also search for your bot by the username that you gave it) and the API key that we’ll need later. Just click on the API key to copy it to the clipboard. Here’s a video of me following the steps above.
Adding commands to the bot
Let’s create a command to our bot before adding some functionality to it. You can skip this section for the tutorial, if you’d like. However, if you plan to create more commands for the bot, later on, it might make sense to try this on for size.
To set a new command for our bot, go to the BotFather chat window again. Issue the /setcommands command and you’ll be asked to select the bot for which you want to set a command. Select the bot that you just created and enter a command in the suggested format. I went ahead and entered the following:
weather — Tells you about the weather
Here’s a video of me setting a command for my bot.
Now, if you go back to the bot that you created and start typing ‘/’, it will show you the list of commands that you have prepared for the bot. Very well, now we have a bot and a command. Now it’s time to add some functionality to the bot.
Creating a Telegram trigger node on n8n
Our bot needs a back-end. To get started with creating the back-end of the bot, you’ll need access to n8n. You can sign-up for n8n.cloud to get early access to our hosted service. Alternatively, install n8n using npm with the following command:
npm install n8n -g
You can also run n8n using Docker. Once you have installed n8n, you can start it using the following command:
n8n start --tunnel
We started n8n using the --tunnel parameter to be able to use webhooks trigger from Telegram as it has to be reachable from the web. To learn more about this, check out the documentation.
Typing “o” in the terminal will open the Editor UI for us.

Let us now create a Trigger node, which starts a workflow when the webhook gets some data. In our case, it is the *Telegram Trigger* getting webhook data via the bot.
Create the Trigger node by clicking on the ‘+’ button on the top right of the screen. Select the Telegram Trigger node under the Trigger nodes menu to create the node.
Now you’ll have to configure this node. First of all, we have to add the credentials for the Telegram API and give the Telegram Trigger node access to that. If you forgot to copy the API token, go to the BotFather chat window and retrieve it from there. Add a new credential by clicking on Create New under the Credentials section of the node.
After that, you’ll need to configure that the node gets triggered every time a message is sent to the bot. To do that, select the option ‘message’ for the Updates field. Lastly, click on Execute Node on the top right of the dialog box. And voilà, our Telegram Trigger node is ready.
Here’s a video of me following the steps above.
Creating a weather node on n8n
Now it’s time to add the OpenWeatherMap node. This node will pull in the weather information for our bot.
To do that, click on the ‘+’ button on the top right of the screen and select the OpenWeatherMap node. We again need to add the credentials for the API. To get the API key for OpenWeatherMap, you’ll need to register for a free account and you’ll find your API keys here. Once, you have the key, create a new credential just like you did for the Telegram Trigger node.
For me, the node’s default settings were ideal. I just added berlin,de as the city. You can check the code for your city here. Finally, click on create Execute Node and we are ready!
Here’s a video of me following the steps above.
Creating a Telegram node on n8n
First, you should save your workflow by clicking on ‘Save as’ under the Workflow menu on the top left. Toggle Active to true.
Now, send a message to the bot and you’ll see that it will be received by the trigger.
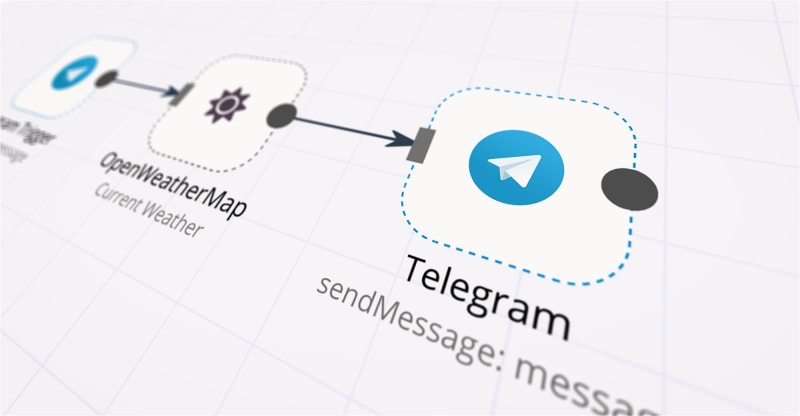
Our final component is adding a Telegram node that will send a message with the weather details back to the person who queried it.
Add a Telegram node like you added the nodes before. Before moving on to configure the node, make sure that you connect it to the OpenWeatherMap node before continuing. This will ensure that the node receives the data from the Telegram Trigger and OpenWeatherMap node for setting the configuration.
Now it’s time to configure the node. We already have the Telegram credentials that we entered early on and they can be re-used. Once you have selected the credentials, click on the pencil icon next to the credentials and make sure that you move the Telegram node from No Access column on the left to the Access column on the right. Once you are done with that, it should look like this.

You have two fields left to configure now: Chat ID and Text. Since we need to send the message to the person who queried the bot, we can get their chat ID from the Telegram Trigger node. Since this is a dynamic piece of information, we’ll click on the gears icon next to the ‘Chat ID’ field to add expressions. There you can select:
Nodes > Telegram Trigger > Output Data > JSON > message > chat > id
For the Text field, since we need to add more dynamic information again, we’ll select the output from the OpenWeatherMap in a similar way:
Current Node > Input Data > JSON > main > temp
This will give us the current temperature reading. Finally, click on create Execute Node, which will make the bot send a message to you on Telegram.
Here’s a video of me following the steps above.
I recommend you to play around with the different output values from the node to create your own message. I ended up adding the following expression for the ‘Text’ field:
Now, when I go back to my Telegram app, it runs like this.
Once your workflow is saved, you can activate it by toggling the button marked Active on the top right. The bot will continue to work as long as the workflow is active on your computer.
Next Steps
This tutorial contained a Telegram bot powered with a basic n8n workflow. n8n has tons of integrations that can simply enable very complex workflows. As a next exercise, you can also look into getting daily dashboard data from maybe Google Sheets or Airtable. You can create another command and add an IF or Switch node in front of the Telegram Trigger node to handle different commands. You can also look into how you can create your own nodes here.
Did you decide to create a different bot and used other nodes? Don’t forget to submit your workflow here. You can find the workflow that I created for this tutorial here.
Conclusion
Telegram Bots are fun to create and can open a gateway to quickly retrieve any kind of information. Designing the back-end of such bots require knowledge of handling APIs and can be tough if you have just entered the world of programming or if you lack the time. Using no-code solutions like n8n makes it efficient to create the back-end workflow of such systems without having to delve deeper into the mechanics.
I’d be really excited to check out what you’ve built using n8n! In case you’ve run into an issue while following the tutorial, feel free to reach out to me on Twitter or ask for help on our forum 💙

Oldest comments (0)