
I’ve been working with RESTFul APIs for some time now and one thing that I love to do is to talk about APIs.
So, today I will show you how to build an API using the API-First approach and Design First with OpenApi Specification.

First thing first, if you don’t know what's an API-First approach means, it would be nice you stop reading this and check the blog post that I wrote to the Farfetchs blog where I explain everything that you need to know to start an API using API-First.
📋 — Preparing the ground
Before you get your hands dirty, let’s prepare the ground and understand the use case that will be developed.
Tools
If you desire to reproduce the examples that will be shown here, you will need some of those items below.
- NodeJS
- OpenAPI Specification
- Text Editor (I’ll use VSCode)
- Command Line
Use Case
To keep easy to understand, let’s use the Todo List App, it is a very common concept beyond the software development community.
Disclaimer
I will hide some information to keep easy to read from the gist files, but at the end of this post, I will share the Github repository link, so you can access the full content.
🙌 — Get your hands dirty
Now that you already have your environment with the needed dependencies, let’s have some fun and start to see the things happening.
The first step is to create the entry point file for the OpenAPI specification and add some content to this file.
openapi: 3.0.0
info:
  title: Todo App API
  description: Todo App API.
  version: v1
  contact:
    email: 'nicolas.tcs@hotmail.com'
    name: 'Nicolas Takashi'
paths:
#... there more content here.
The file above is a very simple representation of an OpenAPI document, just to introduce you to the concept.
OpenAPI is a self-explanatory notation, but if you don’t know how this works yet, I recommend to use the Oficial documentation to support you during the spec design process.
Writing Path Objects
The Path Object holds the relative paths to each endpoint and their operations, let's add a file named tasks.yaml that should look like that.
get:
  operationId: get-tasks
  summary: Returns a paged list of tasks.
  description: Returns a paged list of active tasks
  tags:
    - Tasks
  parameters:
    - $ref: '../../parameters/page-parameters.yaml#/components/parameters/page'
    - $ref: '../../parameters/page-parameters.yaml#/components/parameters/pageSize'
  responses:
    '200':
      description: Success
      content:
        application/json:
          schema:
            $ref: '../../schemas/pagedTask.yaml#/components/schemas/PagedTask'
post:
  operationId: create-task
  summary: Create a task
  description: Create a new task
  tags:
    - Tasks
  requestBody:
    required: true
    content:
      application/json:
        schema:
          $ref: '../../schemas/task.yaml#/components/schemas/Task'
  responses:
    '201':
      description: Created
      headers:
        Location:
          description: 'Location of the created task /tasks/{id}'
          schema:
            type: string
Above you can see that was added two operations, that will enable the Todo List API to create a task and get a paged list of tasks.
Now we can add the operation to enable the API to remove a task, find one specific task, and update a task, to do that we must create a new file named tasks-with-id.yaml and add the following content.
get:
  operationId: get-task
  summary: Get task by id
  description: Return a task
  tags:
    - Tasks
  parameters:
    - in: path
      name: id
      description: Task id
      required: true
      schema:
        type: string
        format: uuid
  responses:
    '200':
      description: Success
      content:
        application/json:
          schema:
            $ref: '../../schemas/task.yaml#/components/schemas/Task'
put:
  operationId: update-task
  summary: Update a task
  description: Update a task
  tags:
    - Tasks
  parameters:
    - in: path
      name: id
      description: Task id
      required: true
      schema:
        type: string
        format: uuid
  requestBody:
    required: true
    content:
      application/json:
        schema:
          $ref: '../../schemas/task.yaml#/components/schemas/Task'
  responses:
    '202':
      description: No Content
delete:
  operationId: delete-task
  summary: Delete a task
  description: Delete a task
  tags:
    - Tasks
  parameters:
    - in: path
      name: id
      description: Task id
      required: true
      schema:
        type: string
        format: uuid
  responses:
    '202':
      description: No content
Probably you can understand almost everything as described in the file above, but I believe the $ref notation deserves some explanation.
Using references
In software development is very common to share code, and, the same happens when we are designing API. Bering in mind the OpenAPI specification able us to re-utilize common objects across an OpenAPI document.
Using the notation $ref you can add local or remote references to the API, as you can see in the examples above.
If you want to understand better how to work with references and where you can use it, please take a look at the official documentation.
Writing Schema Objects
We are using a schema component named Task, this schema is used across the API to represent the resource tasks, this schema looks like the example below.
components:
  schemas:
    Task:
      type: object
      required:
        - name
        - id
      properties:
        id:
          description: Task unique identifier
          type: string
          format: uuid
          readOnly: true
        name:
          description: Task name
          type: string
          example: Todo Service
With the code above we can re-utilize the Task schema across all the API and avoid code duplication.
Writing Parameter Object
Just like the schemas, we can do the same with the parameters, if there are parameters that are shared across the API, we can reference a local or remote file, here we will create two parameters to represent the information about the page and its size that must be like the following example.
components:
  parameters:
    page:
      in: query
      description: Desired page
      name: page
      schema:
        type: integer
        format: int32
        default: 1
        minimum: 1
    pageSize:
      in: query
      description: Desired quantity of itens per page
      name: pageSize
      schema:
        type: integer
        format: int32
        default: 10
        minimum: 10
        maximum: 100
The final API entry point
After a lot of separated examples of files, let’s see how everything looks together.
openapi: 3.0.0
info:
  title: Todo App API
  description: Todo App API.
  version: v1
  contact:
    email: 'nicolas.tcs@hotmail.com'
    name: 'Nicolas Takashi'
tags:
  - name: Tasks
paths:
  '/tasks':
    $ref: './components/paths/tasks/task.yaml'
  '/tasks/{id}':
    $ref: './components/paths/tasks/task-by-id.yaml'
components:
  schemas:
    Task:
      $ref: 'components/schemas/task.yaml#/components/schemas/Task'
    PagedTask:
      $ref: 'components/schemas/pagedTask.yaml#/components/schemas/PagedTask'
Everything looks good, we have a Todo List API designed, following with a good design, right now if you are using Visual Studio code like me, you can install an extension named Swagger View, so you can render the specification such example below.

As you can see the swagger view looks great and every client can explore your API through the Swagger-UI.
📦 Bundling OpenAPI Documents
Before start to interact with the OpenAPI documents to lint, create mock servers and SDKs for our clients, we must bundle the API to enable machine read and interact with that.
The concept of splitting the OpenAPI documents into many files and reference those files later is an approach to help you during the design process, avoiding duplications and enhance code reuse.
But it's not a valid OpenAPI document and right now, we'll see how to bundle many documents into one using swagger-cli.
To install the swagger-cli is very simple, just run the command above and it's done.
// using npm
npm install swagger-cli

// using yarn
yarn add swagger-cli
After that, you just need to run the bundle command below.
swagger-cli bundle api.yaml -o ./bin/api.yaml -t yaml
Done, you already have the API bundled into one file only, now you are able to lint this file ensuring that every guideline was used.
📐 - RESTFul Guidelines
A very important thing that must be done, when we are designing APIs is to define guidelines.
There are a bunch of guidelines to design RESTFul APIs provided by the software community, but in many cases, those guidelines don’t meet your business requirements and you need to create your own guidelines.
Much more important than define guidelines is to ensure that your APIs are following these guidelines, for instance, ensure that every request has a 200 response.
But we know that it’s very difficult to do this job without a tool to help us, so bearing it in mind let me introduce you to a good friend to support you during this job.
Using spectral to validate OpenAPI documents
Check if your APIs are being designed following the proposed guidelines by your company, which could be a difficult job to do manually.
Thereby we can ask for a tool like Spectral to help us and create an autonomous process, to do this job.
Spectral is an open-source project that works like a linter to OpenAPI documents and has a lot of rules to ensure very common guidelines in the software industry to develop RESTFul APIs.
To use spectral is very simple, you just need to install the node package using the command below.
// using npm
npm install @stoplight/spectral

// using yarn
yarn add @stoplight/spectral
Before executing the command to lint and check if the API meets the guidelines, you need to bundle the API as mentioned before, after that just run the command below.
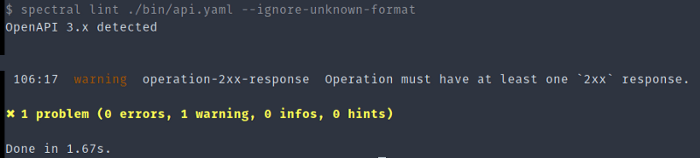
spectral lint ./bin/api.yaml --ignore-unknown-format
After that, you can see the output informing if there are errors or not, such as the image below.
Spectral success output
Spectral error output

If you want to understand how the spectral works, what are the options available to lint, and how to create your own rules or ignore existing rules, I really recommend you visit the official documentation, they have awesome examples of how to do that.
In addition to the main benefit that spectral gives us, we can also take advantage and add this in the process of continuous integration or even via git hook, ensuring that we will always have the OpenAPI documents validated and compliant with the guidelines.
🏁Conclusion
Let’s stop here in this post, I really want to talk more about API-First and OpenAPI but to a first post, there is a lot of information that must be digested.
The idea behind this post is just to show how to start designing an API with an API-First approach and OpenAPI Specification. In the next post, we will talk about Mock Servers and SDKs, how we could take advantage of OpenAPI to help improve the development process.
I hope you enjoyed the content and please if you have any doubts or suggestions let me know, write a comment, or hit me on twitter or somewhere else.
Github Repository with Examples

Oldest comments (0)