
Motivation
Recently we started a Swift API proof of concept and wanted to see if we can deploy the service with "the tools we know" from Node.js: continuous integration in the cloud and deployment to serverless / managed k8s platforms. TL;DR: It works! And very similar to working with Node.js services.
Dockerfile
Let's start with the Dockerfile, the current standard for k8s/Cloud Native services. If you created your new awesome Swift API with the Vapor CLI/template, there's a Dockerfile already in the folder. We decided to remove the package updates to speed up the builds a bit. We also removed the user/group specifics and rely on system defaults:
FROM swift:5.5-focal as build
WORKDIR /build
COPY ./Package.* ./
RUN swift package resolve
COPY . .
RUN swift build -c release

WORKDIR /staging
RUN cp "$(swift build --package-path /build -c release --show-bin-path)/Run" ./
RUN [ -d /build/Public ] && { mv /build/Public ./Public && chmod -R a-w ./Public; } || true
RUN [ -d /build/Resources ] && { mv /build/Resources ./Resources && chmod -R a-w ./Resources; } || true

FROM swift:5.5-focal-slim

RUN export DEBIAN_FRONTEND=noninteractive DEBCONF_NONINTERACTIVE_SEEN=true && \
    apt-get install ca-certificates

WORKDIR /app
COPY --from=build /staging /app

EXPOSE 8080
ENTRYPOINT ["./Run"]
CMD ["serve", "--env", "production", "--hostname", "0.0.0.0", "--port", "8080"]
We still need to make sure the ca-certificates package is installed, as PlanetScale uses those. If you use a different database, you might be able to skip this step too.
Artifact Registry
Google deprecated the Container Registry in favor of the Artifact Registry, which can also handle Node.js, Java and other packages, not just Docker containers. You have to enable the Artifact Registry for your project. There are a few minor changes to the URLs. If you want to connect locally to the registry (push/pull), you need to authenticate for your region. You can read more here: https://cloud.google.com/artifact-registry/docs/transition/changes-docker.
Cloud Build
For continous deployment of our Swift API, we're using Cloud Build pretty much the same way as for a Node.js API:
- build the container image
- deploy the image to Cloud Run
- cache the image in the Artifact Registry
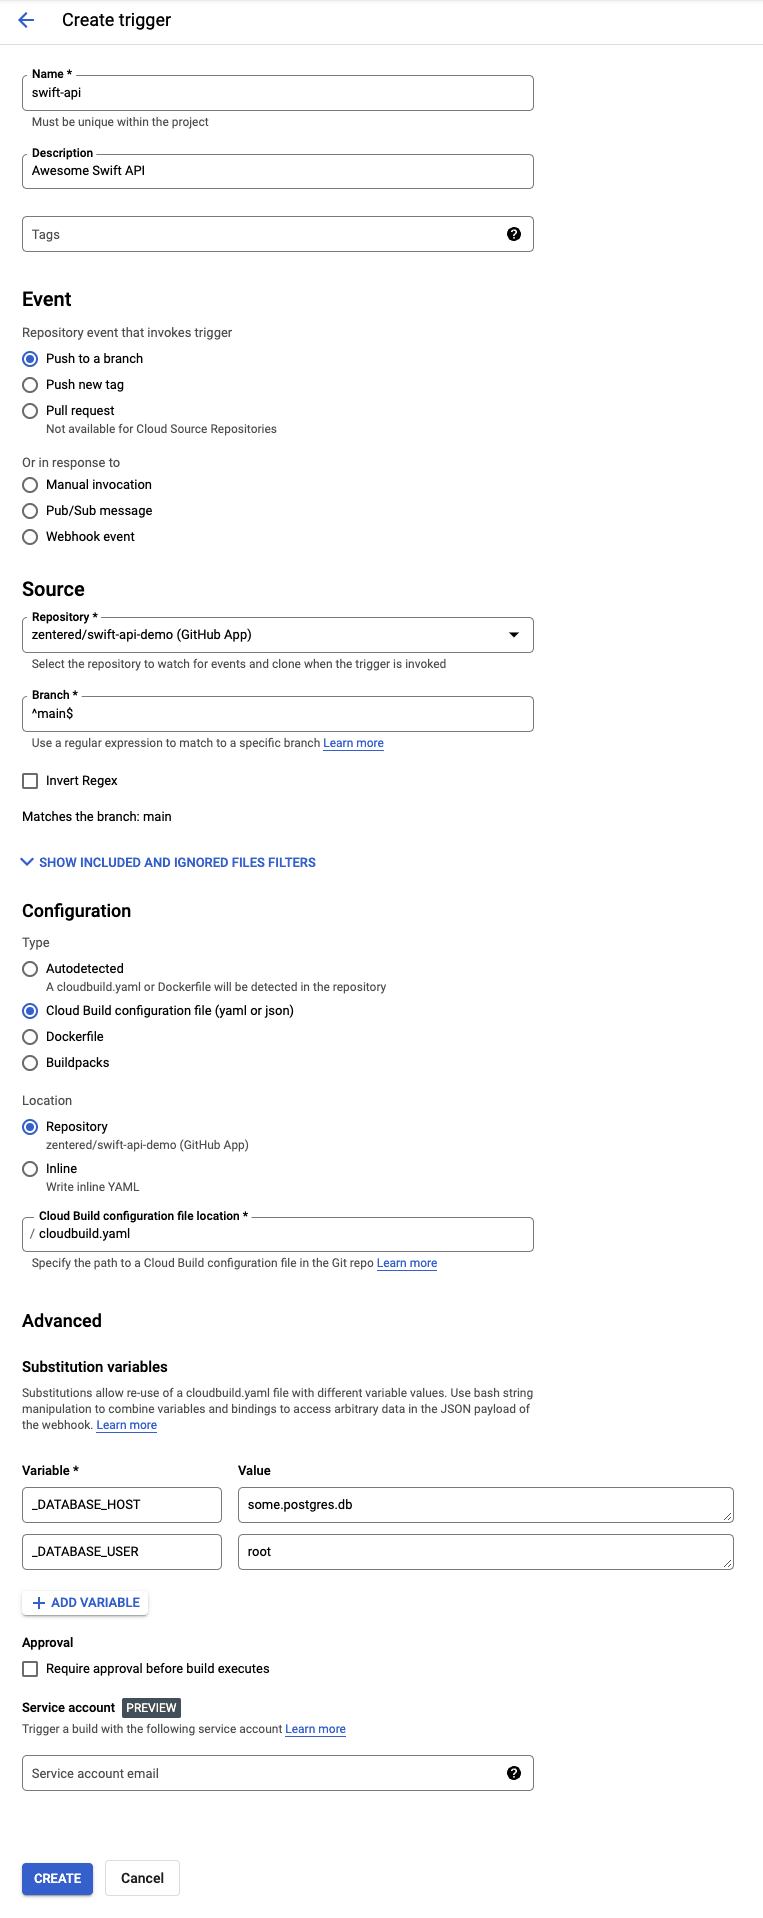
The easiest way to set this up is to go to Cloud Build Triggers and "Create a Trigger". Set a name, "Push to branch", and pick the Source Repository. You may need to authenticate to GitHub/Bitbucket and set permissions for Google Cloud Platform to access your repo. At the end you should set the "Substitution variables", which are environment variables that you can inject in the runtime, such as the DATABASE_HOST or other information. We're going to check out how to use the Secret Manager with Swift in a future post. See the screenshot for the trigger settings:
For the trigger to work, a cloudbuild.yml file is required in the root of the project. We first try to fetch the latest image for caching, then we build the Dockerfile, push it to the registry and deploy the service to Cloud Run. Important here is to set the --port=8080 parameter, as Vapor doesn't use the PORT environment variable at the moment. Here is a list of Cloud Run regions, we recommend us-central1 or europe-west1.
Unfortunately the builds take quite long, be prepared for 20-30 minute build times. To save yourself time and energy, build (docker build . -t swift-server) and test run (docker run -p 8080:8080 swift-server) the image on your local machine first, and make sure the server starts correctly.
cloudbuild.yml, replace <repo-name> and <image-name>:
steps:
  - name: 'gcr.io/cloud-builders/docker'
    entrypoint: 'bash'
    args:
      - '-c'
      - |
        docker pull ${_REGISTRY}/$PROJECT_ID/<repo-name>/<image-name>:latest || exit 0
  - name: 'gcr.io/cloud-builders/docker'
    args:
      - build
      - -t
      - ${_REGISTRY}/$PROJECT_ID/<repo-name>/<image-name>:$SHORT_SHA
      - -t
      - ${_REGISTRY}/$PROJECT_ID/<repo-name>/<image-name>:latest
      - .
      - --cache-from
      - ${_REGISTRY}/$PROJECT_ID/<repo-name>/<image-name>:latest
  - name: 'gcr.io/cloud-builders/docker'
    args:
      ['push', '${_REGISTRY}/$PROJECT_ID/<repo-name>/<image-name>:$SHORT_SHA']
  - name: 'gcr.io/cloud-builders/gcloud'
    args:
      - run
      - deploy
      - <repo-name>
      - --image=${_REGISTRY}/$PROJECT_ID/<repo-name>/<image-name>:$SHORT_SHA
      - --port=8080
      - --region=us-central1
      - --memory=512Mi
      - --platform=managed
      - --allow-unauthenticated
      - --min-instances=0
      - --max-instances=5
      - --set-env-vars
      - ^;^ENV=production; DATABASE_HOST=${_DATABASE_HOST}; DATABASE_PORT=${_DATABASE_PORT}; DATABASE_USERNAME=${_DATABASE_USERNAME}; DATABASE_PASSWORD=${_DATABASE_PASSWORD}; DATABASE_NAME=${_DATABASE_NAME}
images:
  - '${_REGISTRY}/$PROJECT_ID/<repo-name>/<image-name>:$SHORT_SHA'
  - '${_REGISTRY}/$PROJECT_ID/<repo-name>/<image-name>:latest'
timeout: 2000s
Note: See environment variables for more information on ^;^....
Cloud Run
In this article we use Cloud Run, a managed Kubernetes product on Google Cloud Platform. It allows cloud native, serverless deployments of Docker images directly from Cloud Build.
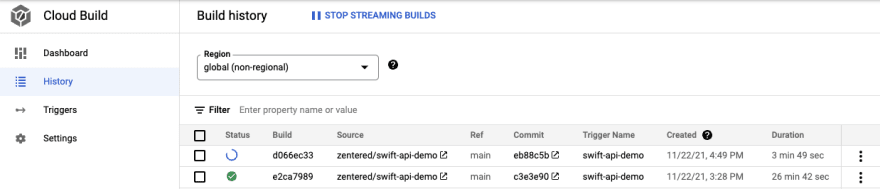
If you have the Dockerfile and cloudbuild.yml files in your repo, and Cloud Build finished the build job with the little green ✅, your Cloud Run service should already be deployed and running:

Click on the service and you should see the service details, including the URL of your app (ie. swift-api-demo-123.run.app.):
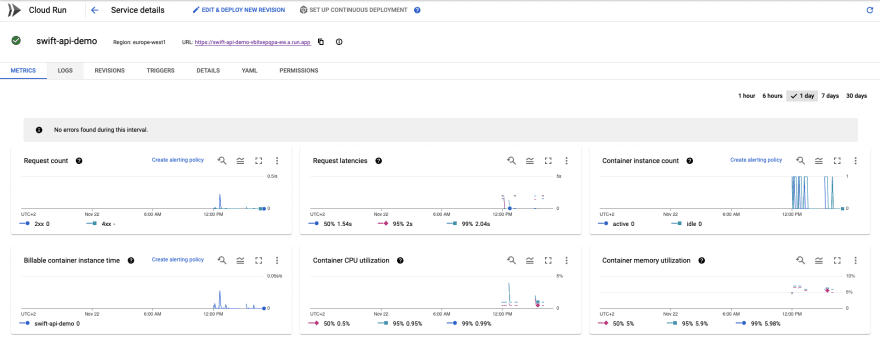
Clicking the link should show you a simple but satisfying It works! in the browser. If you add /todos to the URL, you should see the item you added during development, or you can POST to the address to create a new item. In our Cloud Build config we defined --min-instances=0 which means the app will go into standby after ~15 minutes if there are no requests, which is very cost effective. You can increase the number to have "always on" services. --max-instances sets the maximum number of instances, for auto scaling. The region, memory, cpu settings etc. can be adjusted either with substitution variables or hard-coded in the cloudbuild file. Substitutions are great if you want to deploy to different regions, for example.
As this proof of concept is successful, with Cloud Run we can also perform gradual rollouts such as canary deployments or blue/green deployments of your Swift API, run everything on your own domain and create high availability services 🥳.
Summary
This is very exciting. We're essentially using the same tools and workflows we already use for production apps in Node.js, and get the same logging, monitoring and scaling for our apps. To sum up the setup:
- Create a
Dockerfileand build/run the app locally to verify it works - Add the
Dockerfileandcloudbuild.ymlto the repo in the project root folder - Go to the Cloud Build history and check if your build is green
- Go to the Cloud Run overview to check the status of your service
Afterwards the workflow for developers is simple:
- Write code
- Commit, push and merge
- Wait...
- Check out your feature live in production
Thanks for reading! You can check out all the code on GitHub. If you have any questions or comments, please reach out on Twitter or start a discussion on GitHub.
We'll be working on authentication, performance and semantic versioning next, stay tuned!

Top comments (0)