
Often we want to share links to a website to other platforms, But the links are too long.
If I talk about this blog.
The link will be something like...
https://dev.to/pranjaljain0/creating-a-very-simple-url-shortner-using-express...
Which is already occupying 77 characters when it can occupy around 10 characters.
Lets get started
Prerequisit
- Nodejs
- Firebase Account
Packages
Step 1
Creating a project directory
The first step would be to create a project directory and cd into that directory.
mkdir urlshortner && cd urlshortner
Then we would initialize node.js in the same directory.
npm init
This command prompts you for several things, such as the name and version of your application. For now, you can simply hit RETURN to accept the defaults for all of them.
Now install Express in the project directory and save it in the dependencies list.
npm install express --save
Step 2
creating a basic express application
In the second step, we would start by creating a basic express application.
First, let's create an index.js file in the directory.
touch index.js
And paste the following code into the index.js file.
const express = require('express')
const app = express()
const port = 3000

app.get('/', (req, res) => {
  res.send('Hello World!')
})

app.listen(port, () => {
  console.log(`Example app listening at http://localhost:${port}`)
})
This will create a simple express application that will respond to a get request.
We can run and test the application by running node index.js and going to our browser and going to http://localhost:3000/. We should see Hello World! in the browser.
I will be using nodemon to execute the application as nodemon is a tool that helps develop node.js based applications by automatically restarting the node application when file changes in the directory are detected.
Install nodemon with the following command
npm i nodemon
Adding CORS configuration to the application.
Cross-Origin Resource Sharing (CORS) is a mechanism that uses additional HTTP headers to tell browsers to give a web application running at one origin, access to selected resources from a different origin.
include cors package to the application
var cors = require("cors");
Also, add these lines to allow headers
app.all("/*", function (req, res, next) {
    res.header("Access-Control-Allow-Origin", "*");
    res.header("Access-Control-Allow-Headers", "X-Requested-With");
    next();
});
Now the application looks like this...
const express = require('express')
const app = express()
const cors = require("cors");
const port = 3000

app.all("/*", function (req, res, next) {
    res.header("Access-Control-Allow-Origin", "*");
    res.header("Access-Control-Allow-Headers", "X-Requested-With");
    next();
});

app.get('/', cors(), (req, res) => {
  res.send('Hello World!')
})

app.listen(port, () => {
  console.log(`Example app listening at http://localhost:${port}`)
})
Step 3
Configuring the express application to receive URLs and generate a short version of them
Now we will start to configure the express application to receive URLs and generate a short version of them.
We need to add body-parser to parse POST body
const bodyParser = require("body-parser");
And we need to add these lines to tell the application that the POST body it will be receiving will be in JSON format.
app.use(bodyParser.urlencoded({ extended: true }));
app.use(bodyParser.json());
We will be using POST request to get the URLs from the user.
The function will be
app.post('/url', cors(), async (req, res) => {
        var URL = req.body.url;
        const host = req.get('host');
        var generatedURL = await generateURL(host, URL)
        if (generatedURL != null)
            res.json(generatedURL)
        else
            res.sendStatus(500)
    });
Here we are getting the URL from the user using req.body.url and storing it in a URL variable and also getting the hostname using req.get('host') Which we are sending both the variables to a function generateURL(host, URL)
The function generateURL() is as follows.
async function generateURL(host, url) {

        var randStr = randomstring.generate({
            length: 5,
            charset: 'alphabetic'
        });

        var response = {
            url: url,
            short_url: host + "/" + randStr
        };

        return response
    }
What this function does is it takes generates a random string of 5 characters which are all alphabets, & store both the URL and a short version of the URL in a response variable in JSON format.
An example of the response which will be generated is...
{
url: "www.pranjaljain.tech",
short_url: "www.sho.rt/CYzAS"
}
As we can see that we return the response from the generateURL(). Now we need to store the response and the Generated string on the database so that it can be referred to later.
After adding the generateURL() function...
const express = require('express')
const app = express()
const cors = require("cors");
const port = 3000

app.all("/*", function (req, res, next) {
    res.header("Access-Control-Allow-Origin", "*");
    res.header("Access-Control-Allow-Headers", "X-Requested-With");
    next();
});

app.use(bodyParser.urlencoded({ extended: true }));
app.use(bodyParser.json());

async function generateURL(host, url) {

        var randStr = randomstring.generate({
            length: 5,
            charset: 'alphabetic'
        });

        var response = {
            url: url,
            short_url: host + "/" + randStr
        };

        return response
    }

app.post('/url', cors(), async (req, res) => {
        var URL = req.body.url;
        const host = req.get('host');
        var generatedURL = await generateURL(host, URL)
        if (generatedURL != null)
            res.json(generatedURL)
        else
            res.sendStatus(500)
    });

app.get('/', cors(), (req, res) => {
  res.send('Hello World!')
})

app.listen(port, () => {
  console.log(`Example app listening at http://localhost:${port}`)
})
To add a URL we can run this command from our terminals
curl -H "Content-Type: application/json" -d '{"url":"{URL TO STORE}"}' http://localhost:3000/new
Step 4
Configuring firebase to work with our application.
Go to your Firebase Console
Create a new firebase project and name it anything you want.

Then click Continue on the second step and click Create Project on the final step.
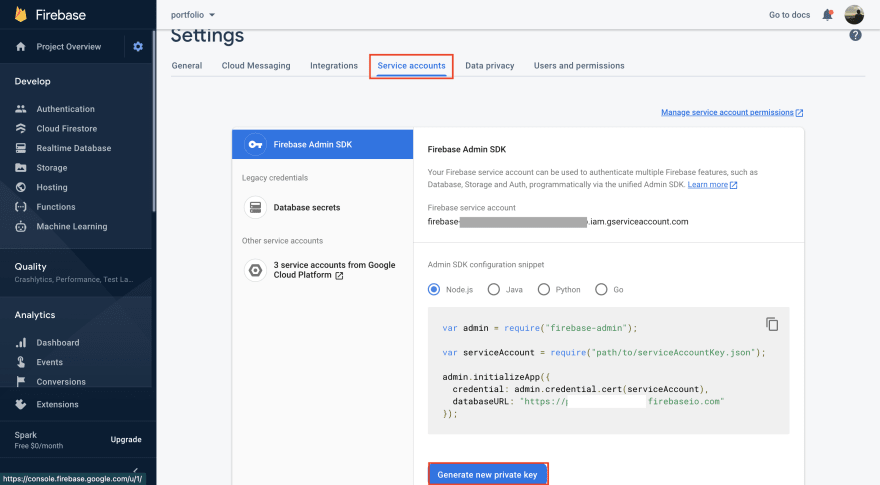
Now go to Project settings from the gear icon on the left pane.

Click on the Service account tab and generate a new private key, You will have to download the configuration JSON file after generating the new key.
After downloading the configuration JSON file store it in the project directory inside the folder and name the folder secret.
Now we need to run the command npm i firebase-admin to install firebase-admin which will help us perform Firebase-related operations.
And we include it in our application using
var admin = require('firebase-admin');
Now we include the config file which we downloaded from the Firebase console.
var serviceAccount = require("./secret/config.json");
It is not the perfect way to use this file but it serves the purpose. The perfect way is to use it as ENVIROMENT_VARIABLE.
We then initialize the firebase application using this command which is provided in the firebase docs.
admin.initializeApp({
    credential: admin.credential.cert(serviceAccount),
    databaseURL: "https://{YOUR_DB_NAME}.firebaseio.com"
});
Here you can see that we have passed the serviceAccount variable as the credentials to the app so the app knows which database it is talking to.
Now we create a function to store the URL to the database.
async function storePassword(id, response) {
        var db = admin.database();
        var ref = db.ref("restricted_access");
        ref.child("short_urls").child(id).set(response)
    }
Here we are providing the 5 characters as the ID or the key for the database the response JSON which we created before as the value completing a key-value pair.
Now we can successfully store the URL and shortened URL to the database with the ID as the key for reference.
The final application ut this step is...
const express = require('express')
const app = express()
const bodyParser = require("body-parser");
const cors = require("cors");
var admin = require('firebase-admin');
const port = 3000

var serviceAccount = require("./secret/config.json");


app.all("/*", function (req, res, next) {
    res.header("Access-Control-Allow-Origin", "*");
    res.header("Access-Control-Allow-Headers", "X-Requested-With");
    next();
});

app.use(bodyParser.urlencoded({ extended: true }));
app.use(bodyParser.json());

admin.initializeApp({
    credential: admin.credential.cert(serviceAccount),
    databaseURL: "https://{YOUR_DB_NAME}.firebaseio.com"
});

async function generateURL(host, url) {

    var randStr = randomstring.generate({
        length: 5,
        charset: 'alphabetic'
    });

    var response = {
        url: url,
        short_url: host + "/" + randStr
    };

    return response
}

async function storePassword(id, response) {
    var db = admin.database();
    var ref = db.ref("restricted_access");
    ref.child("short_urls").child(id).set(response)
}

app.post('/url', cors(), async (req, res) => {
    var URL = req.body.url;
    const host = req.get('host');
    var generatedURL = await generateURL(host, URL)
    if (generatedURL != null)
        res.json(generatedURL)
    else
        res.sendStatus(500)
});

app.get('/', cors(), (req, res) => {
    res.send('Hello World!')
})

app.listen(port, () => {
    console.log(`Example app listening at http://localhost:${port}`)
})
And as you can see

This is how our data is being uploaded to the firebase database.
Step 5
Retrieve the data and redirect.
Now in the final step of our express application, We need to retrieve the data from the firebase database, Then we need to redirect the user whenever he visits our short URL.
First, we will take the URL parameter as input from the user with a get method.
app.get('/:short_url_id', cors(), async (req, res) => {
        console.log(req.params.short_url_id)
    });
Using this method we will get the ID from the user which we need to find in firebase.
now we will write a function to search firebase with the ID and redirect as the search is successful.
async function getUrl(urlID, res) {
        var db = admin.database();
        var ref = db.ref("restricted_access/short_urls/" + urlID);
        var data = {}
        ref.once("value", function (snapshot) {
            data = snapshot.val();
            res.redirect(data['url'])
        });

    }
In the function getUrl(urlID, res) We are passing urlID and response as the parameters so that as soon as the urlID matches with a key-value pair, It will use the response to redirect the user to the fetched URL.
The final code can be found on this GitHub repo
You can deploy it on Heroku at it will work.
Thank you for reading till here.
Follow me
Twitter
GitHub
Dev.to

Oldest comments (0)