
Introduction
Have you ever wondered how does a machine classify among different species of animals just by looking at a image? How does a machine able to predict whether there is a cat or dog in an image? A rule based system might work for some images, however when a new or unseen image is given to the machine, there are chances prediction may go wrong. Also, rule based system might not scale for large number of images. Deep Neural Network comes as a rescue for such kind of problems and it really scales well. Deep Neural Network simplifies and help classify the things. In this tutorial, I will cover some concepts related to Deep Neural Networks and show how to build a serverless image classification application using Microsoft Azure Functions and ML.Net framework. The implementation will be in C# language.
If you prefer video, please visit Serverless ANZ 2020.
Before I jump into code, let's revisit some of the concepts used in this tutorial.
Serverless

source: https://parkardigital.com/serverless-cloud-computing/
Serverless is an execution model where the cloud provider such as AWS, Azure or Google cloud is responsible for executing a piece of code by dynamically allocating the resources. The infrastructure is managed and maintained by the Cloud providers. The consumer is billed only for the resources consumed to run the code. It's an efficient way to reduce the overhead and cost of managing the servers. The code that is executed is in the form of a function, hence sometimes its called 'Function as a Service(Faas). It allows you to focus on writing business logic instead of spending time on managing the infrastructure.
Azure Functions


Azure Functions is a serverless framework developed by Microsoft and provides rich capabilities. It allows you to run a small piece of code(called 'Functions') without worrying about application infrastructure. It leverages event-driven capabilities and runs the code whenever a supported trigger happens. It support multiple triggers such as HTTP, Blob, Queue, Service Bus, etc. I'll be deploying the prediction part of machine learning pipeline to Azure functions which will take an image as an input and throw back a prediction.
Deep Neural Network

source: https://quantdare.com/what-is-the-difference-between-deep-learning-and-machine-learning/
Deep Learning is subset of Machine learning in Artificial Intelligence. It is capable of learning features on its own compared to machine learning where features are identified manually. A neural network, is a technology built to simulate the activity of a human brain such as pattern recognition and its done through a set of layers. When we have multiple layers present in a neural network, its called as Deep Neural network. It mainly comprise of an input layer, multiple hidden layers and a final output layer. I'll be using a pre-trained deep neural network such as ResNet18 in this tutorial. Pre-trained means its already trained on large amount of images and we'll use that learning to make predictions for new images being given to the machine learning pipeline. Its called as Transfer Learning.
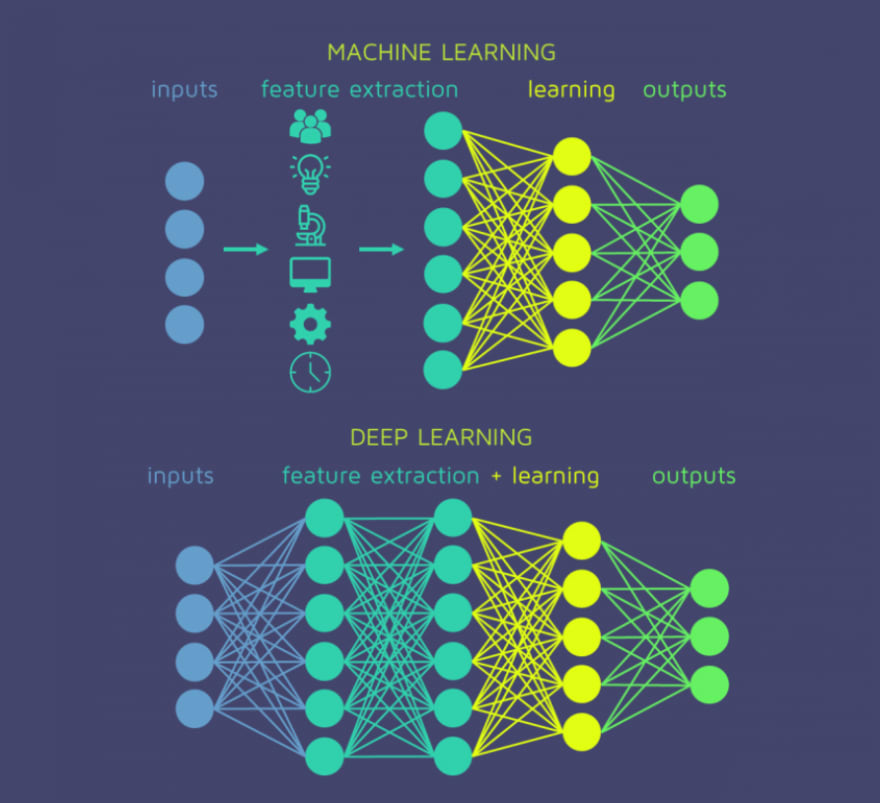
source: https://quantdare.com/what-is-the-difference-between-deep-learning-and-machine-learning/
ML.Net
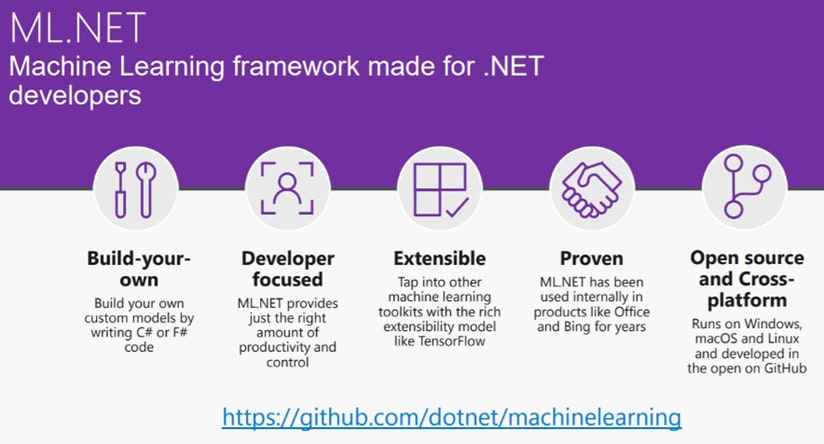
ML.Net is a cross-platform framework from Microsoft for developing Machine learning models in the .Net ecosystem. It allows .Net developers to solve business problems using machine learning algorithms leveraging their preferred language such as C# or F#. It's highly scalable and used within Microsoft in many of its products such as Bing, Powerpoint, etc. I'll be using image classification algorithms for this tutorial.
Application
I am going to create an application that will classify an image based on 1000 classes present in ImageNet dataset. First we'll create a local console application and thereafter move it to Azure function(Local and Cloud). The framework used for this exercise is ML.Net and language is C#.
Prerequisites
- IDE - Visual Studio / Visual Studio Code
- REST Client - Postman
- Serverless Deployment
- Local :
- Azure function - Prediction Logic
- Blob Storage via Storage emulator - Machine learning Model
- Cloud: Azure subscription (Only for cloud deployment to Azure Function) and Azure blob storage
Cloud Architecture

Image Classification - Serverless (Azure Function) - Local
As this is a classification problem where an image is given to the App and its class is predicted. In Azure, we can achieve this using different options available such as Azure App service, Azure Functions. Azure App service uses App service plan and is more expensive compared to Azure Function which is serverless and billed based on usage only. We need an Azure subscription in order to use Azure Functions. Limited time subscription can be obtained by registring at Azure portal.
I'll be using a pre-trained MobileNet V2 model for predictions. In order to use this, donwload Mobilenet and upload it to Azure blob storage both locally(storage emulator) and cloud. I have stored it in 'serverlessdnnstorage' container and file name as mobilenetv2-7.onnx
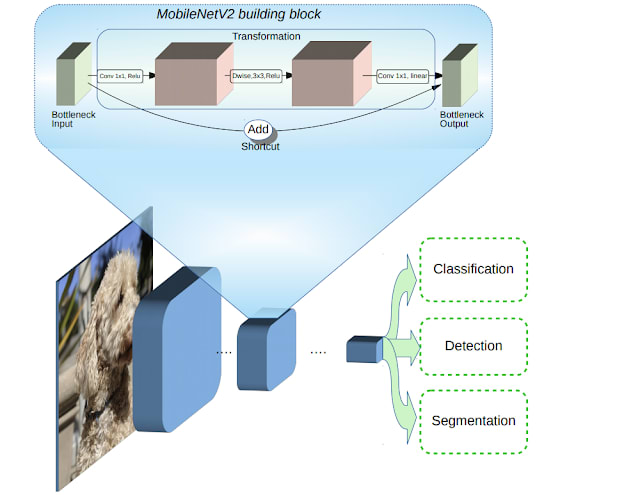
source: https://ai.googleblog.com/2018/04/mobilenetv2-next-generation-of-on.html
Steps in creating a image classification serverless function using Azure Function
- Create Azure Function project using visual studio - Http Trigger
- Add Http trigger function 'ClassifyImage' to the project
- Add nuget packages
- Microsoft.ML
- Download MobileNet model from Blob and access it in function app
- Local - Storage emulator
- Cloud - Upload to Azure blob storage and access it from there.
- Load model
- Make prediction and return result as a response
- Validate Azure function endpoint through Postman REST client.
I'll first create Azure function locally using template present in Visual Studio. Once everything is working fine, I'll deploy azure function to cloud.
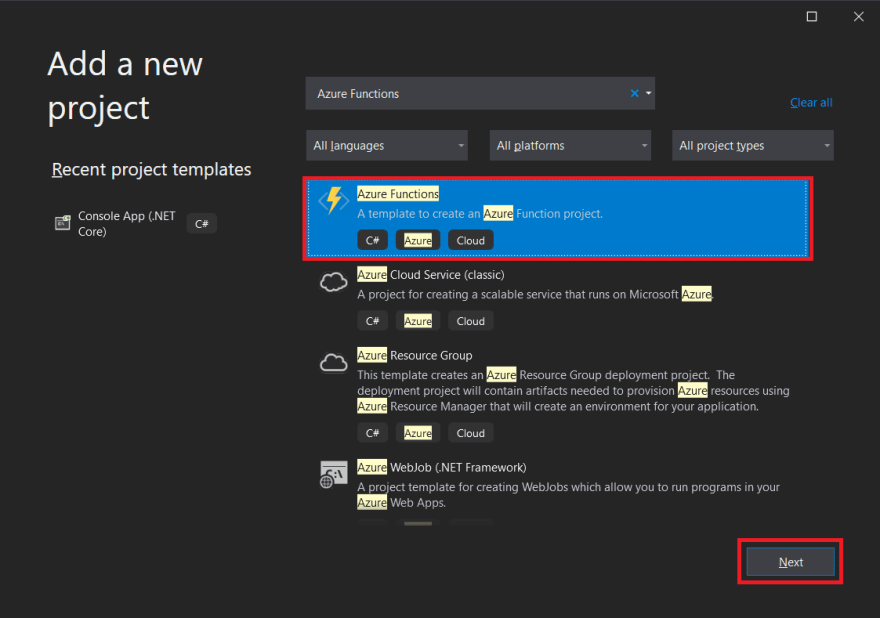
Let's create a new project and select 'Azure Function' from the project template and add this project to the existing solution.
In the next dialog, give a name to the project 'ServerlessDNNFunction' and click create.

This will add a new project to ServerlessDNN solution. Build the solution, just to ensure there are no errors. A default function(Function1) will be added.
Rename 'Function1.cs' file to ClassifyImage.cs and ensure it gets changed in the function attribute as shown below.
namespace ServelessDNNFunction
{
    public static class ClassifyImage
    {
        [FunctionName("ClassifyImage")]
        public static async Task<IActionResult> Run(
            [HttpTrigger(AuthorizationLevel.Anonymous, "get", "post", Route = null)] HttpRequest req,
            ILogger log)
        {
            log.LogInformation("C# HTTP trigger function processed a request.");

            string name = req.Query["name"];

            string requestBody = await new StreamReader(req.Body).ReadToEndAsync();
            dynamic data = JsonConvert.DeserializeObject(requestBody);
            name = name ?? data?.name;

            string responseMessage = string.IsNullOrEmpty(name)
                ? "This HTTP triggered function executed successfully. Pass a name in the query string or in the request body for a personalized response."
                : $"Hello, {name}. This HTTP triggered function executed successfully.";

            return new OkObjectResult(responseMessage);
        }
    }
}
Press F5 to run the project and it should generate an endpoint like http://localhost:7071/api/ClassifyImage

- Hit the url in browser and message 'This HTTP triggered function executed successfully.
- Remove 'get' from the HttpTrigger attribute of the function as we only need 'post' to upload an image.
- Ensure AuthorizationLevel is Anonymous. Do not do this on Production.
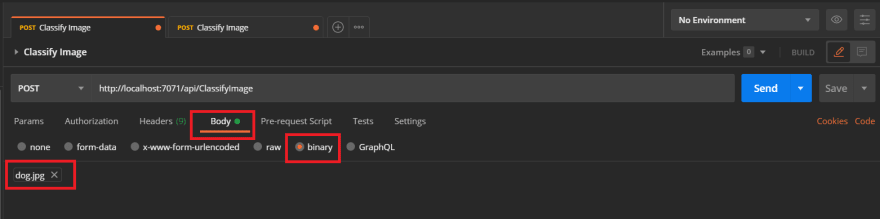
In order to upload an image from postman, create a POST request with above URL and select 'Body' as binary. Select a file by clicking on 'Select File' in the Body tab

Add below code in Azure function to read and save uploaded image to temp directory
STEP-1: Upload model to Blob storage
In order to use the pre-trained model, we need to upload mobilenetv2-7.onnx (14MB) to some storage. The file can be accessed through disk or Storage Blob. In order to keep the experience same for both local and cloud, I have used storage emulator for storing/reading the model. The model can be uploaded through Microsoft Azure Storage Explorer.
Please follow steps to create a container 'serverlessdnn' and upload mobilenetv2-7.onnx
Launch Azure Storage Explorer and select 'Local & Attached' account.

Select 'serverlessdnn' and click on Upload to upload mobilenetv2-7.onnx


Model will be uploaded to blob and available to be used.

STEP-2: Load model from Blob Storage to Azure Function
Navigate back to Azure function in visual studio. In order to load model we need to have below changes

Open local.settings.json and replace with below content
{
    "IsEncrypted": false,
    "Values": {
      "AzureWebJobsStorage": "UseDevelopmentStorage=true",
      "FUNCTIONS_WORKER_RUNTIME": "dotnet",
      "CONTAINER_NAME": "serverlessdnn",
      "MODEL_FILE": "mobilenetv2-7.onnx"
      }
}
Add 'Azure.Storage.Blobs' nuget package
Add below items at the start of ClassifyImage function
// Load App Settings
var containerName = Environment.GetEnvironmentVariable("CONTAINER_NAME") ?? "serverlessdnn";
var connectionString = Environment.GetEnvironmentVariable("AzureWebJobsStorage") ?? "UseDevelopmentStorage=true";
var modelName = Environment.GetEnvironmentVariable("MODEL") ?? "mobilenetv2-7.onnx";
- Add 'ReadModelFromBlob' method to read blob from container and return a stream of model.
private static Stream ReadModelFromBlob(ILogger log, string connectionString, string containerName, string modelName)
{
   try
   {
       BlobContainerClient container = new BlobContainerClient(connectionString, containerName);
       container.CreateIfNotExists(PublicAccessType.Blob);
       var blockBlob = container.GetBlockBlobClient(modelName);

       log.LogInformation($"Loading Model : {modelName}");

       var modelStream = new MemoryStream();
       blockBlob.DownloadTo(modelStream);
       return modelStream;
   }
   catch (Exception e)
   {
       log.LogError(e, e.Message);
       throw;
   }
}
We need to save this model file to temp path as ML.Net support loading of ONNX model from a path and not from the stream
Add SaveModel(...) to save the model to temp path
private static string SaveModel(ILogger log, string tempPath, string modelName, Stream modelStream)
{
    string savedModelPath = Path.Combine(tempPath, modelName);

    try
    {
         using (var fileStream = File.Create(savedModelPath))
         {
             modelStream.Seek(0, SeekOrigin.Begin);
             modelStream.CopyTo(fileStream);
         }
    }
    catch (Exception e)
    {
         log.LogError(e, e.Message);
         throw;
    }

    return savedModelPath;
}
- Add below line to load the model from blob and save to temp path in ClassifyImage function
// STEP-2: Load model from Blob storage and save to temp path
string tempPath = CreateTempDirectory(log);

var modelStream = ReadModelFromBlob(log, connectionString, containerName, modelName);
var savedModelPath = SaveModel(log, tempPath, modelName, modelStream);
log.LogInformation($"Model saved to : {savedModelPath}");
STEP-3: Load ONNX model into ML.Net MLContext
-
Add below nuget packages
- Microsoft.ML
- Microsoft.ML.Vision
- Microsoft.ML.ImageAnalytics
In order to load the ONNX model, we need to define schema for Model input and output.
Add a new struct 'InputSettings' for holding attributes of image such as height and width. As we are working with MobileNet, it expects input image to be of size 224 x 224
public struct ImageSettings
{
     public const int imageHeight = 224;
     public const int imageWidth = 224;
}
Add a new class 'ModelInput' which holds information about the input image that will be uploaded and its class as Label. ImageType attribute allows defining the size of image.
public class ModelInput
{
    [ImageType(ImageSettings.Height, ImageSettings.Width)]
    public Bitmap ImageSource { get; set; }
}
Add a new class 'ModelOutput' which holds information about the output image that will be uploaded.
public class ModelOutput
{
    [ColumnName("mobilenetv20_output_flatten0_reshape0")]
    public float[] Score { get; set; }
}
Score attribute is important. The value 'mobilenetv20_output_flatten0_reshape0' is the name of output layer of the model. You can get it by opening mobilenetv2-7.onnx file using Netron application. As seen below input layer name is 'data' and output layer name is 'mobilenetv20_output_flatten0_reshape0'.
Make a note of input and output layer names and use it.

Now we'll create MLContext and load the ONNX model
- Add 'Microsoft.ML.OnnxTransformer' nuget packages
-
For ML pipeline, three transformations are done
- ResizeImages: It is to ensure the size of input size is 224 x224
- ExtractPixels: Its used to extract pixel values from the data specified in the column. A pixel value varies from 0-255.
- ApplyOnnxModel: It loads the ONNX model from the specified path
Data is loaded in a lazy manner using MLContext.
In order to load the data into pipeline, Fit(...) method is called.
// STEP-3: Load ONNX model into ML.Net MLContext
var modelInputName = "data";
var modelOutputName = "mobilenetv20_output_flatten0_reshape0";

var mlContext = new MLContext(seed: 1);

var emptyData = new List<ModelInput>();
var data = mlContext.Data.LoadFromEnumerable(emptyData);

var pipeline = mlContext.Transforms.ResizeImages(resizing: ImageResizingEstimator.ResizingKind.Fill, outputColumnName: modelInputName, imageWidth: ImageSettings.Width, imageHeight: ImageSettings.Height, inputColumnName: nameof(ModelInput.ImageSource))
        .Append(mlContext.Transforms.ExtractPixels(outputColumnName: modelInputName))
.Append(mlContext.Transforms.ApplyOnnxModel(modelFile: savedModelPath, outputColumnName: modelOutputName, inputColumnName: modelInputName));

var model = pipeline.Fit(data);
STEP-4: Prediction
In order to predict, we need to supply the image uploaded to Azure function and pass it to the ML pipeline. In ML.Net PrectionEngine has Predict(...) API to perform prediction on a single input image. maxScore gives the predicted class
// STEP-4: Prediction
Bitmap testImage = (Bitmap)Image.FromStream(req.Body);

ModelInput inputData = new ModelInput()
{
    ImageSource = testImage
};

var predictionEngine = mlContext.Model.CreatePredictionEngine<ModelInput, ModelOutput>(model);
var prediction = predictionEngine.Predict(inputData);
var maxScore = Convert.ToInt16(prediction.Score?.Max());
STEP-5: Return Predicted value as a response to Function API
// STEP-5: Return Predicted value as a response to Function API
string responseMessage = $"Predicted: {maxScore}";
return new OkObjectResult(responseMessage);
- Build the solution
- ERROR In case below error is reported, add win-x64 to the ServerlessDNNFunction.csproj file
1>C:\Program Files (x86)\Microsoft Visual Studio\2019\Professional\MSBuild\Current\Bin\Microsoft.Common.CurrentVersion.targets(4364,5): warning MSB3026: Could not copy "C:\Users\<username>\.nuget\packages\microsoft.ml.onnxruntime\1.4.0\runtimes\osx-x64\native\libonnxruntime.dylib.dSYM\Contents\Resources\DWARF\libonnxruntime.dylib" to "bin\Debug\netcoreapp3.1\bin\runtimes\osx-x64\native\libonnxruntime.dylib.dSYM\Contents\Resources\DWARF\libonnxruntime.dylib". Beginning retry 1 in 1000ms. Could not find a part of the path 'bin\Debug\netcoreapp3.1\bin\runtimes\osx-x64\native\libonnxruntime.dylib.dSYM\Contents\Resources\DWARF\libonnxruntime.dylib'.
<Project Sdk="Microsoft.NET.Sdk">
  <PropertyGroup>
    <TargetFramework>netcoreapp3.1</TargetFramework>
    <AzureFunctionsVersion>v3</AzureFunctionsVersion>
    <Platforms>AnyCPU</Platforms>
    <RuntimeIdentifier>win-x64</RuntimeIdentifier>
  </PropertyGroup>
  <ItemGroup>
    <PackageReference Include="Azure.Storage.Blobs" Version="12.5.1" />
    <PackageReference Include="Microsoft.ML" Version="1.5.1" />
    <PackageReference Include="Microsoft.ML.ImageAnalytics" Version="1.5.1" />
    <PackageReference Include="Microsoft.ML.OnnxRuntime" Version="1.4.0" />
    <PackageReference Include="Microsoft.ML.OnnxTransformer" Version="1.5.1" />
    <PackageReference Include="Microsoft.ML.Vision" Version="1.5.1" />
    <PackageReference Include="Microsoft.NET.Sdk.Functions" Version="3.0.7" />
  </ItemGroup>
  <ItemGroup>
    <None Update="host.json">
      <CopyToOutputDirectory>PreserveNewest</CopyToOutputDirectory>
    </None>
    <None Update="local.settings.json">
      <CopyToOutputDirectory>PreserveNewest</CopyToOutputDirectory>
      <CopyToPublishDirectory>Never</CopyToPublishDirectory>
    </None>
  </ItemGroup>
</Project>
STEP-6: Validate using REST client - Postman
Run Project and hit the URL with an image of a dog from Postman as shown below
Input image

Predicted: 212 (English setter)
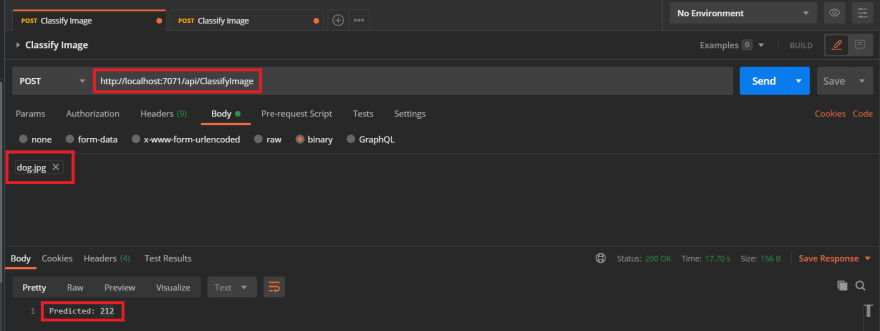
Predicted class is 212 which corresponds to 'English Setter', one of the dog breed. The prediction may not be very accurate as we have used MobileNet which doesn't have a very good accuracy. The reason of using it is small model size. Azure function can process small models only in consumption plan. If you have a high configuration of Azure Function, a large model could be used. Also, memory allocated in consumption plan is 1.5 GB only for the CPU.
Image Classification - Serverless (Azure Function) - Cloud
Now we are going to deploy this function app on Cloud(Azure). We need an Azure subscription for it. Deploying to azure is pretty easy through Visual Studio. Steps in deploying the Azure Function to the cloud is as follows.
Prerequisites
- Azure Subscription
- Azure Resource Group
Deploy to Cloud
Before we deploy function to cloud, please ensure mobilenetv2-7.onnx is saved to Azure Storage blob with the correct container name and blob name. Follow the steps mentioned for local, just replace local with Azure account.

Deploying through Visual Studio
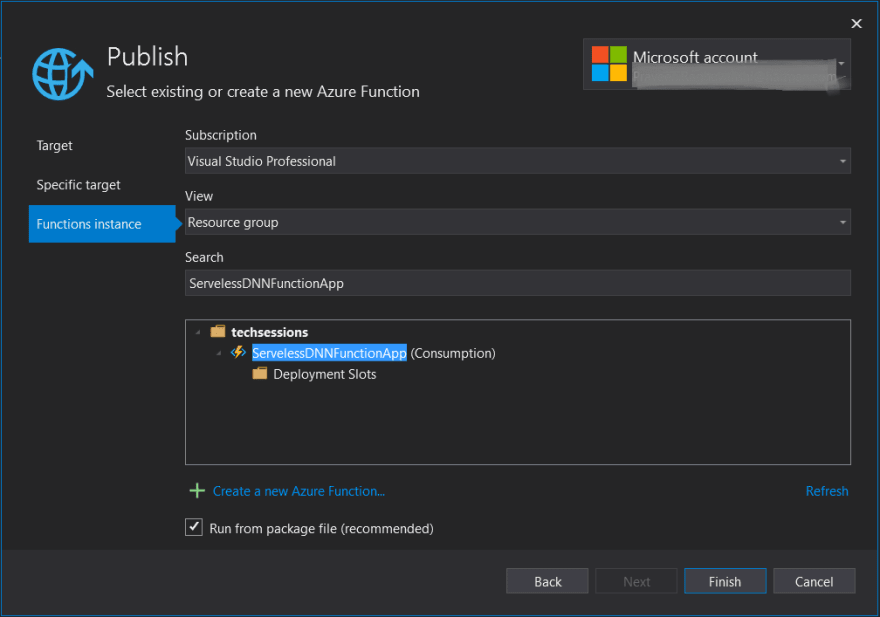
Right click on ServerlessDNNFunction project and select Publish


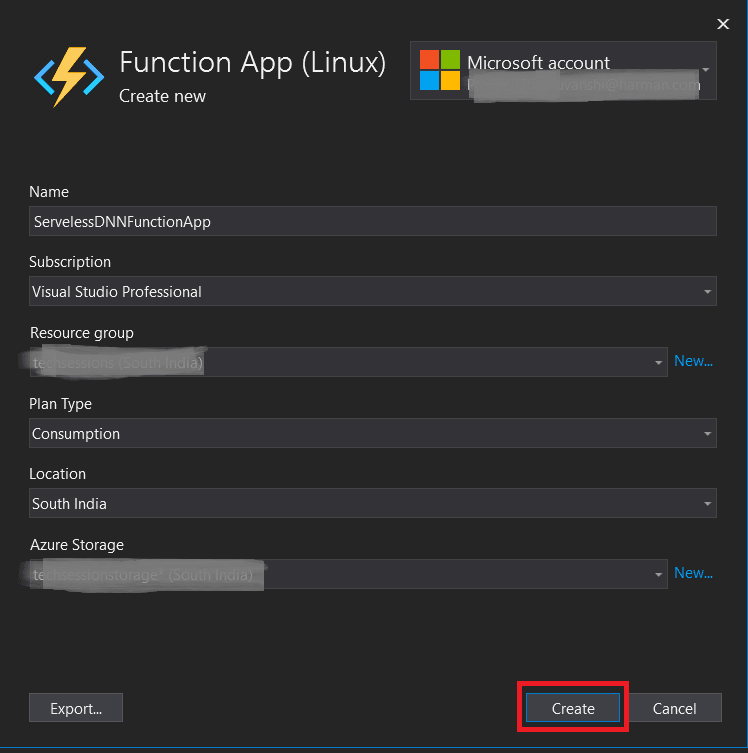
Login with your Azure credentials in the next dialog. Select subscription and Resource group. I'll create a new Azure Function. Click on 'Create a new Azure Function' at the bottom.

Fill in the details of new Azure function
If above step is successful, skip next step. If its unsuccessful and gives below error, navigate to previous dialog, select 'Specific target' and select 'Windows'. Hopefully this time Azure function will be created.

Successful creation of Azure function
Once published, Azure Function app is ready to use.
Error In case below error is reported in Azure portal for the Azure function, go to Configuration -> General Settings -> Change 'Platform' to '64 Bit' and redeploy.
System.IO.FileLoadException : Could not load file or assembly 'ServerlessDNNFunction, Version=1.0.0.0, Culture=neutral, PublicKeyToken=null'.

Validate using REST client - Postman
Run Project and hit the URL with an image of a dog from Postman as shown below

Input image
Predicted: 212 (English setter)

Predicted class is 212 which corresponds to 'English Setter', one of the dog breed. The prediction may not be very accurate as we have used MobileNet which doesn't have a very good accuracy. The reason of using it is small model size. Azure function can process small models only in consumption plan. If you have a high configuration of Azure Function, a large model could be used. Also, memory allocated in consumption plan is 1.5 GB only for the CPU.
Conclusion
In this tutorial, we saw how we can leverage transfer learning to create deep neural networks and consume it within .Net ecosystem. Later we deployed the azure function app to Azure cloud and saw how easy is to create an image classification application. We saw lot of concepts such as Deep Neural networks, Serverless, Azure Functions and ML.Net being utilized and combined together to create an amazing application.
Resources
I am running an unofficial telegram group for ML.Net enthusiasts, please feel free to join it at https://t.me/joinchat/IifUJQ_PuYT757Turx-nLg
Please share your feedback/comments through below channels.
Contact
Twitter : @praveenraghuvan\
LinkedIn : https://in.linkedin.com/in/praveenraghuvanshi \
Github : https://github.com/praveenraghuvanshi \
dev.to : https://dev.to/praveenraghuvanshi

Oldest comments (0)