What is Spring Tool Suite (STS)?
- STS is an IDE and eclipse-based development environment that is used to develop Spring applications.
- It is easy to run, implement, deploy, and debug the application.
- It provides a ready-to-use environment to implement, run, deploy, and debug the application. It validates our application and provides quick fixes for the applications.
IDE
You can use either IntelliJ, Eclipse, or STS.
Source Code
You can refer to the source code below.
https://github.com/ZarLiHninn/Spring-Boot-Hello-World-Example
How to install Spring Tool Suite (STS)
It can be either installed by downloading STS from https://spring.io/tools or can be installed as a plugin to an existing installation of Eclipse JEE.
In this tutorial, let’s install STS as a plugin in Eclipse.
Help → Eclipse Marketplace
Type Spring Tool Suite in the search box, and click the Go button.


After installation, restart Eclipse.
How to create a project
File → New → Spring Starter Project

Fill necessary information

Configure Group for your component which is the root package name to use.
Configure Artifact for your component which is the name of the project. When configuring Artifact, you will be noticed the project name is automatically filled.
Fill description for your project.
Fill the root package of the project. If not specified, the value of the Group attribute is used.
Choose Java version you want to use.
Choose Jar or War.
If you want to execute Java application containing Java class files, and associated metadata, you can choose Jar.
-
If you want to develop Web application containing Servlet, JSP, HTML, JavaScript, and other necessary files, you can choose War.
Select Dependencies

Choose Spring Web, Spring Boot DevTools, and Thymeleaf by searching.- The spring-web dependency contains common web-specific utilities for both Servlet and Portlet environments, while spring-web MVC enables the MVC support for Servlet environments.
- The Spring-boot-devtools automatically reload your project when you change some code in your classpath file.
- Thymeleaf is a Java-based library or template engine to create web-based applications.
And now, you can see the project in Project Explorer.

Let’s see the files from the project folder
DemoApplication.java
- It is the main class of Spring Boot Project. ```java
package com.reytech.demo;
import org.springframework.boot.SpringApplication;
import org.springframework.boot.autoconfigure.SpringBootApplication;
@SpringBootApplication
public class DemoApplication {
public static void main(String[] args) {
    SpringApplication.run(DemoApplication.class, args);
}
}
**pom.xml**
- As we filled and selected when creating a project, you can see the following properties, description, dependencies, etc.
```xml


<?xml version="1.0" encoding="UTF-8"?>
<project xmlns="http://maven.apache.org/POM/4.0.0" xmlns:xsi="http://www.w3.org/2001/XMLSchema-instance"
    xsi:schemaLocation="http://maven.apache.org/POM/4.0.0 https://maven.apache.org/xsd/maven-4.0.0.xsd">
    <modelVersion>4.0.0</modelVersion>
    <parent>
        <groupId>org.springframework.boot</groupId>
        <artifactId>spring-boot-starter-parent</artifactId>
        <version>2.3.1.RELEASE</version>
        <relativePath/> <!-- lookup parent from repository -->
    </parent>
    <groupId>com.reytech</groupId>
    <artifactId>demo</artifactId>
    <version>0.0.1-SNAPSHOT</version>
    <name>demo</name>
    <description>Demo project for Spring Boot</description>

    <properties>
        <java.version>1.8</java.version>
    </properties>

    <dependencies>
        <dependency>
            <groupId>org.springframework.boot</groupId>
            <artifactId>spring-boot-starter-thymeleaf</artifactId>
        </dependency>
        <dependency>
            <groupId>org.springframework.boot</groupId>
            <artifactId>spring-boot-starter-web</artifactId>
        </dependency>

        <dependency>
            <groupId>org.springframework.boot</groupId>
            <artifactId>spring-boot-devtools</artifactId>
            <scope>runtime</scope>
            <optional>true</optional>
        </dependency>
        <dependency>
            <groupId>org.springframework.boot</groupId>
            <artifactId>spring-boot-starter-test</artifactId>
            <scope>test</scope>
            <exclusions>
                <exclusion>
                    <groupId>org.junit.vintage</groupId>
                    <artifactId>junit-vintage-engine</artifactId>
                </exclusion>
            </exclusions>
        </dependency>
    </dependencies>

    <build>
        <plugins>
            <plugin>
                <groupId>org.springframework.boot</groupId>
                <artifactId>spring-boot-maven-plugin</artifactId>
            </plugin>
        </plugins>
    </build>

</project>
DemoApplicationTests.java
- It contains the basic context that can be used to start writing the tests as we start developing the application. ```java
package com.reytech.demo;
import org.junit.jupiter.api.Test;
import org.springframework.boot.test.context.SpringBootTest;
@SpringBootTest
class DemoApplicationTests {
@Test
void contextLoads() {
}
}
#Let’s add some coding files to show Hello World
Let’s add HomeController.java and hello.html and message.html to show Hello World and some message on your browser.
- Under the demo package, please create a controller package and HomeController.
- Under src/main/resources/templates directory, create hello.html and message.html.

**HomeController.java**
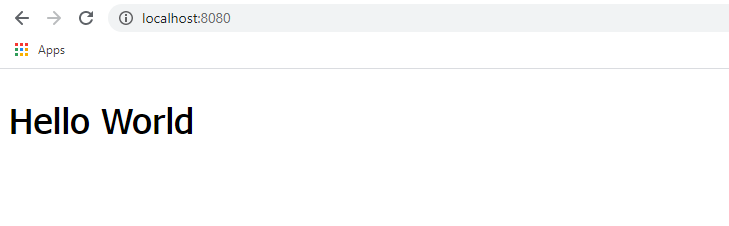
- hello() function calls hello.html when URL is localhost:8080/
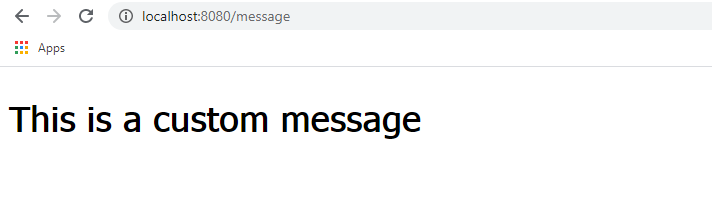
- message() function calls message.html and you can set the custom message on the controller by using model.addAttribute ("message", "This is a custom message");
```java
package com.reytech.demo.controller;
import org.springframework.stereotype.Controller;
import org.springframework.ui.Model;
import org.springframework.web.bind.annotation.GetMapping;
@Controller
public class HomeController {
@GetMapping("/")
public String hello(){
return "hello";
}
@GetMapping("/message")
public String message(Model model) {
model.addAttribute("message", "This is a custom message");
return "message";
}
}
hello.html
<!DOCTYPE html>
<html xmlns="http://www.w3.org/1999/xhtml"
      xmlns:th="http://www.thymeleaf.org">
<head>
    <meta charset="UTF-8">
    <title>Spring Demo Project</title>
</head>
<body>
    <h1>Hello World</h1>
</body>
</html>
message.html
- The th:text=”${attributename}” tag attribute is used to display the value of model attributes. ```html
<!DOCTYPE html>
xmlns:th="http://www.thymeleaf.org">
Spring Demo Project
#Let’s run
Just run the server and navigate to http://localhost:8080/.
And navigate to http://localhost:8080/message.
You can see the following message on your browser.
Thank You!

Top comments (0)