Flutter is a mobile SDK, built and open sourced by Google; and at its core, it’s about empowering everyone to build beautiful cross platform mobile apps(Now available for the Web and Desktop as well). 📱
Whether you come from the world of web development or native mobile development, Flutter makes it easier than ever to create mobile apps in a familiar, simplified way.
Its a platform that provides everything you need to build full scale applications: rendering engine, UI components, testing framework, tooling, routing, and so much more.
In this article we'll not just look into but also understand in depth the real super-power of Flutter that is rendering, which happens over a million times everyday. 👨🏻💻
Rendering
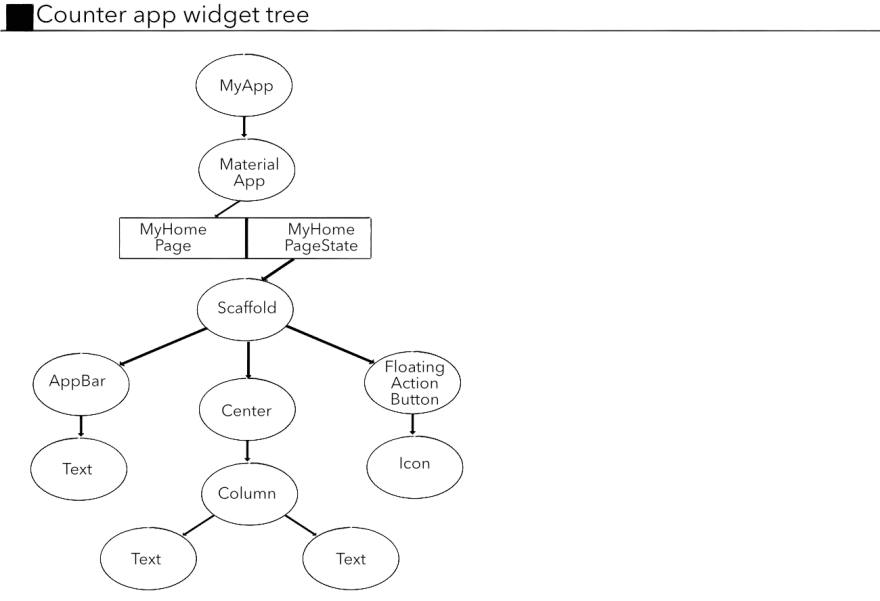
Your Flutter application is always connected to a huge Widget Tree 🌲. Even for the simplest of applications you might see a pretty long Widget Tree. The Widget tree of the basic counter app which is provided by default in Flutter would look like this(In reality its much bigger than this):
Flutter widgets are reactive. They respond to any new information from an outside source. Consider a Stateful component as a parent to another Stateless component.
In that case whenever one of the states on which the stateless component was relying on changes, the widget calls didUpdateWidget life cycle method and repaints if necessary. For example:
IconButton(
    icon: Icons.add,
    onPressed: (){
        setState((){
            this.value++;
        })
    }
),
Text("Value = ${this.value}")
In this example the value state is a part of Text Widget which is updated every time it receives the onPressed callback from icon button. The button calls the setState() method will tells Flutter to repaint the widget which relies on the state change.
Flutter knows that it needs to rebuild because the IconButton state is marked dirty.
Let's look at this in a stepwise manner 🧗
- User taps on the Icon Button.
- Your application calls the
setStatemethod in theIconButton.onPressed()callback. - Flutter realises that it needs to re-build, because the state value inside the has updated which called the
didUpdateWidgetcausing the IconButton to be marked asdirty. - The new widget replaces the old one in the Widget Tree.
- Flutter renders the new tree.
Now that you know how flutter knows when to render a new widget, let's take a look at how the rendering happens in a series of steps.
Rendering Pipeline
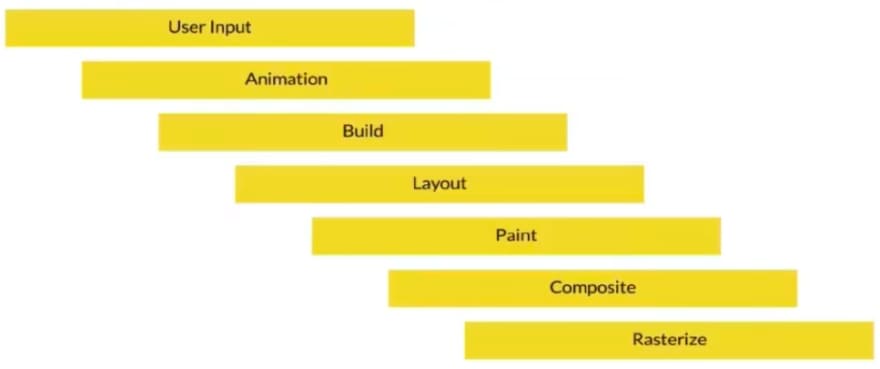
This is a sequence of steps that the Flutter's rendering engine takes when rendering objects. This overview will provide a high-level description of the steps in the pipeline.
Animate
Flutter kicks off the rendering process by starting an animation ticker. If an element needs to be repainted, for example, if you are scrolling down a list, in a scenario like this, the starting position of the list is incrementally moved to its ending location in order for it to have a smooth transition.
This is controlled by animation tickers, which dictate the time that an element has to move. You can therefore control how dramatic the animations are. During an animation, flutter rebuilds and paints every single frame.
Build
In this step Flutter builds and constructs the Widget Tree. The individual configurations of the widgets are taken into consideration here while building the widget tree, rather than the Shape and Size of the Widget.
It means the data and configuration of how that Widget will look into the screen is taken into count here, it's not actually building a blue box or something like that. Widgets just handle the configuration of what will eventually be painted into the screen.
Layout
After the Widgets are composed, Flutter starts thinking about layouts. Flutter walks down the tree in a Bottom Up fashion in linear time(If you've done Compiler Design before you might get this part easily).
When it walks down the tree, it collects information about the position of the widgets, which was defined in the previous step. In Flutter, layout and size are dictated from the parent to the child.
Widget build(BuildContext context) {
    return Container(
        child: Row(
            children: List<Widget>[
                IconButton(
                    icon: Icons.add,
                    onPressed: () {
                        setState(() {
                            this.value++;
                        });
                    }),
                Text("Qty: ${this.value}")
            ],
        )
    );
}
What this means is when the IconButton is tapped on the ValueUpdateWidget(Let's say the name of the widget is ValueUpdate) the value state is updated with a new value which is one more than the previous value. Flutter walks down the widget tree and ValueUpdateWidget tells the buttons and text fields their constraints.
Then the buttons will tell the widget which represent the addition icons(or the widgets which are further concerned with the parent widget which in this case is the button) their constraints, and it goes on down the tree. Once the algorithm bottoms out at the leaf node widgets, then it knows their size constraints.
On the way back up they can all safely take up the right amount of space at the correct position.
Paint
After Flutter gets the exact idea of the widget's constraints and is completely sure that there are no conflicts, it can finally paint all the widgets.
Note: The widgets are not physically painted in the screen.
Compositing
In this step Flutter gives the actual widget co-ordinates to the screen. Now they know the exact pixel they'll take up. This step is called compositing.
For a good number of reasons this step is kept separate from the painting step. For example, lets consider the use case when you are scrolling through a long list.
In such cases rather than rebuilding your entire list items every time a new one scrolls on or off the screen, Flutter already has them built and painted and can plug them in where they need to go.
Rasterize
Now the widgets are ready to go. The engine combines the entire tree into a render-able view and tells the operating system to display it. This is called rasterizing, and it’s the last step.
If you'd like to know more about Flutter renders, check out this Google Tech Talk. If I missed out any point or you want to discuss about something feel free to leave a comment down below, I'd hop in ASAP. 🌟
Lastly, Thank you for making it this far down into the article and showing your interest in Flutter. You are amazing and keep making a positive different everyday. Peace out. ✌🏼


Latest comments (0)