data-recoveryntfspartitioning
I have a Toshiba satellite A-200 laptop with a Vista OS on it with 4 NTFS partitions
(C:) Vista
(D:) Entertainment
(E:) Work
(F:) Sources
and I wanted to start using Ubuntu instead. So I tried it first from the live CD and everything was OK and all the partitions were shown and working and so I decided to install Ubuntu to replace Vista on the (C:) drive. After I did that I can no longer find my folders and files on the (D:), (E:), (F:) partitions and the only file system that is shown is one 198 GB although my HDD is 320 GB.
I can’t access the lost data on the remaining 120 GB which I hope is still there and not totally lost
I am now working from the live CD but I am unable to install testdisk. Can I recover the Vista partitions by the product recovery CD to get my laptop back to the factory settings? Can I recover the NTFS partitions using a recovery program for Windows or will that make the problem worse?
I need these data badly as I don’t have a backup for them.
(adsbygoogle = window.adsbygoogle || []).push({});
Best Answer
Unfortunately it seems you accidentally partitioned your whole drive replacing your Windows partitions with a single Ubuntu partition.
You will not be able to recover these partitions by restoring Vista with the recovery CD. In fact every write attempt to your hard drive will make things worse as remnants of your data may get more and more overwritten.
- Encrypted partitions can not be recovered
- Drives that were part of a Windows “Storage Space/Pool” can not be recovered
You may however be able to recover your partitions with testdisk but you may not be able to recover all of your data. You can temporarily install testdisk on a live session too (however this will then not be a permanent installation).
- Please have an external drive ready to save your recovered data before you proceed. You can’t recover the data on the same drive.
-
Boot your Ubuntu LiveCD (“Try Ubuntu”) and then install
testdiskby:- Adding the “Universe” repository to your software sources (from
Ubuntu system settings>Software & updates)
- Adding the “Universe” repository to your software sources (from

- Updating your apt cache in a terminal by first pressing Ctrl+Alt+T and then typing:
sudo apt update
- then install testdisk with:
sudo apt install testdisk
- Mount your external backup drive in the live session (e.g. with Nautilus) to be able to store recovered data later.
- Follow the concise step by step guide on the Testdisk Wiki which will help you to recover lost partitions.
- If you are not able to recover from an image of your overwritten drive (this will need an external drive with more than double the free space than your laptop’s hard drive) you need to save all your data on an external drive soon after recovery.
- You will not be able to recover your Windows installation, as this was overwritten by Ubuntu.
- Only if you fail to recover partitions you may be able to recover single data file using PhotoRec from the TestDisk suite but this will not recover filenames, folder structures or time stamps of your files.
- Do not use the drive before you were able to recover your lost data.
Copy data from the live system to an external drive
To be able to save our data to an external drive we need to mount both the recovered partitions and the external USB drive in the live environment. The below picture shows how the USB drive will be mounted on insertion (the internal partitions will be mounted on selecting them):
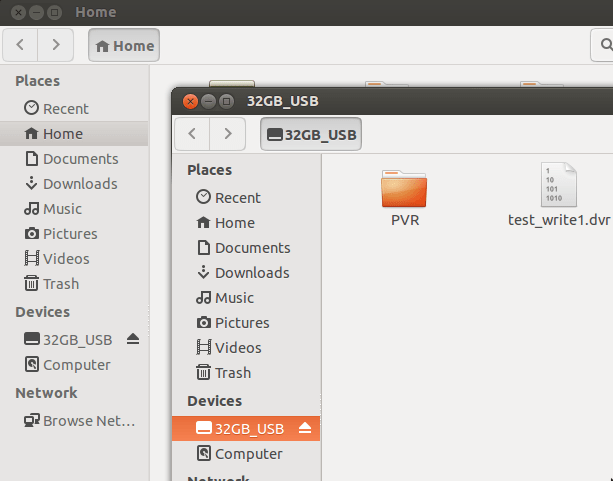
We can then copy & paste (or drag & drop) our rescued files from the internal drive to the external drive (e.g. by opening a separate Nautilus window, or in releases < 13.04 by adding an extra pane with F3 ). From the terminal we can issue:
cp -a /<mountpoint_source>/* /media/ubuntu/<name_destination>
After sucessful copy we need to unmount the drives to avoid data loss. This will be done in Nautilus from a right click context menu or in the terminal:
sudo umount /media/ubuntu/<name>
Copy single files using testdisk
In case we were unable or did not want to recover the partition table we may try to copy selected files or directories with testdisk from the <Advanced> Filesystem Utils menu:

In above example I had selected examples.desktop and rsynctest folder by pressing : . To copy these files we press C for the next menu giving the file hierarchy of our running system. We have to browse to the mountpoint of our external drive (here /media/23GB_USB but this will probably be /media/ubuntu/<name_of_device in your case). The content of our USB is now listed, and can be browsed for deeper directories:
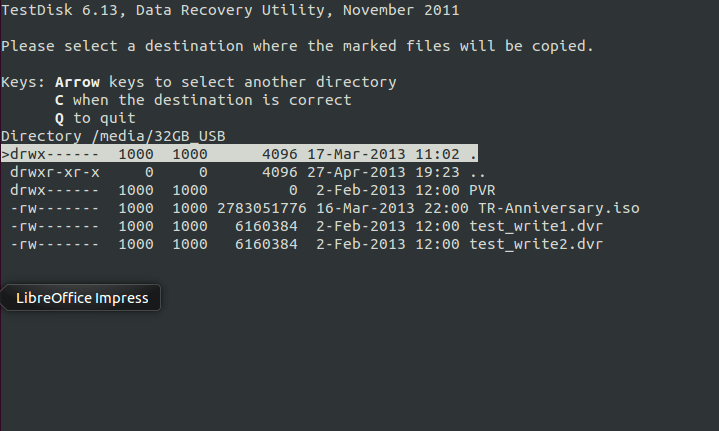
When we press C in the example above our above selected example.desktop, and the folder rsynctest will be copied to the external USB drive.
To verify we had succeeded we can now open Nautilus in our live system and see the content of the rescued files. After we are done, do not forget to unmount the USB drive.
The post How to recover the accidentally lost Windows partitions after installing Ubuntu? appeared first on Stack All Flow.

Top comments (0)