Thanks to the rise of the Internet of Things (IoT), vast amounts of machine data is being generated by things like smart factories and smart cities. Accordingly, there is a demand for linearly scalable time-series databases that can handle data ingestion and processing at this scale.
Microsoft Azure and CrateDB (a distributed SQL database) are an excellent fit for such applications. In fact, we recently published a blog post titled Supercharge your Azure Internet-of-Things and Time-Series Data Applications.
Here’s a high-level view of what a container ready, horizontally scalable, and highly-available infrastructure using Azure and CrateDB might look like:
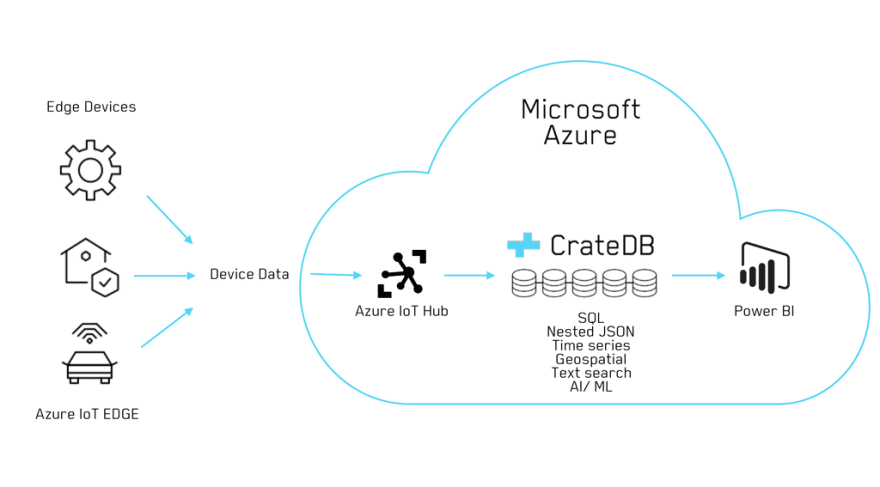
Let’s break that down:
- The data being generated by your edge devices (e.g., sensors in a smart factory) is ingested by the Azure IoT Hub.
- From there, you can use CrateDB (hosted on Microsoft Azure) to query and analyze the data in real-time.
- Then, generate reports using Power BI or plug-in Grafana for data visualization tailored to time-series and machine data.
In this post, I will show you how to:
- Launch a CrateDB cluster on Azure,
- Connect it with an IoT Hub, and
- Simulate sensor data to be ingested with the help of an Azure IoT Solution Accelerator
Simulate sensor data
First of all, we need to decide what the data looks like before we can start to generate and push it to the Azure IoT Hub.
Smart factories have a ton of sensors, taking measurements for a wide variety of parameters.
Data structures differ from sensor to sensor, but we can model these with a single table using dynamic objects that can be queried to an arbitrary depth. It’s not what we’d recommend for a production setup, but it makes things easier for demonstration purposes.
Azure IoT Solution Accelerators provide a library of preconfigured templates to speed up your IoT projects.
The Device Simulation accelerator allows you to simulate various types of IoT Devices. These devices will produce data that we can then ingest into CrateDB.
To create one, go to the New Device Simulation page, provide a deployment name, and select the appropriate Azure subscription, deployment options, and Azure location.
Here’s what my setup looked like:
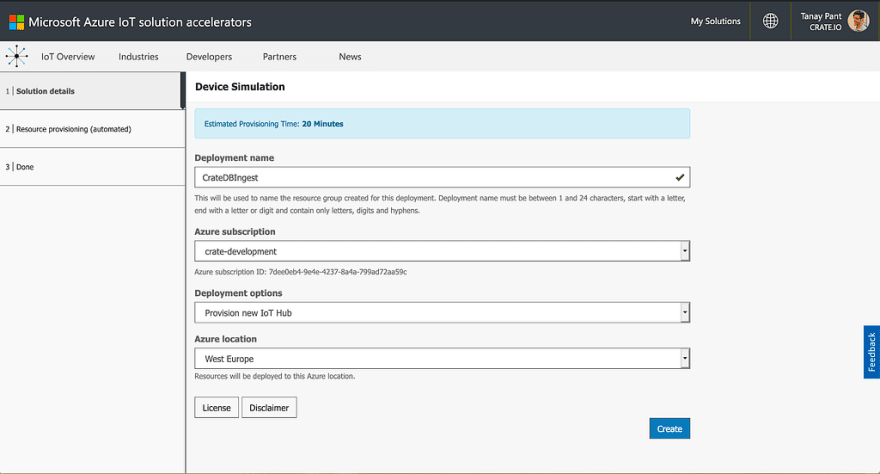
I gave my device simulation the name CrateDBIngest, selected my crate-development Azure subscription, selected Provision new IoT Hub, and then selected West Europe as my Azure location.
When you’re done, select the Create button to start the deployment process.
It should take about 15 to 20 minutes to deploy the new device simulation. And once complete, you will be notified via email.
The solution accelerator page should now look like this:
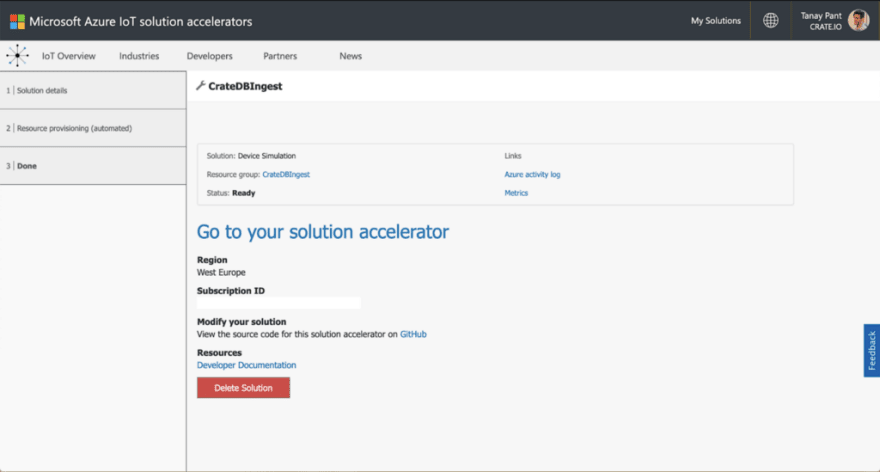
From here, select the My Solutions tab at the right-hand side of the top navigation bar and then select the appropriate Launch button.
Once inside the solution accelerator, select New Simulation and enter some information about your simulator:
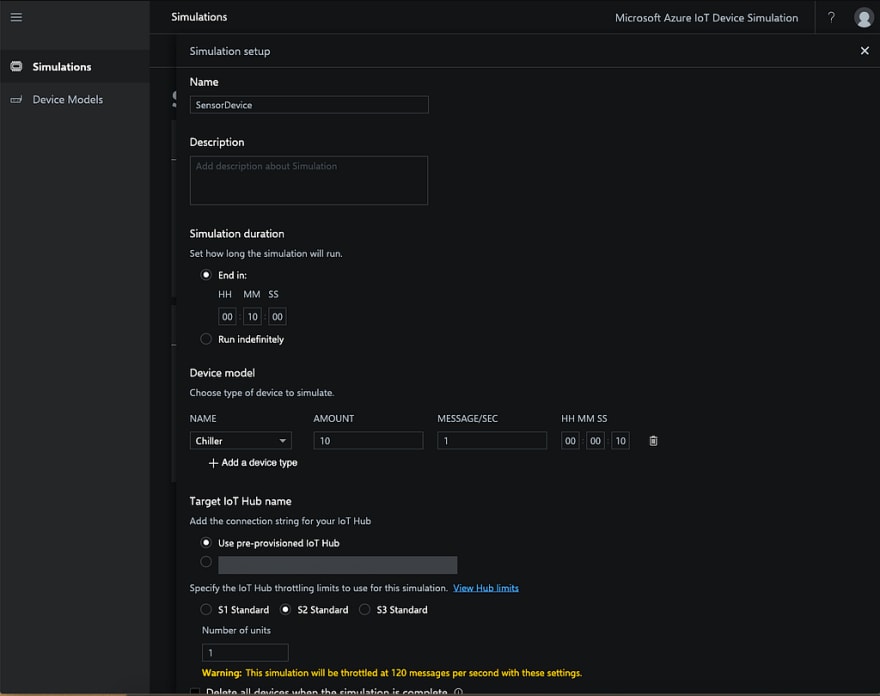
I named the simulation SensorDevice and set the simulation to end 10 minutes after starting. Then, I selected the Chiller device model, which basically sends simulated telemetry data on temperature, pressure, and humidity.
I set up 10 of these devices and configured them to send one message per second in aggregate.
Finally, I chose to use a pre-provisioned IoT Hub for this and set the throttling limit at S2 Standard.
When you’re ready, select the Start simulation button. Azure will start running the simulation, and you should see a screen like this:
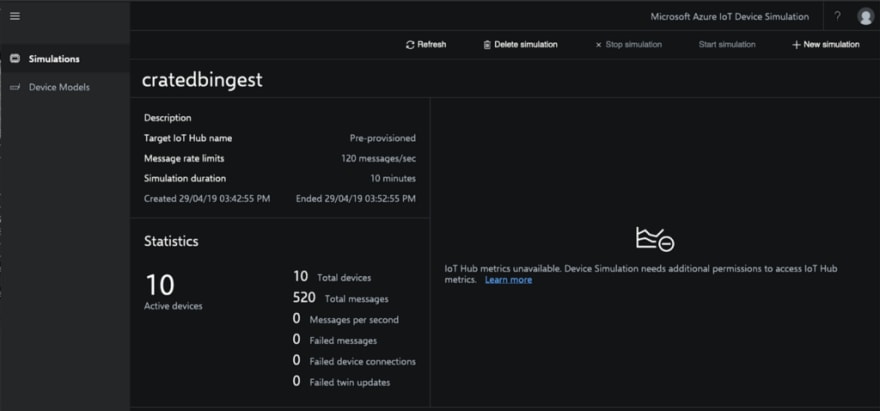
Here, we see that 520 messages were created during the 10 minutes the simulation ran. These messages (also known as events) will be pushed to CrateDB once we are finished with the whole setup.
Configure the Azure Portal
Now, let’s go to the Azure Portal and configure a few things.
In the search bar on the top of the Azure Portal screen, search for Resource Groups. A new resource group should have been created for you using the same name as the deployment name of the solution accelerator. (This is not the case if you manually chose to deploy the solution accelerator to an existing resource group.)
My device simulation was named CrateDBIngest, so my resource group was also named CrateDBIngest:
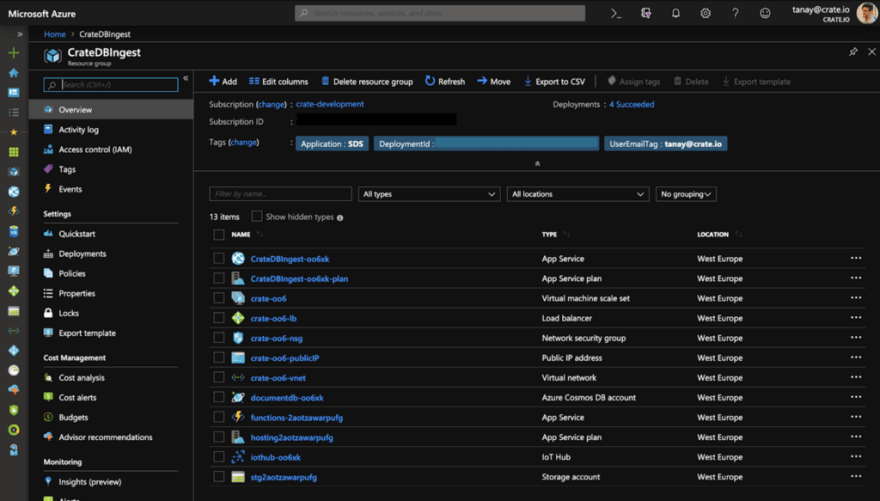
There are 13 resources listed in this resource group. We need to alter the configuration for the IoT Hub and the Storage account resource types (see the TYPE column).
IoT Hub
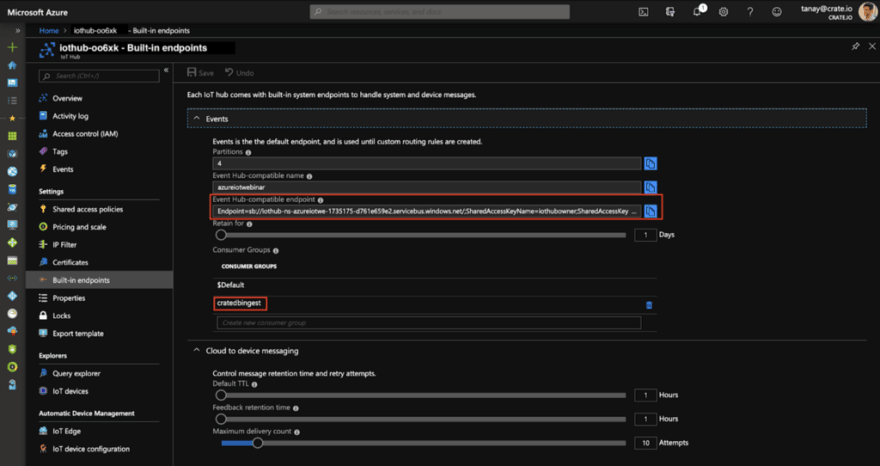
In the screenshot above, you can see that my IoT Hub resource is named iothub-oo6xk.
Select your IoT Hub resource. Then, go to the Built-in endpoints option on the left-hand side in the Settings section and create a new consumer group under the Consumer Groups section.
I chose the name cratedbingest for my consumer group.
Make a note of the name you chose and copy down the listed EventHub-compatible endpoint URL. You will need both in a later step (marked in red below).
Once you’ve done that, select Message routing from the menu list and add a new route. Name the route (I went with cratedbingest again). Then, select the endpoint events, set Device Telemetry Message as the data source, and save your changes.
Storage account
Now, go back to the resource group and create a new storage account with the following settings:

Note: You could have used the pre-created storage account created by the solution accelerator. However, it might make sense to have the data in separate storage accounts as deleting the solution accelerator in the future would require you to create a new one for other use cases.
We’re going to use blob storage to checkpoint data from the events queue.
Once the storage account has been created, create a blob storage. Then, go to the Access keys option in the Settings section and copy the name of the storage account as well as the blob storage connection string (marked in red below).
Set up CrateDB Cloud
Okay, at this point, your device simulator should be set up on Microsoft Azure, and you should have the following information:
- The name of your Azure consumer group
- The consumer group EventHub-compatible endpoint URL
- The name of the storage account you’re using for Azure blob storage
- The blob storage connection URL
With this in hand, you can proceed to set up CrateDB Cloud.
You can interact with CrateDB Cloud using Croud, a command-line interface (CLI) tool.
Install Croud, like so:
$ pip install croud
Then, log in:
$ croud login
This will open up a browser window so that you can sign in to your CrateDB Cloud account:

If you do not currently have a CrateDB Cloud account, you can create one by selecting Sign up on this screen.
A CrateDB Cloud account is organized like this:
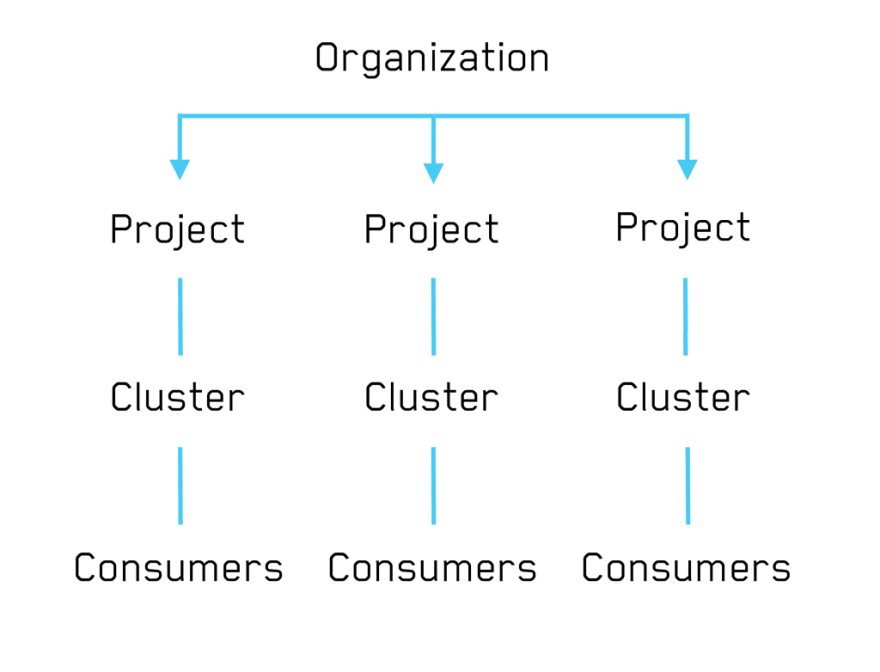
Let’s break that down:
- At the top level, all accounts must belong to an organization
- Organizations can have multiple projects
- Projects can have multiple CrateDB clusters
- CrateDB clusters can have multiple event consumers
Deploy a CrateDB cluster
First of all, create a new organization:
$ croud organizations create --name "CrateDBIngest" --plan-type 1

+--------------------------------------+---------------+-----------+
|id                                  | name          |   plan_type |
|--------------------------------------+---------------+-----------|
|8a8e5841-ad1d-4519-8683-138a08b73130| CrateDBIngest | 1           |
+--------------------------------------+---------------+-----------+
Now, create your first project:
$ croud projects create --name "CrateDBIngest" --org-id ORG_ID

+----------------------------------------------+
| id                                           |
|----------------------------------------------|
| d24b6665-9719-42e8-9876-9b7f300dd159         |
+----------------------------------------------+
Here, replace ORG_ID with your organization ID (given in the output from the command you ran above.
The output table returns the project ID (in my case, d24b6665-9719-42e8-9876-9b7f300dd159).
Now, deploy your first CrateDB cluster:
Let’s break that down:
- We’re using the
cratedb.az-gp1product at thexs(extra small) tier. If you are interested in the available options, please contact us. - Cluster sizes are measured in units, with one unit comprising three nodes. Here, we are deploying CrateDB version 3.3.3 in three node cluster (i.e., one unit) named
cratedbingest.
Additionally:
- Replace
PROJECT_IDwith your project ID. - Replace
USERNAMEandPASSWORDwith the username and password you wish to use for the CrateDB admin UI.
If successful, the clusters deploy command will output a table with the following cluster information:
The command will return this information immediately, but it will take a few minutes for CrateDB Cloud to actually deploy the cluster.
You can check to see whether the cluster is up-and-running yet by visiting the cluster URL in your browser.
Once the cluster is running, the cluster URL will allow you to access your cluster’s admin UI. From here, you can authenticate with the username and password you specified during cluster creation.
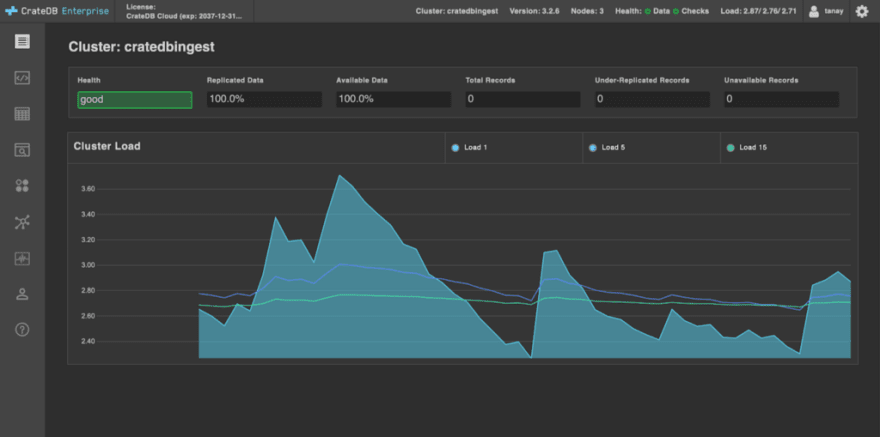
After authenticating, you should see a screen like this:
Create a sensor events table
Before you can consume the simulated events we previously generated, you must create a table to hold the sensor data.
In the CrateDB admin UI, navigate to the from the left-hand navigation menu. Then, copy and paste the following statement:
Here, data from the sensor is modeled as a dynamic object (named payload) that can handle sensor readings with any arbitrary structure.
As well as recording the event timestamp, we also generate a timestamp for the beginning of the current week. This is used to partition the table by week, which can be used to dramatically speed up date-ranged queries by limiting the total number of records that need to be processed.
Select EXECUTE QUERY to create the table.
Deploy a CrateDB event consumer
Now that you have a table to record sensor events, you can subscribe to your Device Simulation IoT Hub to receive events with a CrateDB event consumer.
You can deploy an event consumer with a command like this:
Let’s break that down:
- We’re using the
eventhub-consumerproduct at thexs(extra small) tier. Like before, we'll give you information about the available products and product tiers during your account setup. (This information will be made public soon.) - We are deploying a consumer named
cratedbingestthat will write to the previously createdrawtable in thedocschema.
Additionally:
- Replace
PROJECT_IDandCLUSTER_IDwith the appropriate project ID and cluster ID. - Replace
EVENTHUB_DSNwith the EventHub-compatible connection string (copied down in a previous step) used by the Azure IoT Hub endpoint you configured earlier. - Replace
CONSUMER_GROUPwith the name of the consumer group (copied down in a previous step) used by the Azure IoT Hub endpoint you configured earlier. - Replace
STORAGE_DSNwith your blob storage connection URL (copied down in a previous step). - Replace
STORAGE_CONTAINERwith the name of your Azure storage account (copied down in a previous step).
If this command is successful, the data generated by your Azure device simulator will start flowing into CrateDB.
You can verify this has worked by using the left-hand navigation menu in the CrateDB admin UI to access the Tables screen.
You should see something like this:
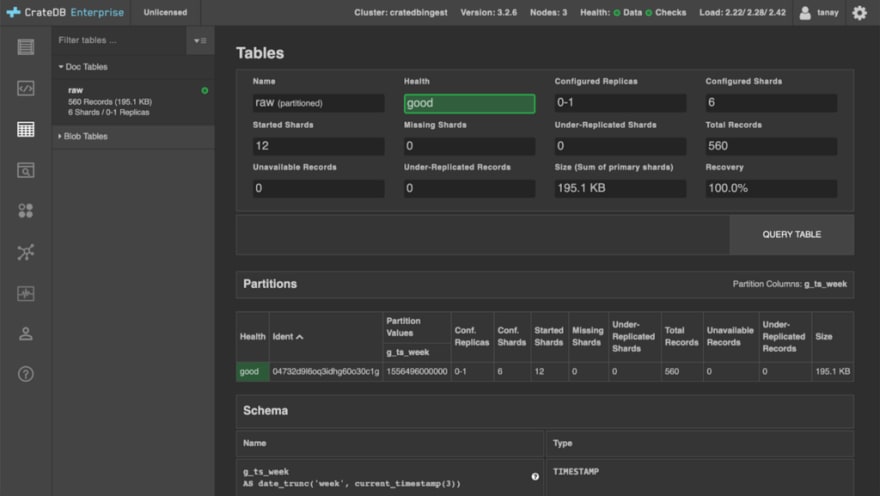
Here, you can see the raw table holds 560 records.
If you select QUERY TABLE, you can query the table and see what your simulated data actually looks like:
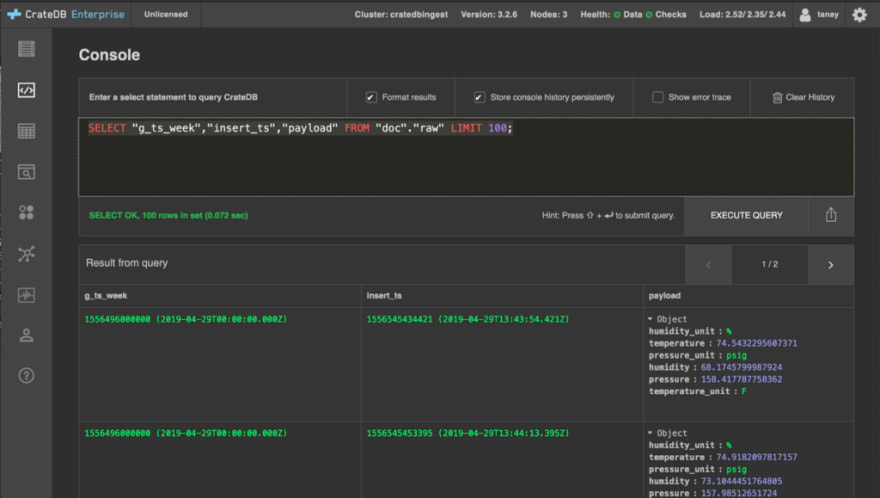
Here, you can see that each sensor reading includes information about humidity, temperature, and pressure.
Wrap-up
In this post, I showed you how to use Microsoft Azure to generate an event stream from a simulated IoT sensor. I then showed you how to deploy CrateDB cluster and subscribe it to that event stream using the Azure IoT hub.
Got a question? Give me a shout on Twitter, and I’ll see how I can help.
Originally published at https://crate.io/blog on June 17, 2019.

Latest comments (0)