In this tutorial, I want to explore how to onboard a Ubuntu server to Azure using Azure Arc. The tutorial will walk you through registering the necessary Azure resource providers, registering your server in Azure by installing the Azure Arc agent and lastly assigning a governance policy to the server using Azure Policy.
Prerequisites
- An Ubuntu 22.04 server with outbound Internet access
- An active Microsoft Azure subscription
Register Azure resource providers
An Azure resource provider is a collection of REST operations that provide functionality for an Azure service.
To use Azure Arc-enabled servers, the following Azure resource providers must be registered in your subscription:
- Microsoft.HybridCompute
- Microsoft.GuestConfiguration
- Microsoft.HybridConnectivity
- Microsoft.AzureArcData (if you plan to Arc-enable SQL Servers)
To enable them you can use Azure PowerShell, Azure CLI or the Azure portal. We’re going to use Azure CLI this time.
Head over to https://shell.portal.com
Paste the following code into your shell window:
az provider register --namespace 'Microsoft.HybridCompute'
az provider register --namespace 'Microsoft.GuestConfiguration'
az provider register --namespace 'Microsoft.HybridConnectivity'
az provider register --namespace 'Microsoft.AzureArcData'
Registering an Existing Ubuntu Server
From the Azure Portal , search for Servers – Azure Arc to launch the wizard.
Azure Portal - Server - Azure Arc
You can either register servers individually, through a bulk process or via Update Management. In this tutorial, we are going to select the first option and add servers with an interactive script.
Azure Portal - Server - Azure Arc
There are some prerequisites you need to meet, ensure you have met them before going any further.
Azure Portal - Server - Azure Arc
In the next step, you are asked to select some information. You are asked to select the subscription, resource group, operating system (OS), connectivity method and region. For this tutorial, ensure you select Linux as the OS and move to the next step.
Azure Portal - Server - Azure Arc
The next step is to populate any values for the suggested tags or you can create your own.
Azure Portal - Server - Azure Arc
The last screen will show you the command to run on the Ubuntu server. Copy it and close the wizard.
Azure Portal - Server - Azure Arc
Now you have the script, SSH onto your Ubuntu machine. Paste the commands that were generated from the previous step.
Connecting to Linux server via SSH
During the installation you will be asked to go to https://microsoft.com/devicelogin to authenticate this new machine.
Within a few minutes, you will notice the registered machine in the resource group.
Applying a Policy to Registered Servers
The next process we want to follow is to apply a policy to find any registered servers that allow remote connections from accounts without passwords.
From the Azure Portal , search for Servers – Azure Arc.
Select the server you just onboarded.
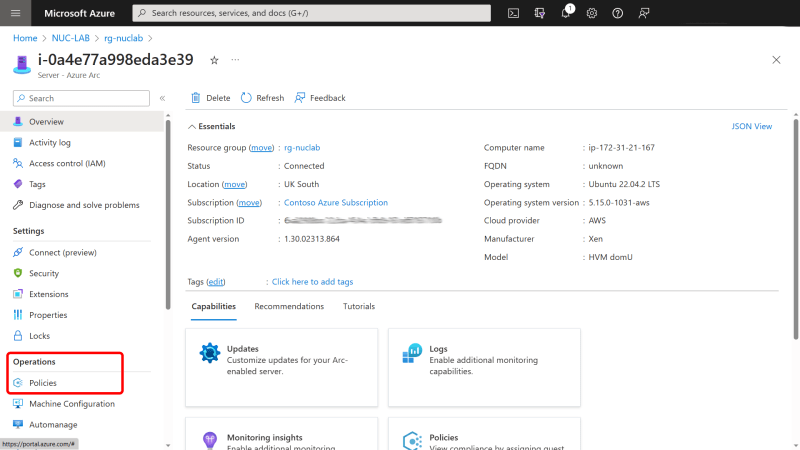
Down the left-hand side menu, scroll down to Operations and select Policies.
Azure Arc - Assign an Azure Policy
Click on assign policy.
Azure Arc - assign policy to machine
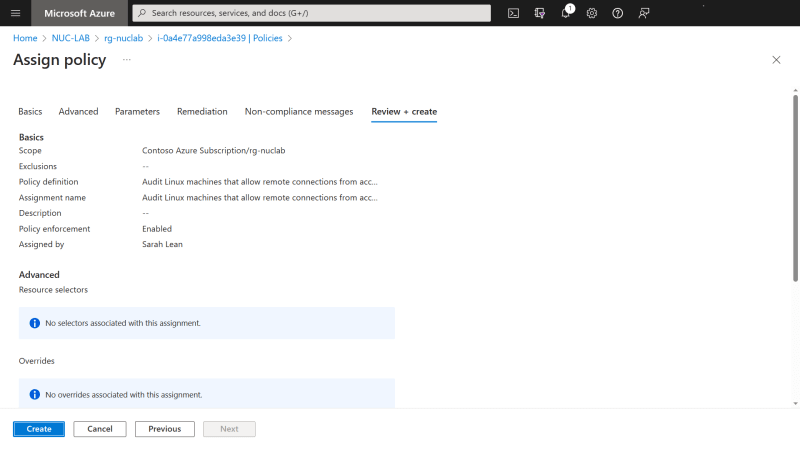
From the available policy definitions, select Audit Linux machines that allow remote connections from accounts without passwords.
Azure Portal - Creating an Azure Policy - selecting policy
Walking through the wizard makes sure you select the option to Include Arc connected servers.
Azure Portal - Creating an Azure Policy - include Azure Arc machines
Within the next step, accept the defaults and create the policy.
Azure Portal - Creating an Azure Policy
After a few minutes when you check the compliance dashboard, it will have updated with the results from the audit.

Azure Policy - compliance dashboard
Well done! You have successfully onboarded a Linux server to Azure using Azure Arc and then assigned an Azure Policy!


Top comments (0)