Introduction:
In this article, we'll explore the process of transmitting and receiving messages via Azure Service Bus Queues with the aid of a .Net Core Client.
Source code: https://github.com/TitanRintu/AzureQueueDemo
Video File: https://youtu.be/rtZ6Y7ked5I
What is Azure Service Bus Queue?
Imagine we need to create an Order Processing Application, where a User can submit an order using a client application (such as a mobile app, website, or Windows app), and a separate server will handle the order through a service. The clients are actively sending orders, and the service is responsible for receiving and processing them. Now, let's consider a scenario where, due to a natural disaster, the server will be unavailable for one hour. What will happen to the orders placed during that time? Since the server is inaccessible, these orders will not reach the server, resulting in a loss for the Order Processing Company.
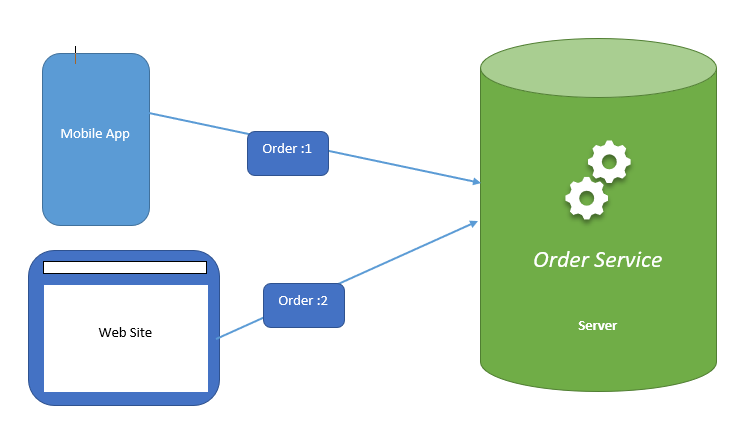
Possible Solution:
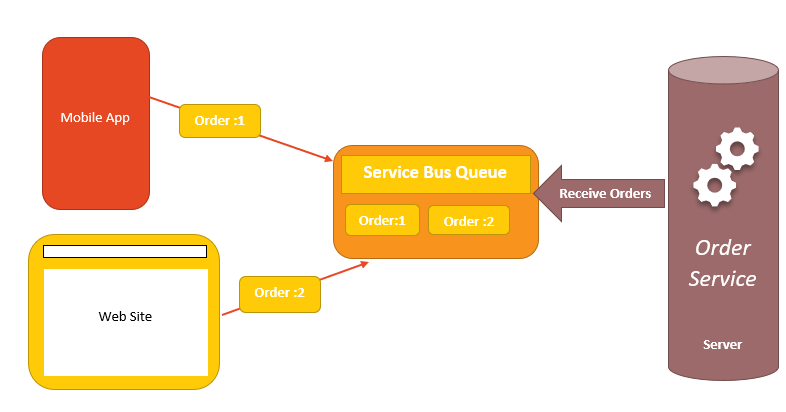
The challenge at hand is to establish separation between the two systems. By decoupling these systems, we can ensure that no orders are lost in the future. To achieve this, we need to introduce a mechanism that allows us to store orders for later processing. Microsoft Azure offers a solution to this problem in the form of Service Bus Queues. With Service Bus Queues, we can store orders and process them at a later time. The following diagram illustrates how a Service Bus Queue functions.
Definition:
The Azure Service Bus Queue is a fully managed enterprise integration message broker. A Service bus can decouple applications and services. The service bus offers a reliable and secure platform for the transfer of data and State. The data transfer between applications and services happened using messages. A Message is in binary format and can contain JSON, XML, or just plain text.
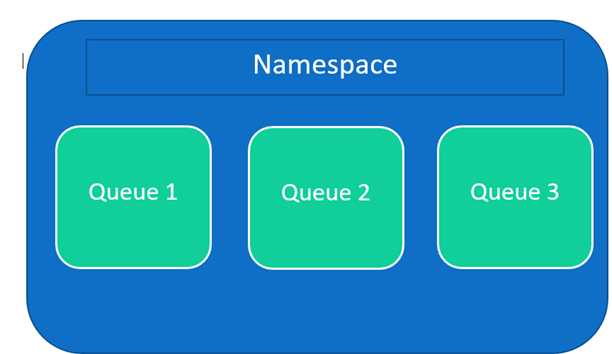
Representational diagram of Service Bus Queues:
Namespace:
The namespace is a container for message queues. Every message queue must be created under a Namespace.
Queue:
Messages are sent to and received from queues. Queues offer FIFO message delivery to one or more competing consumers. This means messages will be received in the same order as they have added to the queue.
Benefits of Message Queue:
Temporal Decoupling:
A key benefit of using queues is Temporal decoupling. Let's understand how the process works.
- The sender sends the messages to the queue.
- Messages from the sender will be stored in the queue.
- The receiver reads the messages from the queue. For the above process, the Sender and Receiver don't have to be sending and receiving the message at the same time. And Receiver and Sender needn't process the same message at the same time. Therefore the whole process is decoupled.
Load Leveling:
Consider an application called App1 (sender) that sends messages, and on the receiving end, there's a service named Ser1 (receiver) responsible for receiving and processing those messages. App1 can transmit a maximum of 100 messages per second, while Ser1 can handle up to 10 messages per second. There are no intermediary components between App1 and Ser1, so as soon as App1 sends a message, Ser1 must promptly receive and process it.
Initially, App1 sends 10 messages per second, and Ser1 can effectively receive and process them. However, let's assume that App1 suddenly increases its message rate to 100 messages per second. Due to Ser1's limited capacity, it can only process 10 messages, causing the remaining 90 messages to either time out or go unprocessed.
By introducing a message queue, App1 can send all 100 messages, which will be stored in the queue. Ser1 can then retrieve messages from the queue and process them at its own pace. This approach eliminates the need to modify App1 or Ser1, ensuring that no data or messages are lost. This is how a message queue assists in load balancing.
How to Create Queues:
Queues can be created by:
- Azure Portal
- PowerShell
- Azure CLI.
- RMT or Resource Manager Templates.
Please follow the article from Microsoft to create a queue through Azure Portal.
https://docs.microsoft.com/en-us/azure/storage/queues/storage-quickstart-queues-portal
How to Create Queue through Azure CLI
- First of all, we need to create a resource group (if not exists already).
az group create --name ResourceGroupName --location eastus
- Since the message queues reside inside a namespace, We need to create a namespace first.(if namespace not exists)
az servicebus namespace create --resource-group
 ResourceGroupName --name OrderManagementNamespace --location eastus
- After that we need to create a queue using the following command.
az servicebus queue create --resource-group ResourceGroupName --namespace-name OrderManagementNamespace --name ordermanagementqueue
- Now the message queue has been created successfully. To check the message queue has been created or not. We need to run the following command.
az servicebus queue list --resource-group ResourceGroupName --namespace-name OrderManagementNamespace
Sending and Receiving Messages
We have created the Azure Service Bus Queue. Now Let's send and receive messages from the Azure Service bus queue through a .Net core Console Application.
I have used a console application for explaining the code, but you can create other types of project to achieve the same.
Let's create a blank solution named AzureQueueDemo and add the following project types into the solution.
- AzureQueueDemo.Domain:Dotnet Standard class library.
- AzureQueueDemo.Receiver:Dotnet Core Console app.
- AzureQueueDemo.Sender:Dotnet Core Console app.
Let's add a new class named OrderInformation in AzureQueueDemo.Domain project.
    public class OrderInformation
       {
           public Guid OrderId { get; set; }
           public string OrderName { get; set; }
           public int OrderQuantity { get; set; }
       }
Add AzureQueueDemo.Domain project into AzureQueueDemo.Sender and AzureQueueDemo.Receiver as Project reference.
- Add following Nuget Package to the AzureQueueDemo.Sender AND AzureQueueDemo.Receiver.
Microsoft.Azure.ServiceBus -v4.1.3
NewtonSoft.Json -v12.0.3
Let's Navigate to the Azure portal now. I have created a Namespace named: OrderManagementNamespace and queue named ordermanagementqueue.
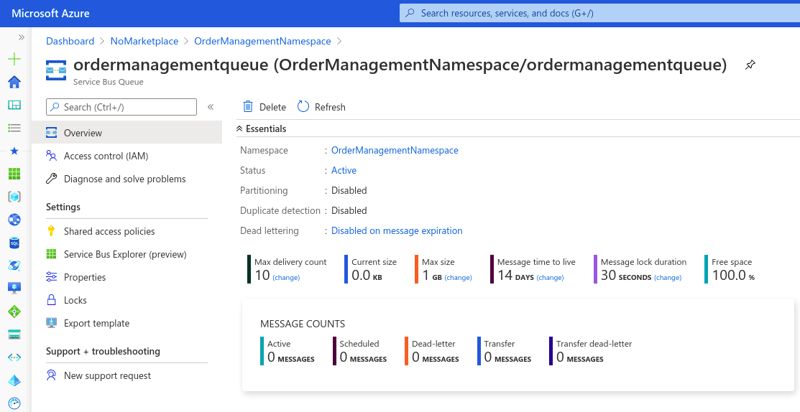
portal.azure.com -> OrderManagementNamespace -> ordermanagementqueue ->Shared Access Policies.
Then add a new Shared access policy, named QueuePolicy. Check the "Manage" Checkbox. Then Save the policy and reopen it. Upon reopen you can see 4 additional properties named Primary Key, Secondary Key, Primary Connection String and Secondary Connection string.
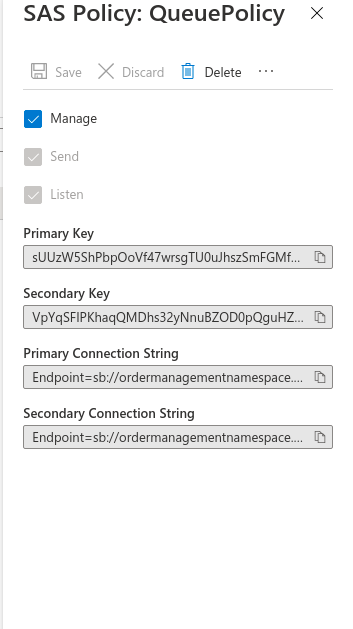
We need to use the primary Connection string to send and receive the messages.
Let's open the program class of AzureQueueDemo.Sender project and Add List Of OrderInformation to it.
    static List<OrderInformation> Orders = new List<OrderInformation>()
           {
               new OrderInformation()
               {
                   OrderId = Guid.NewGuid(),
                   OrderName="Dell Laptop",
                   OrderQuantity=10

               },
                new OrderInformation()
               {
                   OrderId = Guid.NewGuid(),
                   OrderName="Apple Laptop",
                   OrderQuantity=10

               },
                 new OrderInformation()
               {
                   OrderId = Guid.NewGuid(),
                   OrderName="Lenovo Laptop",
                   OrderQuantity=10

               },
                  new OrderInformation()
               {
                   OrderId = Guid.NewGuid(),
                   OrderName="MI Laptop",
                   OrderQuantity=10

               }

           };
How to send messages.
Then add the following variables in the program class of AzureQueueDemo.Sender like following.
class Program
       {

    private static string AZURE_SERVICE_BUS_CONNECTIONSTRING = "<REPLACE WITH YOUR PRIMARY CONNECTION STRING OF *QueuePolicy*";
    private static string QUEUE_NAME = "ordermanagementqueue";
NOTE: Remove EntityPath from the Connection string which you can find at the end of the Connection string.
Let me explain what we'll write about in the program.
- we'll display a message to the user
"Do you want to send Order Information? If Yes, Press Y." - then we'll Capture the user input & If the user input is "Y", then proceed to the next code.
- To Send the message we need to create a variable of type IQueueClient.To know more about IQueueClient, visit here.
- initialize IQueueClient with QueueClient.
- The Queueclient constructor accepts two parameters. The Azure service bus queue connection string and the queue name.
- Provide the primary connection string as the first argument and queue name as the second parameter.
- Then Iterate the orders list which we have already initialized.
- Serialize the Item by using JsonConvert.SerializeObject (Add Newtonsoft.Json as a namespace, if not added.)
- Create a new "Message" object after converting the JSON Object to Bytes by calling Encoding.UTF8.GetBytes() method.
- Now the message object is ready.
- Call the SendAsync() method of QueueClient. for e.g. client.SendAsync(message)
Here is the complete code of the program class of AzureQueueDemo.Sender project.
class program
{
static List<OrderInformation> Orders = new List<OrderInformation>()
           {
               new OrderInformation()
               {
                   OrderId = Guid.NewGuid(),
                   OrderName="Dell Laptop",
                   OrderQuantity=10

               },
                new OrderInformation()
               {
                   OrderId = Guid.NewGuid(),
                   OrderName="Apple Laptop",
                   OrderQuantity=10

               },
                 new OrderInformation()
               {
                   OrderId = Guid.NewGuid(),
                   OrderName="Lenovo Laptop",
                   OrderQuantity=10

               },
                  new OrderInformation()
               {
                   OrderId = Guid.NewGuid(),
                   OrderName="MI Laptop",
                   OrderQuantity=10

               }

           };

    private static string AZURE_SERVICE_BUS_CONNECTIONSTRING = "<REPLACE WITH YOUR PRIMARY CONNECTION STRING Of Senderpolicy REMOVE entitypath AND ITS VALUE FROM THE STRING>";
           private static string QUEUE_NAME = "ordermanagementqueue";
           static async Task Main(string[] args)
           {
               Console.WriteLine("Do you want to send Order Information? If Yes , Press Y.");
               var result = Console.ReadLine();
               if (result.Equals("Y"))
               {
                   IQueueClient client = new QueueClient(AZURE_SERVICE_BUS_CONNECTIONSTRING, QUEUE_NAME);
                   foreach (var item in Orders)
                   {
                       var messageBody = JsonConvert.SerializeObject(item);
                       var message = new Message(Encoding.UTF8.GetBytes(messageBody));
                       await client.SendAsync(message);
                       Console.WriteLine($"Sending Message : {item.OrderName.ToString()} ");

                   }
               }
               Console.Read();
           }
}
How to receive messages.
To receive a message we need a variable of type QueueClient class. We need to use the RegisterMessageHandler method of the QueueClient.
It accepts two parameters. The first one is the Func delegate and the second one is the MessageHandlerOptions.
Func delegate, handles the message processing.
MessageHandlerOptions tell the func how to process the messge.
In MessageHandlerOptions we can handle
- How to complete the message.
- How many concurrent calls client can handle.
- How to handle exceptions if any during the processing of the message.
Following is the complete code of AzureQueueDemo.Receiver program class.
    class Program
       {
           private static string AZURE_SERVICE_BUS_CONNECTIONSTRING = "<REPLACE WITH YOUR PRIMARY CONNECTION STRING Of QueuePolicy. REMOVE entitypath AND ITS VALUE FROM THE STRING>";
           private static string QUEUE_NAME = "ordermanagementqueue";
           private static IQueueClient client;
           static async Task Main(string[] args)
           {
               await ReceiveMessagesAsync();
           }

           private static  async Task ReceiveMessagesAsync()
           {
               await Task.Factory.StartNew(() =>
               {
                   client = new QueueClient(AZURE_SERVICE_BUS_CONNECTIONSTRING, QUEUE_NAME);
                   var options = new MessageHandlerOptions(ExceptionMethod)
                   {
                       MaxConcurrentCalls = 1,
                       AutoComplete = false
                   };
                   client.RegisterMessageHandler(ExecuteMessageProcessing, options);
               });
               Console.Read();

           }

           private static async Task ExecuteMessageProcessing(Message message, CancellationToken arg2)
           {
               var result = JsonConvert.DeserializeObject<OrderInformation>(Encoding.UTF8.GetString(message.Body));
               Console.WriteLine($"Order Id is {result.OrderId}, Order name is {result.OrderName} and quantity is {result.OrderQuantity}");
               await client.CompleteAsync(message.SystemProperties.LockToken);
           }

           private static async Task ExceptionMethod(ExceptionReceivedEventArgs arg)
           {
               await Task.Run(() =>
              Console.WriteLine($"Error occured. Error is {arg.Exception.Message}")
              );
           }
       }
Now we are ready with Sender and Receiver code. Make sure to add both projects as startup project to see the result side by side.
Now lets run the project and see the output window for result.
Conclusion:
In the above article, we have learned how to send and receive messages from the Azure Service Message Queue. The source code has been uploaded to Git Hub and can be downloaded from the following link. https://github.com/TitanRintu/AzureQueueDemo
Cover image courtesy:
(Photo by Waldemar Brandt on Unsplash)


Top comments (0)