Hello Friends, In one of my article I created an About Me page using AWS S3, that would be the prelude for this article. In this article I will add a Contact Me section to the same page using the services like AWS API Gateway, AWS Lambda and AWS SES. And hence you will be having your own single page server less web app showing your work history details and contact me form.
This is one of the benefit of being in the tech space. If you want to avail this kind of web page, you have to pay around $5 per month. But I will show how to create for free.
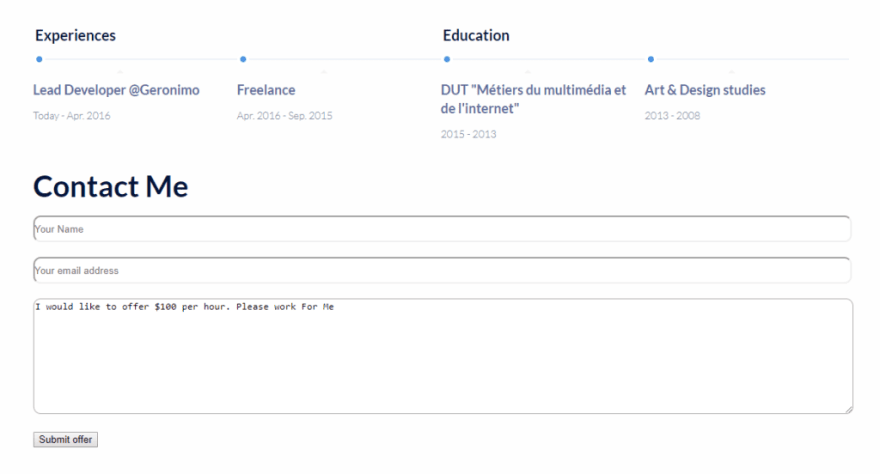
My free web app looks like as shown here : My Sample profile, Not actual data
The page can be used by professionals to create an online profile showing their work history. And letting the end user to contact them.
I have not used any server for the contact form. In fact everything is server less and achieved with the help of AWS services.
Though you will not be able to contact me using the form as I have removed the Web API after writing this article.
This is going to be a long post, please be patient.
Adding a contact Me form to the Web Page
I have added a new section to the Web Page from this article as shown in the figure below.
HTML for the new section is as shown below.
<div class="container">
    <h1 class="contact-me">Contact Me</h1>

      <div id="Offer">
        <div class="row">
          <div class="inputbox">
            <input type="text" placeholder="Your Name" id="f_name" name="f_name">
          </div>
          <div class="inputbox">
            <input type="text" placeholder="Your email address" id="f_email" name="f_email">
          </div>
        </div>
        <div class="row">
          <div class="inputbox">
            <textarea id="f_offer" name="f_offer" rows="10">I would like to offer $100 per hour. Please work For Me</textarea>
        </div>
        <div class="row">
          <div class="col align-right">
            <button class="btn btn-large" type="button">Submit offer</button>
          </div>
        </div>
      </div>
  </div></div>
And some of the CSS I have added is as below
.contact-me{
    margin: 150px 50px 20px 0px;
    font-weight: bold;
    font-size: 40px;
}

.inputbox input {
    width: 100%;
    margin: 0px 20px 20px 0px;
    height: 30px;
    border-radius: 10px;
}

.inputbox textarea {
    width: 100%;
    margin: 0px 20px 20px 0px;
    height: auto;
    border-radius: 10px;
}
And I have added a JavaScript file which has Jquery code to call the API Gateway URL
var bg_x = 0;
jQuery(document).ready( function($){

    // validate and process form here
    $("button", "#Offer").click(function() {

        alert('Hello World');
        var f_name = $("#f_name").val();
        var f_email = $("#f_email").val();
        var f_offer = $("#f_offer").val();

        if (f_name == "") {
            $("#f_name").focus().addClass( 'error' );
            $("#error_name").show();
            return false;
        }
        if (f_email == "") {
            $("#f_email").focus().addClass( "error" );
            $("#error_email").show();
            return false;
        }
        if (f_offer == "") {
            $("#f_offer").focus().addClass( "error" );
            $("#error_offer").show();
            return false;
        }
        var theData = { name: f_name, message: f_offer, fromaddress: f_email };
        $.ajax({
            'url':  " https://bsx0pgkzr0.execute-api.us-east-1.amazonaws.com/default/ContactMe",
            'type': 'POST',
            'crossDomain': true,
            'data': JSON.stringify(theData),
            'crossDomain': true,


            success: function( result ) {
            if( result == 'success' )
                $("#Offer").fadeOut( 200, function(){ $("#msg").fadeIn(500); } );
            else {
                $("i", "#error_msg").html( result );
                $("#Offer").fadeOut( 200, function(){ $("#error_msg").fadeIn(500); } );
            }
        }});
    });

});
Creating an AWS Lambda
This would be the main component of our small project. We will be using this component to receive the web request in JSON from the web page through API gateway and sending it to Amazon SES.
In the AWS console, search for the AWS lambda service. And in the AWS Lambda service console, click “Create Function” button.
Finally in the newly opened console too create a function, select “Author From Scratch” option.
I have named the function as “Contact Me” and selected Node as preferred programming language to create the method. Select “Create a custom Role” and you will be taken to a new console. In this console, you need to create a role which will allow you to grant access to lambda function to AWS services.
Once clicked on the “Create Function” you will be taken to the function console.
In this console, you need to add the trigger. The trigger will be used to invoke this function. In our case the trigger will be an API Geteway service.
Select the API Gateway service from the available triggers in the left hand side.
Below are the two figures showing the lambda method and trigger configuration.
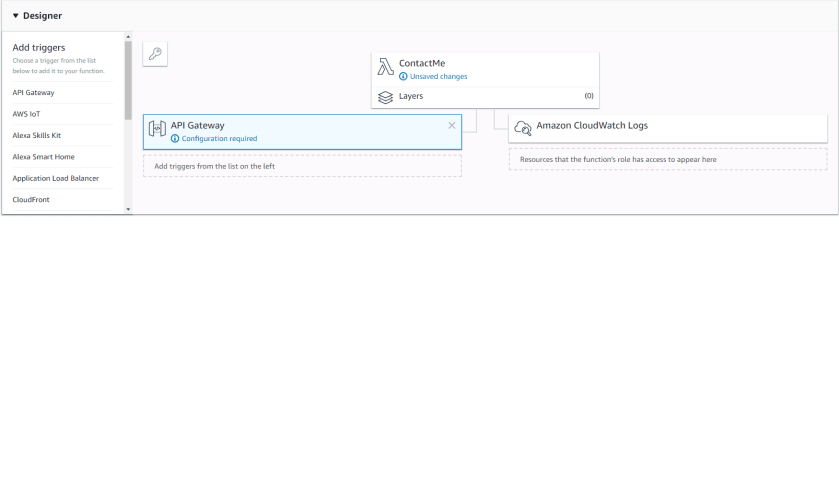

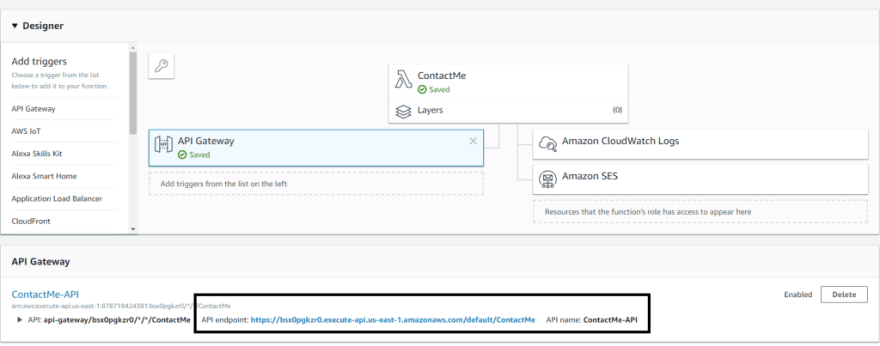
As you can see in the figure b, I have created a new API gateway service. This API will be in turn calling the lambda method.
Click on the “ContactMe” box present in the figure above. You will find a console where you can add the code. Since I have selected NodeJS as my preferred language, I will get the console for NodeJS.
In the console, add the below code:
var aws = require('aws-sdk');
var ses = new aws.SES({
    region: 'us-east-1'
});
var StringDecoder = require('string_decoder').StringDecoder


exports.handler = function (req , context, callback){
    var parsedData = JSON.parse(req.body)

    var message = "Name :" + parsedData.name + "\n Email: " +  parsedData.fromaddress + "\n Message: " + parsedData.message ;

    var eParams = {
        Destination: {
            ToAddresses: ["vikram.vee@outlook.com"]
        },
        Message: {
            Body: {
                Text: {
                    Data: message
                }
            },
            Subject: {
                Data: "Some One Contacted You!!"
            }
        },
        Source: 'vikram.vee@outlook.com'
    };

    var email = ses.sendEmail(eParams, function(err, data) {
        if (err){ console.log(err);
        callback(400, err);
        }
        else {
            console.log("===EMAIL SENT===");
            console.log("EMAIL CODE END");
            console.log('EMAIL: ', email);
            callback(null,{
            "isBase64Encoded": false,
            "statusCode": 200,
            "headers": { "Access-Control-Allow-Origin": "*"},
            "body": "message Sent"
        });
        }
    });
};
The above code receives the request data from the web page through API gateway. Transforms the data in readable format and sends the mail using Amazon SES.
And once you click on the API Gateway trigger in the Lambda function console, you can see the Web API we need to make the call as shown in the figure below.
Configuring API Gateway to Call Lambda
Since we have added API Gateway as trigger to invoke our lambda function. As shown in the figure b above, I have create a “ContactMe-API” API gateway.
Go to the API Gateway console, and find the newly created API.
We need to provide the Model for the API. This is used to convert the request data from web page to a structure we want the data in lambda.
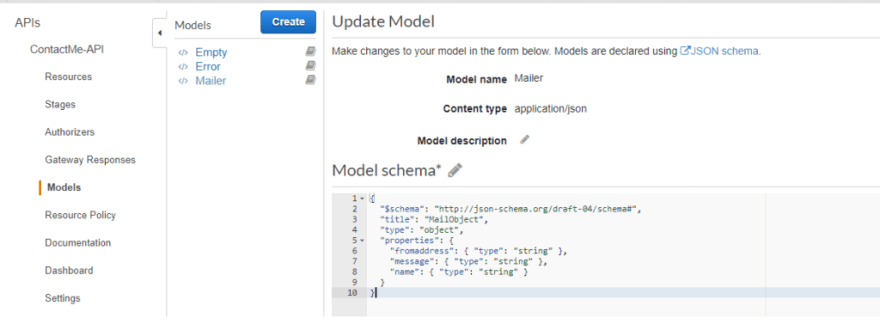
I have named this Data Model as Mailer.
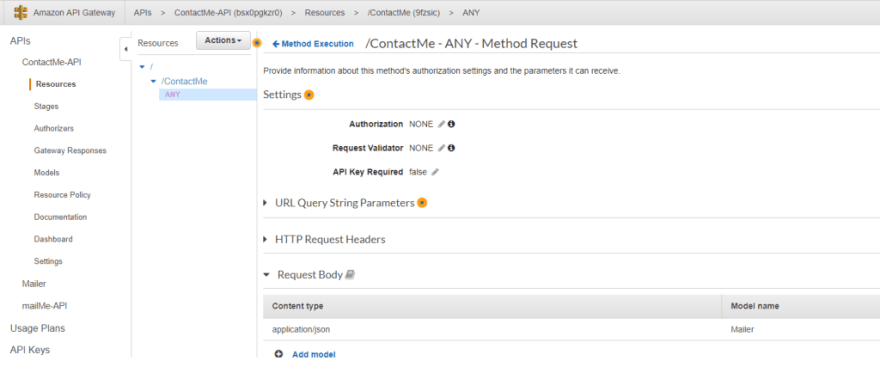
Next we need to provide this DataModel in the “Method Request”. Click on Resources > Contact Me > Any.
And you will see a console having the whole integration.
In the console, click on “Method Request”. And Enter “application/json” as content-type and Mailer as Model. Refer the figure below.
Configuring AWS Simple Email Service
Go the AWS Simple Email Service. Finally add the email you want someone to contact you.
Once you will enter the email, you will get a confirmation mail from AWS. You need to verify it.

Conclusion:
In this article, I have shown you how to create a free single page web app having a contact me form. I have used AWS S3, API Gateway and AWS Lambda services. To send the mail to the owner of web app I have added a contact me section.

Latest comments (1)
Are you eager to create a captivating 'About Us' page for your website? Explore our comprehensive guide, which provides detailed insights on crafting an About Us page that truly connects with your audience. Uncover essential tips, practical advice, and real-life examples to effectively convey your brand's story and values. Don't overlook this invaluable resource from Gapsy Studio