
An exciting new feature landed in Livebook (through Kino) which gives
the ability to animate any output.
In the process of experimenting with Brain and its camera, I needed to
quickly sketch out some code and output video in a Livebook notebook.
I thought the following would do the trick:
Kino.Image.new(Picam.next_frame, :jpeg)
|> Kino.render
but it creates a new output cell every time Kino.render/1 is called.
So I posted this issue (kino#48) and implemented a new
widget Kino.ImageDynamic which can be updated with
Kino.ImageDynamic.push/2.
Then I also implemented a Kino.clear/0
function to dynamically clear any output cell, so that its contents can
be replaced by calling render again.
Thankfully the fruits of this conversation on the issue gave us a more
robust API for animation.
Kino.animate/3
This PR kino#49 and version 0.3.1 of Kino
bring Kino.Frame and the Kino.animate/3 function.
Watch a showcase of the feature below:
Kino.Frame
With Kino.Frame.new/0 you can start a new
widget which can be updated with Kino.Frame.render/2.
widget = Kino.Frame.new() |> tap(&Kino.render/1)

Kino.Frame.render(widget, 1)
Kino.Frame.render(widget, 2)
Kino.Frame.render(widget, 3)
Kino.Frame.render(widget, 4)
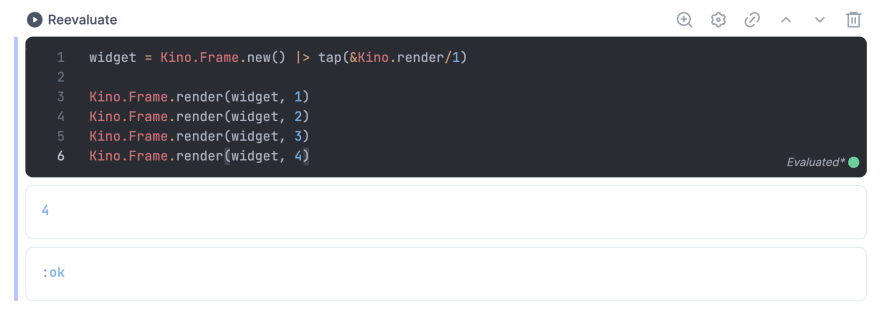
You'll notice that with the code above we only get a single output
cell which gets updated four times.
With Kino.animate/3 the above can be expressed more concisely:
Kino.animate(50, 1, fn
  i when i in 1..4 -> {:cont, i, i + 1}
  _ -> :halt
end)
Life
Let's put this new API to the test by implementing Life.
To try this on your Livebook instance by importing this notebook.
The implemenation is based on this gist.
defmodule Life.Grid do
  defstruct data: nil

  def new(data) when is_list(data) do
    %Life.Grid{data: list_to_data(data)}
  end

  def size(%Life.Grid{data: data}), do: tuple_size(data)

  def cell_status(grid, x, y) do
    grid.data
    |> elem(y)
    |> elem(x)
  end

  def next(grid) do
    %Life.Grid{grid | data: new_data(size(grid), &next_cell_status(grid, &1, &2))}
  end

  defp new_data(size, fun) do
    for y <- 0..(size - 1) do
      for x <- 0..(size - 1) do
        fun.(x, y)
      end
    end
    |> list_to_data
  end

  defp list_to_data(data) do
    data
    |> Enum.map(&List.to_tuple/1)
    |> List.to_tuple()
  end

  def next_cell_status(grid, x, y) do
    case {cell_status(grid, x, y), alive_neighbours(grid, x, y)} do
      {1, 2} -> 1
      {1, 3} -> 1
      {0, 3} -> 1
      {_, _} -> 0
    end
  end

  defp alive_neighbours(grid, cell_x, cell_y) do
    for x <- (cell_x - 1)..(cell_x + 1),
        y <- (cell_y - 1)..(cell_y + 1),
        x in 0..(size(grid) - 1) and
          y in 0..(size(grid) - 1) and
          (x != cell_x or y != cell_y) and
          cell_status(grid, x, y) == 1 do
      1
    end
    |> Enum.sum()
  end
end
Then we need a function which returns an SVG string to visualise the
grid.
defmodule Life.Svg do
  @cell_size 10

  def render(grid) do
    size = Life.Grid.size(grid)

    cells =
      for y <- 0..(size - 1), x <- 0..(size - 1), into: "" do
        status = Life.Grid.cell_status(grid, x, y)
        fill = if status == 0, do: "#EEE", else: "purple"

        "<rect x=\"#{x * @cell_size}\" y=\"#{y * @cell_size}\" width=\"10\" height=\"10\" fill=\"#{fill}\" />\n"
      end

    """
    <svg viewBox="0 0 #{@cell_size * size} #{@cell_size * size}" xmlns="http://www.w3.org/2000/svg">
      #{cells}
    </svg>
    """
    |> Kino.Image.new(:svg)
  end
end
Now we'll add a function to generate random starting configurations.
randomize = fn size ->
  for _ <- 1..size, do: Enum.map 1..size, fn _ -> Enum.random([0,1]) end
end
Next, we'll add a button to generate a few configurations and preview them.
button = Kino.Control.button("randomize")
Kino.Control.subscribe(button, :randomize)

button
When a button is pressed it sends events as messages. We handle them by rendering an SVG.
widget = Kino.Frame.new() |> Kino.render()
loop = fn f ->
  receive do
    {:randomize, _} ->
      # Preview the configuration when the button is pressed
      Kino.Frame.render(widget, Life.Svg.render(Life.Grid.new(randomize.(22))))
      f.(f)
    _ -> :ok
  end
end

loop.(loop)
Buttons are a new addition to Kino and Livebook released in version 0.4.0.
You can find their docs here.
Having made sure that we can correctly render a grid, we can finally animate it.
Kino.animate(100, Life.Grid.new(randomize.(25)), fn grid ->
  {:cont, Life.Svg.render(grid), Life.Grid.next(grid)}
end)
Thanks for reading this post, hope you'll find it useful and make
your notebooks pop with captivating animations.

Latest comments (0)