
Video games have been a huge part of my life since I unwrapped my first console, the SEGA Dreamcast, on Christmas morning back when I was 5 years old. To me, they are the ultimate combination of storytelling, art, and technology.
The process of developing video games became one of my earliest endeavours when I first started learning to code. Unfortunately, it was a frustrating experience akin to learning to draw without knowing how to hold a pencil, and my motivation quickly faded. At that point in time, my programming knowledge extended about as far as knowing what a for loop was. After a few weeks of trying and failing to understand why almost nothing would work, I threw in the towel, feeling deflated and defeated.
A year later I went to university to study Computer Science and it sparked my passion for programming outside of video game development.
Coding and creativity
Despite being an engineer and the "sciencey" type, I've always been driven by creativity. Until I was about 13 years old I couldn't decide whether I wanted to be an animator or a graphic designer, and couldn't imagine ever becoming a software engineer. How could something as technical as programming be considered enjoyable?
What I realised is that coding is a largely creative process, and one that would allow me to scratch both my technical and artistic itches at once. With coding satisfying my need to express my creativity, I never found myself taking the leap back into video game development.
A few weeks ago I discovered Sebastian Lague's fantastic "Coding Adventures" series on YouTube, where he explores coding concepts in Unity, a popular video game engine. The first video I watched mesmerised me. In it, Sebastian uses a "ray-marching" algorithm to generate a stunning Mandelbulb fractal:

Although there is always creativity to be found in coding, the output of the code I typically write doesn't evoke the same feelings that a piece of art like the one above does, nor does it evoke the joy you get when you play your favourite video game. In my case, the end result is often a value being written to a database, or some data being sent over a network.
I will always achieve some amount of satisfaction from these things, just like I did the first time the words "Hello, World!" popped up in my terminal window. However, when the code you wrote today is similar in purpose to the code you wrote yesterday and the day before that, your vision can narrow, and you might forget that computers are capable of so much more. It's easy to forget that code can create truly beautiful things; art, in a very literal sense.
Making planets
On discovering Sebastian's series, I was inspired to pick up game development where I left off, and to prove to myself I was now capable of doing something which once left me feeling defeated. I downloaded the Unity game engine, and after watching another tutorial from the same creator, decided to try my hand at procedurally generating planet surfaces.
I constructed a spherical mesh (a mesh is a collection of points joined together by triangles which together form a 3-dimensional object) using the scripting API provided by Unity. We can do this by providing Unity with a bunch of 3-dimensional vectors (called vertices) which represent points in the world, and some integers indicating how we wish to join these points together using triangles. With these seemingly primitive tools we can create any 3-dimensional shape imaginable.
To generate the mountains of the planet, I pass in each the location of each vertex to a gradient noise function. Gradient noise has been used in computer graphics for years, for a variety of purposes, and it looks like this:
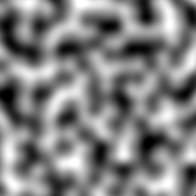
For each pixel in the image above, imagine that the brighter it is, the greater the altitude of the pixel. So, we can think of areas of pure white as being the apex of a mountain, the grey areas represent somewhere around half way up a mountain, and the darkest areas represent the lowest elevations.
Now lets "wrap" this noise around our sphere like you might wrap a basketball with wrapping paper.

If we were to elevate the brighter points of the sphere away from the centre of the circle, we'd find ourselves with a "lumpy" sphere. We can customise the noise to increase it's density (by "zooming out" of the noise), which would result in a rougher surface. Similarly, we can zoom in to the noise to make the surface of the sphere appear smoother.

At this point, the distribution of the noise over the sphere is entirely uniform. The surface of our "planet", much like Edinburgh, is a bit too consistent when it comes to hills. So, to generate more realistic planetary surfaces, we apply the noise in several layers. One layer will model the sea; another will model land; a third will form hills; and a final rough layer of noise will sculpt the highest peaks of our planet's mountains.
There's a couple of smaller additional tricks involved which Sebastian explains in the series, but the end result was a generator that created relatively realistic planetary surfaces. The image below shows what it looks like when I manipulate some of the parameters relating to how the noise is applied to the surface sphere.

In the end, I never finished all of the tutorials in this series. Paradoxically, my motivation was so high after reaching this point that I didn't want to finish the series there and then. Instead, I wanted to explore as many other areas of Unity as possible, as quickly as I could.
The dance of the planets
Next, I would simulate planetary motion. I wanted to make things a little more realistic this time, so I found myself a space skybox on the Unity asset store. A skybox consists of six images that are placed around the player in a cubic shape, so that the player is completely surrounded by them. In this case, it means that wherever the player looks, it looks like space.
Then, I created a sphere in Unity and applied an image of the surface of Mars to it (from Solar System Scope). The image is called an equirectangular projection, which means it was formed by projecting the spherical surface of Mars on to a flat surface.

I wrote a script and attached it to the planet in order to have it apply a pulling force to things around it, based on the mass of the planet. You know, gravity. I placed a few of these "planets" around the scene, then added a glowing effect around them for no reason other than I had just discovered it was possible and I thought it looked pretty cool.
With the scene set, I sat back, and prepared for the elegance that is the dance of the planets.
Here's what happened...

Then I remembered the fundamental law of gravity which states that when the apple drops from the tree it falls to the ground. The apple does not drop from the tree and immediately begin orbiting the planet. With the realisation that this dance was far too dependent on the choreographer's physics knowledge, I decided to beam off to my next adventure.
Interactivity
Both of these experiments were really enjoyable and gave me a feel for working with Unity, but neither were "games". Without interactivity, they're really just simulations.
Despite the fact that it was basically an advert for why NASA should never hire me, I enjoyed the "feel" of the previous scene. I decided to keep things in space. This also meant that I didn't have to fill my scene with assets in order to achieve a sense of realism. After all, space is mostly empty.
I wanted to build in some mechanics from real-time strategy (RTS) games. Although I didn't have a goal in mind for where I wanted my game to go at the time, implementing interesting game mechanics is great experience whether you end up using them or not. I'd learn the concepts behind creating the mechanics, and find out what works, and what doesn't work.
I started by creating a cube which would represent a space ship. Then I added the ability to click the cube in order to select it. This involved learning about raycasting, where you fire off a ray in a direction, and check what it collides with. In order to implement unit selection, I had to send a ray out from the camera, through the cursor position, and detect whether the ray collided with my cube. Then, with the cube selected, I made it so you could right click to have the cube travel to a point in space after rotating to face the correct direction.

After getting movement down, I upgraded my cube to a cool ship asset I found on the Unity Asset Store, and added the ability to pan, zoom and rotate the camera. It took me almost two hours to figure out how to make my ship not fly with its nose pointing down. After some research I found that this was happening because the 3D modelling software Blender uses a different coordinate system from Unity. The axis that the ship model perceived to be "forward", was Unity's idea of "down". To fix the problem, I placed the ship model inside an empty Unity GameObject, adjusted it so that it was facing forward (for real this time), and applied all future rotations to the parent instead of to the ship directly.
I wrote a small script called Rotator to make planets slowly rotate by slightly increasing the rotation on every physics update, which made the scene feel less static.
public class Rotator : MonoBehaviour {
    void FixedUpdate() {
        transform.Rotate(Vector3.up, .01f);
    }
}
Box selection
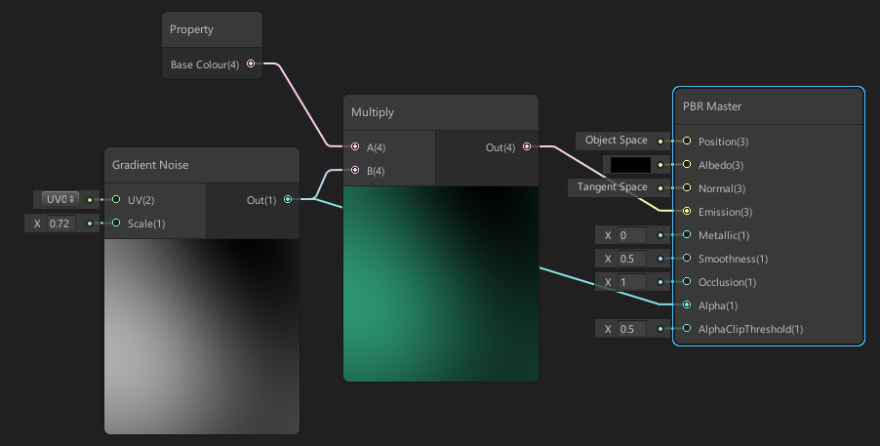
Most top down strategy games allow you to select multiple units at once by dragging a rectangle around them. I used the skills I learned from the planet generation tutorial to dynamically construct a plane as you click and drag the mouse. I applied a shader to the mesh that is generated to make it slightly colourful, and a little transparent. A shader is a concept in computer graphics which lets you apply special effects to an object using your GPU, making them really efficient.
Shaders are usually written using a special scripting language, which looks a bit daunting to learn. However, In Unity, you can build shaders using an amazing visual tool called Shader Graph, which is so much fun to use and something I definitely want to dive deeper into in the future.
After implementing this, I realised that performing the selection in 3-dimensional space can be a little tricky, especially if you have multiple units on screen and if the camera has been rotated at all. It can be hard for the brain to quickly understand the rotation the camera is currently at, and to know the angles that the edges of the box will appear at when you start dragging.

In the future, I may update my rectangular selection code so that you draw the rectangle in 2-dimensional space, and project it onto the 3-dimensional space of the game world. This is how it works in games like StarCraft 2, and it definitely feels more intuitive.

Right now it's also not clear which units you currently have selected. In the future I'll decide how I want to convey this information to the player. It's a tricky problem, especially with the potential for many units to appear on screen at once.
Combat
A game with space ships obviously requires that they have the ability to unleash a barrage of missiles at each other! I wrote a script called BasicAttack and attached it to my ship prefab. This script defines things like "how much damage do my attacks do". At first, attacks were performed using raycasting. An invisible ray was fired out from the selected ship towards the direction of the mouse click. If the ray collided with another ship, it immediately deducted the attack damage of the attacking ship from the hitpoints of the ship that took damage. If the hitpoints of a ship falls to zero or below, it gets immediately removed from the world.
Without any visual feedback, this made for a rather dull experience. So I added a few more features in order to liven things up a little.
I attached a LineRenderer (used to draw lines, and comes with Unity) component to my ship prefab. A prefab in Unity is similar to a class in programming. It's defines a blue print for what an instance of it will look like, and can easily be reused anywhere. The start point of the line is set to be the centre of the selected ship, and the endpoint is set to the position of the cursor. If a ship is selected, and the user presses A, the ship will enter "Attack Mode", and the LineRenderer will become visible on screen. I created a shader using Shader Graph and applied it to the line to make it slowly fade in and out over time, just to make things a little more visually interesting.

Then, I updated the BasicAttack code to spawn a missile instead of casting an invisible ray. The missile is just a capsule, with a TrailRenderer (built in to Unity) attached to it, which results in a trail of light which follows the missile as it travels towards its target. For now, the missiles always travel at a speed such that it takes 3 seconds to reach their target. After 3 seconds, the target takes damage. This isn't the most realistic approach, but it works.

To let the player know how much damage the target has taken, I implemented (after hours of headaches) floating damage numbers above the target. I absolutely love this effect in video games. When a target takes damage, the amount of damage it's taken briefly appears above the unit. The size of the font also dynamically scales based on the damage taken.
In my implementation, for damage numbers between 1 and 50, the standard font size is used (it results in a fontScaleFactor of 1). As we start doing more than 50 damage, the font size used to display the damage numbers increases in size, up to a maximum damage of 300. If an attack applies 300 or more damage, the font size will be double the standard size.
var fontScaleFactor = 1 + Mathf.InverseLerp(50, 300, damage);
damageText.fontSize *= fontScaleFactor;
Since a ship can take multiple damage instances in quick succession, I added some random variation to the position these damage numbers spawn at. Without this variation, the numbers overlap perfectly, and it isn't possible to determine how many instances of damage the ship has received. Here's the function I wrote to apply the randomness to the spawn position of the floating damage numbers:
private Vector3 ApplyRandomOffsets(Vector3 vec, float minOffset, float maxOffset) {
    var xOff = Random.Range(minOffset, maxOffset);
    var yOff = Random.Range(minOffset, maxOffset);
    var zOff = Random.Range(minOffset, maxOffset);
    return new Vector3(vec.x + xOff, vec.y + yOff, vec.z + zOff);
}
With these changes, things became a little bit more visually exciting:

Explosions
To give the player more visual feedback that that their attacks do damage, I added explosions that trigger when the missiles reach their target. Explosions in Unity are usually achieved using the Unity Particle System, which lets you create amazing physics based particle effects. Rather than attempting to create my own textures and particle systems, I used some of the particle systems available in the Unity Particle Pack.
My initial attempts at making things explode didn't really go to plan.

After some messing around, I upgraded my weird pink box shapes and arrived at something which looked a bit like a firework. Not exactly the high impact effect I was looking for, but certainly a step in the right direction.
A bit of Googling and some more messing around with settings, and I finally realised the cause of my problems was my use of Unity's newish Lightweight Render Pipeline (LWRP). The shaders used by the explosion weren't supported. After updating them to ones that are supported by the LWRP, the particle system actually started looking like a realistic explosion:

When the missiles reach their targets, the target will play an explosion effect. As an extra challenge, I gave each ship "shields", which is an additional layer of hitpoints. If a missile strikes a ship and it still has shields, the explosion is blue. After a ship runs out of shield energy, the explosions become orange as a visual cue to the player that the ship is low on total health.

I still have lots of ideas about how I could improve the effects here. Randomly varying the missile strike locations, and making the explosion effects spawn at those locations will add to the realism. Instead of hard-coding the explosion to appear at the centre of the target ship 3 seconds after the missile is fired, moving to a collision based system will allow the missile to explode immediately upon striking its target. A blue explosion isn't how "shield" effects are typically portrayed in films or video games either, so a shader which simulates a "force-field" effect might work better.
Moving forward
There's still lots to learn, but I'm really happy with my progress over the course of the past couple of weeks. Although there's no real gameplay in the project beyond "fly around and attack ships", it was an incredible learning experience and one that still makes me feel like I accomplished my goal of learning to create video games.
Going forward, I'd like to learn how to add a UI to the project above, and perhaps implement some interesting gameplay systems. I have a bunch of notes on how gameplay might work, and some ideas I want to experiment with. I may also move onto other projects, such as implementing interesting game mechanics I've experienced from other games, like the portal gun from Portal, or the Leviathan Axe from God of War.
Either way, learning the basics of Unity has opened up a whole new world of creativity for me. There's now so many things I now want to explore and learn to create, and I now have the confidence in myself that I'll be able to succeed at learning them!
In the future I might create more development/learning logs like these discussing the things I've built, and what I learned in the process. If you're interested, follow me on DEV, Twitter, and check out my personal blog at darrenburns.net.

Latest comments (10)
Nice article. Unity has a lot going for it, but as you experienced first-hand, LWRP and HDRP are not really ready for production use yet. Terrain and foliage have always been the Achilles Heel of Unity, but things got even worse with HDRP and LWRP (neither of them fully supports terrain). However, the built-in renderer does not support shader graph. It's a constant trade-off of features which just wouldn't be there if the Unity devs gave a f**k about backwards compatibility. Oh and don't get me started on the... "unique experience"... of upgrading an existing project to a new unity version.
I've been looking into Godot lately, which does several things a lot better (starting with the license) but I don't get this "millions of people have used this before, we got you covered no matter which way you go" feeling from it. But maybe I'm wrong. I would love to read how Godot 3 stands in comparison to Unity.
Thanks Martin.
Yeah, it's unfortunate that you need to move over to one of the new pipelines to take advantage of Shader Graph, it's actually the reason I initially migrated my project over to LWRP (it wasn't using it to begin with). I used the built-in tool in Unity to migrate my materials over to be LWRP compatible, but I found that in a lot of cases it just didn't work, and I had to change them manually.
I actually tried Godot briefly before settling on Unity. My reasons for doing so were quite similar to what you say: with Unity it feels like there's a much larger community and more support and resources available.
Looking good! Is there a particular reason you went with Unity? I fiddled with UE4 and Unity in the past but after finding out about Godot i just could not go back to them. Then again everyone has a different preference of course.
Thanks :) I did briefly try Godot but opted for Unity solely because I found there to be a lot more learning resources available for it.
This is the content I'm here for. Really well written, and an interesting look into someone learning game dev. Your game looks neat!
Thanks so much! Comments like this are so motivational and I have a huge smile on my face now :)
I'm glad :) Also I gotta agree with the numbers thing lol. I'm such a sucker for that. I used to love when I played WoW and numbers would fly out like crazy.
I also experiment with game ideas in Unity. Not to the extent you have though. I wish I knew how to use meshes and make bumpy spheres! Always nice to see others projects. Awesome. I think the planet's gravitational pull is wonderful the way it is, lol. You just needed one more element, constant speed. It's the fact that the Earth is moving at a near constant speed that we don't go crashing into the Sun or flying off into nowhere. Now I'm curious if that would actually work... I must try!
Yeah, I realised pretty quickly that I forgot about tangential velocity. I did actually try this by applying an arbitrary force to a planet, and it did cause the planet to start orbiting. It always fell ended up launching off into space eventually, or eventually it came crashing into the planet it was orbiting around!
I wasn't sure how to calculate the exact force I had to apply to each planet in order for it to maintain orbit. It made my brain hurt :)
I'm no math wiz. My brain hurts anytime I have to do any math, lol.