Foreword
Flask-State is a lightweight chart plugin to show machine state.
Flaks State GitHub
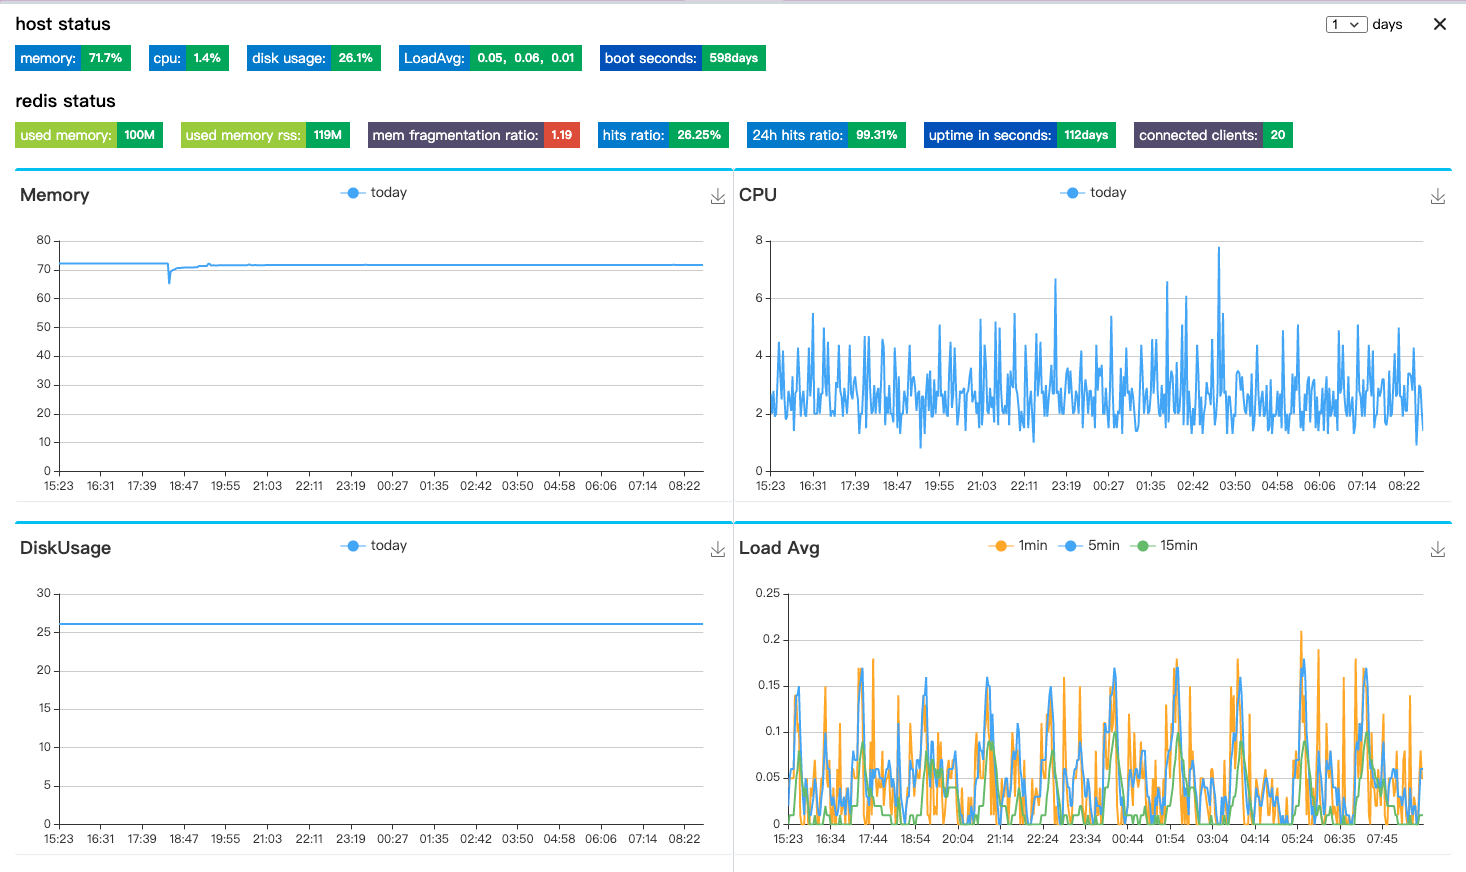
- Monitoring indicators: CPU, Memory, Disk usage, LoadAVG, Boot time.
- Extensible: It has rich options for extended functions, including redis monitoring, user authentication, custom logging, i18n and etc.
- Stable: Lightweight dependencies, meanwhile solving multi-progress concurrency problems (if you use gunicorn).
Quickstart
Install Dependencies
- Install via pip
pip3 install flask-state
- Visualization plugin dependencies
Use jsDelivr CDN to import the Flask-State file.
<!DOCTYPE html>
<html>
<head>
    <meta charset="utf-8">
    <!-- Import the Flask-State file -->
    <link href="https://cdn.jsdelivr.net/gh/yoobool/flask-state@v1.0.3/packages/umd/flask-state.min.css" rel="stylesheet">
    <script src="https://cdn.jsdelivr.net/gh/yoobool/flask-state@v1.0.3/packages/umd/flask-state.min.js"></script>
</head>
Initialization
# app.py
from flask import Flask
from flask import render_template
import flask_state

# Create a Flask app
app = Flask(__name__)

# Just bind the correct,readable and writable sqlite database path
app.config['SQLALCHEMY_BINDS'] = {flask_state.DEFAULT_BIND_SQLITE: 'sqlite:///path'}
flask_state.init_app(app)

# After setting up the route,you can display data!
@app.route('/helloworld')
def hello:
    return render_template('index.html')

if __name__ == '__main__':
    app.run(debug=True)
Display Flask-State
Example of initializing via Flask-State's init method. You can open the Flask-State window, by click on the DOM element bound to the method.
Below is the complete code:
<!DOCTYPE html>
<!-- templates/index.html>
<html>
<head>
    <meta charset="utf-8">
    <title>Flask-State</title>
    <!-- Import echarts file -->
    <script src="echarts.min.js"></script>
    <!-- Import Flask-State file -->
    <link rel="stylesheet" href="flask-state.css">
    <script src="flask-state.min.js"></script>
</head>
<body>
    <!-- Create the DOM element that triggers Flask-State -->
    <button id="trigger" style="width: 100px; height:50px;"></button>
    <script type="text/javascript">
        // Bind the Flask-State trigger event to the specified DOM element
        flaskState.init({dom: document.getElementById('trigger')});
    </script>
</body>
</html>
Run
now, Open
```http://127.0.0.1:5000/helloworld```
by using browser, Flask-State is already running!
## Configuration
### Recording Frequency
Records the state of the machine every 60 seconds by default. Custom time interval is allowed, **but please note that the minimum interval for collecting metrics also is 60 seconds**.
```python
import flask_state
app.config['SQLALCHEMY_BINDS'] = {flask_state.DEFAULT_BIND_SQLITE: 'sqlite:///path'}
# Pass the custom time into the init method
custom_interval = 120
flask_state.init(app, interval=custom_interval)
Redis Monitor
If you need to monitor Redis, just introduce the connection configuration of Redis, and Flask-State will collect Redis related indicators and display them on the page.
app.config['REDIS_CONF'] = {
    'REDIS_STATUS': True,
    'REDIS_HOST': '192.168.0.1',
    'REDIS_PORT': 16000,
    'REDIS_PASSWORD': 'fish'
}
# Initialize Flask-State after configuration
Localization
Flask-State currently supports three languages, including English, Simplified Chinese, and Japanese. The default language is English. If you need other languages, please leave us a message under Issues.
<!DOCTYPE html>
<html>
<head>
    <meta charset="utf-8">
    <title>ECharts</title>
    <!-- including Flask-State file -->
    <script src="flask-state.min.js"></script>
    <!-- Load language pack after import the Flask-State -->
    <script src="umd/zh.js"></script>
    <script src="umd/ja.js"></script>
    <link rel="stylesheet" href="flask-state.css">
</head>
<body>
    <script type="text/javascript">
        flaskState.init({lang: flaskState.zh});
    </script>
</body>
</html>
Trigger popup windows event
Flask-State supports you to bind multiple
 methods to different DOM elements, those elements can be clicked to open the Flask-State windows.

Of course, you needn't bind the DOM element, Flask-State will create a floating button on the page to open the Flask-State windows. **(Through long press and drag to adjust the position of the floating button)**


```html
<!DOCTYPE html>
<html>
<head>
    <meta charset="utf-8">
    <title>Flask-State</title>
    <!-- Import Flask-State -->
    <script src="flask-state.min.js"></script>
    <link href="flask-state.css" rel="stylesheet">
</head>
<body>
    <!-- Create the DOM element that triggers Flask-State -->
    <button id="trigger1" style="width: 100px; height:50px;"></button>
    <button id="trigger2" style="width: 100px; height:50px;"></button>
    <script type="text/javascript">
        /* Flask-State binds the trigger event to trigger1, trigger2, and floating button respectively */
        flaskState.init({dom: document.getElementById('trigger1')});
        flaskState.init({dom: document.getElementById('trigger2')});
        flaskState.init();
    </script>
</body>
</html>
FAQ
Data Backup
Records that ranges from 1, 3, 7 or 30 days is queryable in current Flask-State version. Meanwhile 30 days ago data will be auto delete.
If you need to view more data, please make a data backup in time.
Multiprocessing
When running multiple instances of Flask on the same server (For example using Gunicorn). In order to avoid the concurrency problem of Flask-State recording state, we introduced an external lock setting.
Only the process that obtains the lock resource has the permission to read and write the database. At the same time, the process that has acquired the lock resource will print out its PID.
Access Control
For users who have worry about security , we will recommend that you introduce the Flask-Login.
After enabling, in each read and write operation, Flask-State will perform user authentication based on Flask-Login, and only users who pass the authentication can read and write local state data.
Roadmap
- Make Flask-State mobile-friendly.
- Set up collect frequency via Cron expression.
- Add more extended service monitoring.

Top comments (0)