
TLDR;
Colab Notebook
Introduction
Communication is an essence of human life. From ancient hieroglyphics to the 6500 languages spoken currently across the world, they all signify the importance of our ability to reach out to our fellow human beings.
Even though the global literacy rate for all people aged 15 and above is 86.3%, there are only about 250 certified sign language interpreters in India, translating for a deaf population of between 1.8 million and 7 million. The wide disparity in population estimates exists because the Indian census doesn’t track the number of deaf people — instead, it documents an aggregate number of people with disabilities.
(Source : https://www.pri.org/stories/2017-01-04/deaf-community-millions-hearing-india-only-just-beginning-sign)
What will you build!
In this blog post we build an American Sign Language classifier and try to automate the process of sign language translation.
Setup
We start by setting up Monk and it’s dependencies on colab. For further setup instructions on different platforms check out the DOCS.
$ git clone https://github.com/Tessellate-Imaging/monk_v1
$ cd monk_v1/installation && pip install -r requirements_cu10.txt
$ cd ../..
Dataset
We will utilise the ASL image dataset from Kaggle — LINK.
Training
Next we will use Pytorch as our backend to create a new Project and use Resnet50 as our pre-trained model.
ptf = prototype(verbose=1);
ptf.Prototype("asl", "exp1");
ptf.Default(dataset_path="./dataset/train",
            model_name="resnet50",
            freeze_base_network=True, num_epochs=10);
We train our model for 10 epochs and check the training and validation accuracy.
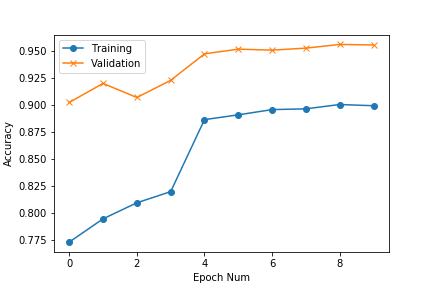 Accuracy curves
The plot shows that even though our training accuracy is lower, the model performs quite well on the validation set.
The dataset is not diverse enough to create a generalised model.
However further improvement can be achieved by using image augmentation strategies.
Let’s put the model to test with a realtime video classification.
*Note: A process automation pipeline for image or video processing requires much more than just a classification model. In our case we would require a hand detector to localise the position of hands within the frame, a hand tracker to reduce jitter from the hand detector and finally the sign language classifier. Even after setting up all the modules, the heuristics and dataset requirements would differ based on the application and deployment scenario. To give an example, the current classifier is built with a webcam dataset and will surely not work with AR headsets which have a different point of view.
For this exercise we will set a region of interest within the frame where our hand must be placed for the model to determine the gestures.
Realtime Gesture Classification
We begin by loading our experiment in evaluation mode.
import os
import sys
sys.path.append(“./monk_v1/monk/”);
import psutil
from pytorch_prototype import prototype
from imutils.video import VideoStream
import cv2ptf = prototype(verbose=1)
ptf.Prototype(“asl”, “exp1”, eval_infer=True);
We capture a video stream from our webcam, set a region of interest within the frame and store it in a file.
if __name__ == ‘__main__’:
  vs = VideoStream().start()
  im_height, im_width = (None, None)
  while True:
    # Read Frame and process
    frame = vs.read()
    frame = cv2.resize(frame, (640, 480))
    frame = cv2.flip( frame, 1 )    #Set ROI
    cv2.rectangle(frame, (350,50), (600,300), (255,0,0) , 3, 1)    roi = frame[50:300,350:600]    roi = cv2.cvtColor(roi, cv2.COLOR_BGR2RGB)
    cv2.imwrite(“roi.jpg”,roi)
Next we load the ROI image and infer using our classification model generated with Monk and display the predicted class:
    predictions = ptf.Infer(img_name=”roi.jpg”, return_raw=False);

    cv2.putText(frame, predictions[‘predicted_class’],(350,40),cv2.FONT_HERSHEY_SIMPLEX, 1, (0,255,0), 2)

    cv2.imshow(‘ASL’, cv2.cvtColor(frame, cv2.COLOR_RGB2BGR))

    if cv2.waitKey(25) & 0xFF == ord(‘q’):
      cv2.destroyAllWindows()
      vs.stop()
      break
The model performs fairly well in proper lighting conditions. In the following video I try to write the word “MONK” using hand gestures.
Coming Soon!
We are constantly striving to improve the features available in Monk. Following are some developments that we will be releasing soon:
- Adding custom layers and creating custom Deep Neural architectures
- More optimisers, regularisers and loss functions
- Multi-label classification for image tagging
We are creating a community of collaborators for Monk.
Signup here to become a beta tester : LINK
Mention in comments which features and applications you would like us to build next.
Do give us a star on Github if you like what you see!
Happy Coding!

Latest comments (0)