
In the previous article from the API Gateway 101 Series we saw an Introduction to API Gateway, understanding the basic know-how. Now it’s time to see an API gateway in action in front of multiple microservices.
We’ll be spinning up multiple mock microservices within a private network (docker network) making them inaccessible from the host. The API gateway will be accessible from the host and all the microservices will be attached to the gateway. Thus any client request needs to go through the gateway first before being served by the actual microservice in the backend.
Prerequisites
We’ll be deploying the API gateway and the mock microservices using Docker. If you’re not familiar with Docker & Docker Compose then here is a quick link to understand the basics - Docker Docs.
For exploring and utilizing the Kong Admin API we'll be using Postman Collections.
- Postman is an API Client that assists to create, share, test and documenting APIs.
- Postman collections are basically a group of saved API requests that are executable.
You’ll see that I’ve organized the postman collection for this series in folders making it easy for you to explore saved APIs section-wise. Postman isn’t necessary for this series, you can easily replicate the saved APIs into your favourite API client.
NOTE: I’m using Docker installed on a windows machine. In this article where ever I mention ‘192.168.99.100’, it refers to the ‘docker-machine ip’.
Cool, now that once Docker, Docker Compose & Postman are installed, we can move forward to get started. Let’s now get our hands dirty by spinning up some mock microservices and setting up an API Gateway in front of them.
Spinning up mock microservices
The source code for the mock microservices created for this article can be found on my GitHub repository - adisakshya/api-gateway
To get started let’s clone the git repository -
git clone https://github.com/adisakshya/api-gateway
cd api-gateway/single-node-kong-gateway
Source code for each mock microservice lives in the respective directory named after them. Some services are defined directly in the docker-compose file. All the microservices and the API gateway can be started at once using the following command -
docker-compose up -d
This will start the respective docker containers in the background of your terminal (aka docker detached mode). You can check the list of containers that are up using the following command -
docker ps -a

Since we’re running docker containers in the detached mode we’ll not be able to see any logs. But If you want to see logs of a specific container you can use the following command -
docker container logs '<<CONTAINER_ID>>'
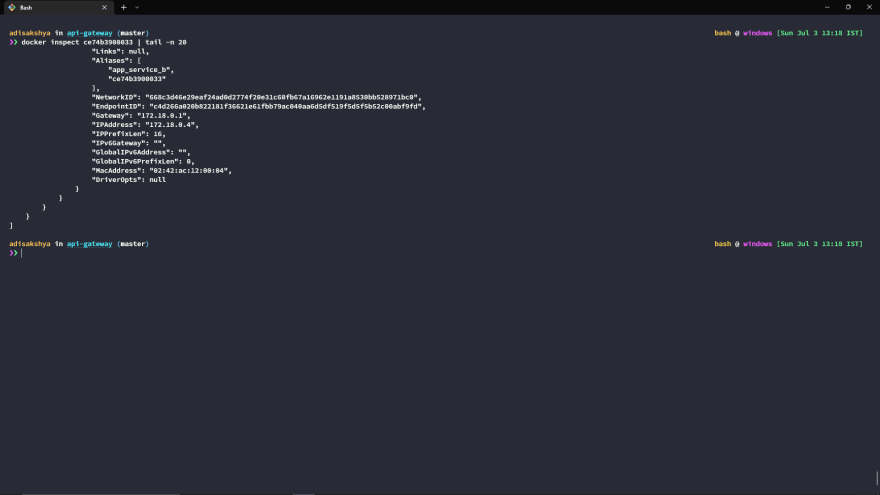
The IP for the internal docker gateway is 172.18.0.1, to get the IP for a particular docker container you can use the following command -
docker inspect '<<CONTAINER_ID>>' | tail -n 20
I’ve used the tail command to see the IP address of the docker container, which is found towards the end of the response from the docker inspect command.
We’ll need the IPs of the docker containers to attach these microservices to our Kong API gateway. By now you’ll have the following containers up and running -
| Container Name | IP (Docker Network) | IP (Host Network) |
|---|---|---|
| Konga (Admin GUI) | 172.19.0.2 | 192.168.99.100:1337 |
| Kong | 172.18.0.9 | 192.168.99.100:8000-8001 |
| Kong Database | 172.18.0.3 | 192.168.99.100:5432 |
| Nginx Web Server | 172.18.0.6 | Not accessible |
| Apache Server | 172.18.0.2 | Not accessible |
| HTTPBin | 172.18.0.5 | Not accessible |
| Application Server A | 172.18.0.7 | Not accessible |
| Application Server B | 172.18.0.4 | Not accessible |
Kong Gateway APIs
Kong can be administered with an internal RESTful API called the Admin API. This API provides full control over the kong gateway.
-
8001is the default port for HTTP traffic to the Admin API. -
8444is the default port for HTTPS traffic to the Admin API.
Apart from the Admin API, we have another API using which the API consumers can consume the services. This API needs to be exposed to the world in order for the services to be accessible.
-
8000is the default port for HTTP traffic from Consumers. -
8443is the default port for HTTPS traffic from Consumers.
The traffic from consumers on 8000/8443 is forwarded to the corresponding service based upon the defined routes.
Accessing the Admin GUI (Konga)
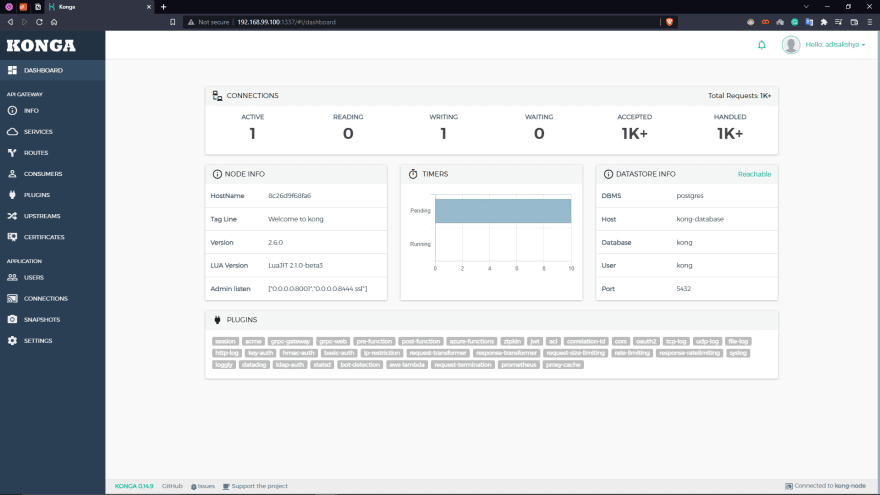
The admin GUI can be found at 192.168.99.100:1337. Once you register yourself as an admin you'll be prompted to specify the kong admin URL using which the Admin GUI can create objects like services/routes etc on the kong node.
The Kong Admin API is found at 192.168.99.100:8001. Once the Admin GUI is connected to the Admin API you’ll be directed to the main dashboard -
Interacting with the Kong Admin API
I’ve created a Postman collection containing the requests that can be made to the Kong APIs for administrating and accessing services from the gateway.
The Admin API provides a ‘/status’ route that can be used to check the status of a Kong node.

The Admin API provides you with complete control over the Kong Node so there’s a lot you can do with this API like attaching/detaching backend services, creating/removing consumers, creating passwords for users and much more.
To get the full list of routes provided by the Admin API you can call the ‘/endpoint’ route. I’ve included a few requests in the postman collection for you to explore the Admin API.
Registering the microservices with the API gateway
Having played with the Admin API now let’s attach our already running backend microservices with the API gateway.
- Every microservice will have a service object corresponding to it on the API gateway that is identified by the service name, hostname (or IP address) and a port number.
- Every service will have defined route(s) which can be called by the end-users.
- The request to any route is proxied to the corresponding backend microservice and the generated response is returned back to the end-user by the API gateway.
To create a service object for a backend microservice, we can send a POST request to the Admin API on the ‘/services’ route with the service name, hostname and port number (default 80).

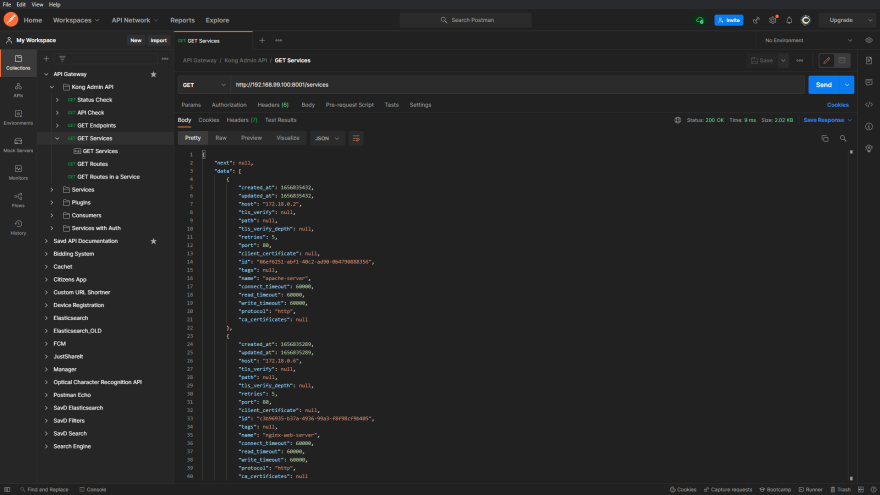
Having created a service object for all our microservices we can get a list of available services on the API gateway using the Admin API.
Having defined the service objects now we need to create the routes to which the API consumers can forward their requests. To create a route object for a gateway service, we can send a POST request to the Admin API on the ‘/routes’ route with the route name, route path and list of allowed methods on that path.

Having created route objects for all our gateway services we can get a list of all available routes using the Admin API.

Utilizing the microservices from the API gateway
All the routes defined on the gateway are reachable from port 8000. Let’s hit the routes we’ve created and analyze the response. We’re running a raw Nginx Web Server behind the route ‘/nginx’, let’s hit it first using the API -

As expected the response returned is the default Nginx welcome page, this means that the backend Nginx web service running on 172.18.0.6 (inside docker network) is now accessible on the host via the API gateway. Now let’s try hitting the HTTPBin service -
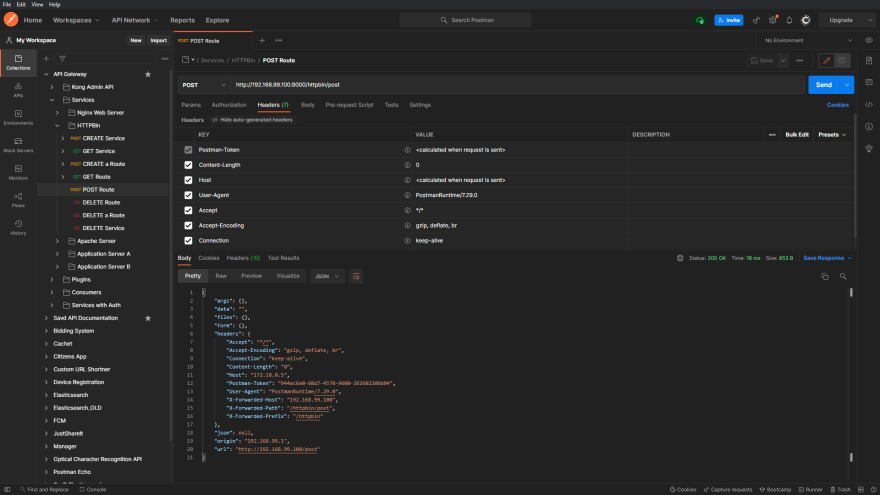
The purpose of using the HTTPBin service was to analyze the returned response in detail. Focus on the fields named ‘X-Forwarded-Host’, ‘X-Forwarded-Path’ and ‘X-Forwarded-Prefix’, these fields are often referred to as X-Forwarded-For (XFF) HTTP header fields.
XFF fields are used for identifying the originating IP address of the consumer who is connecting to the service. There can be more details like UserId and Username of the consumer as part of XFF which can be utilized by the backend microservices. We’ll be exploring them in detail in upcoming articles.
Next Steps
As you might have noticed already that all the services that we’ve created are open to access for anyone on the host. In the next article, we’ll understand some key concepts about authentication and authorization to secure our backend services. We’ll see how we can restrict access to a particular backend service on the user level.
See you there!
Contribution
Enjoyed the article, found it useful or learned something new? Consider sharing it so more people can benefit from it! Also, feel free to @ me on Twitter with your opinions.
Found a mistake? Feel free to mention it in comments or at GitHub issues or fix it using a PR at adisakshya/weblog.

Latest comments (0)