
Written by Yoav Danieli @ Team Aspecto
In this article, you will learn how to deploy and configure the OpenTelemetry Collector as an agent on Kubernetes.
In part 1, we described how to set up a local Kubernetes environment with Minikube. We configured an OpenTelemetry collector and deployed it to a local Kubernetes cluster. We outlined and explained each of the Kubernetes resources we need to deploy the Opentelemetry Collector as a Gateway.
You can read this article as a stand-alone guide or as part 2 of our OpenTelemetry Collector on Kubernetes series.
Related Guides
- The OpenTelemetry Collector and how to configure it
- Distributed tracing with OpenTelemetry Collector on Kubernetes -- Part 1
- OpenTelemetry Collector on Kubernetes with Helm Chart -- Part 3
Why Deploy the OpenTelemetry Collector as an Agent
We use the collector gateway as a central point for all our telemetry data from our distributed architecture. It means the collector usually receives a lot of traffic and therefore is responsible for handling this traffic.
Deploying specific collector instances for certain services can help us offload some of those responsibilities. For example, the agent can handle actions like batching, compression, retries, and more.
In addition, it improves the overall performance of the system. Since the agent is running in the same host as our services, there is no DNS resolving (it's just localhost). Thus it receives the data much faster.
Lastly, having a specific collector instance per service means we can add specific features and configurations to our telemetry data. We can add specific attributes and use any collector process configuration specific to this service.
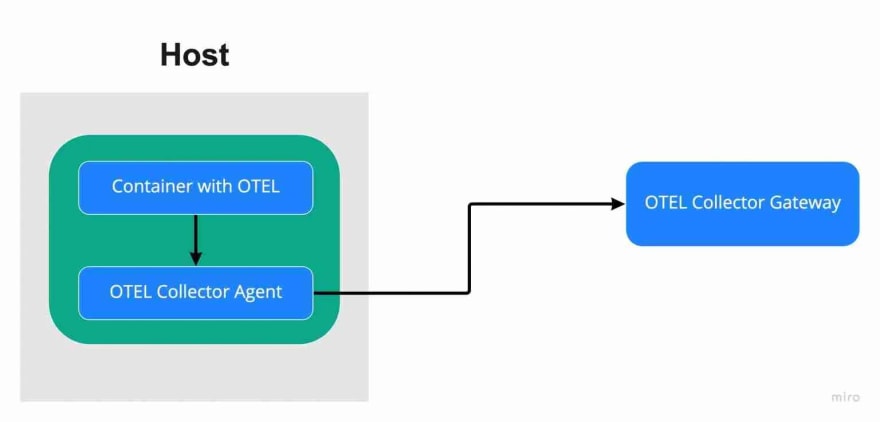
Here is an illustration of running a collector gateway + agent as sidecar architecture:
There are a couple of strategies to deploy the collector as an agent.
We can deploy it as a DeamonSet, Sidecar, or StatefullSet. Each strategy has its use cases. To read more about deployment strategies, I recommend reading this article.
In this tutorial, I will deploy the OpenTelemetry collector agent as a sidecar.
Kubernetes Resource Configuration for Collector as an Agent
Let's create a new manifest file named business-application.yml. We will start by creating the agent's configuration.
One exporter and one receiver on OTLP protocols:
apiVersion: v1
kind: ConfigMap
metadata:
 name: otel-agent-conf
data:
 otel-agent-config: |
   receivers:
     otlp:
       protocols:
         grpc:
         http:
   processors:
     batch:
   exporters:
     otlp:
       endpoint: otel-collector:4317
       tls:
         insecure: true
   service:
     pipelines:
       traces:
         receivers: [otlp]
         processors: []
         exporters: [otlp]
---
Secondly, we will create a deployment with two containers. The application and the sidecar.
For the application service, I will use a test service that sends an example span every 5 seconds to the agent's endpoint. For all code examples, please check out the source code.
I built it using:
docker build -t test-service ./test-service
Here is the deployment:
apiVersion: apps/v1
kind: Deployment
metadata:
 name: test-service
spec:
 selector:
   matchLabels:
     app: test-service
 template:
   metadata:
     labels:
       app: test-service
   spec:
     containers:
       - name: test-service
         image: test-service
         env:
           - name: SERVICE_NAME
             value: test-service
         resources:
       - name: otel-agent
         image: otel/opentelemetry-collector:latest
         command:
           - '/otelcol'
           - '--config=/conf/otel-agent-config.yaml'
         resources:
         volumeMounts:
           - name: otel-agent-config-vol
             mountPath: /conf
     volumes:
       - configMap:
           name: otel-agent-conf
           items:
             - key: otel-agent-config
               path: otel-agent-config.yaml
         name: otel-agent-config-vol
Deploying the OpenTelemetry Collector Gateway + Agent locally
Let's apply the configuration we have so far to check the new service is working and deploy the agent and gateway to verify the new service is working.
You can find all gateway configurations in this gateway.yml file.
Deploy it using
kubectl apply -f gateway.yml
Next deploy the manifests we just wrote using:
kubectl apply -f business-application.yml
The application crashed.
- Issue #1 -- Use locally built docker inside a Kubernetes cluster. Printing the log from the test-service pod we get the following message:
Defaulted container "test-service" out of: test-service, otel-agent
Error from server (BadRequest): container "test-service" in pod "test-service-5646dd8d77-fp27c" is waiting to start: trying and failing to pull image
The cluster can't build the image because it can't pull it. It searches the cluster's docker daemon for the image and can't find it. The solution, as described here, is to push the image to the local docker environment of minikube.
Following the documentation, we enter the following, change the imagePullPolicy to Never, and run it again:
eval $(minikube docker-env)
Let's verify that everything runs smoothly. The logs state that the exporter could not be found. It makes sense because we didn't create a service to enable this communication.
Add another service resource in the gateway manifest. It needs to be of type ClusterIP and have the gateways labels in its selector block:
apiVersion: v1
kind: Service
metadata:
 name: otel-collector-in
 namespace: opentelemetry
 labels:
   app: opentelemetry
   component: otel-collector
spec:
 type: ClusterIP
 selector:
   component: otel-collector
 ports:
   - name: otlp-grpc # Default endpoint for OpenTelemetry gRPC receiver.
     port: 4317
     protocol: TCP
     targetPort: 4317
   - name: otlp-http # Default endpoint for OpenTelemetry HTTP receiver.
     port: 4318
     protocol: TCP
     targetPort: 4318
Let's run the application once more. Still no connection with the exporter.
- Issue #2 -- Cross Namespace Communication in Kubernetes. When running pods in different namespaces the pod's DNS is suffixed with the name of the namespace. In our config map, we need to specify the full DNS in the exporter's endpoint:
endpoint: otel-collector.opentelemetry.svc.cluster.local:4317
Read the Kubernetes documentation regarding DNS to learn more.
After fixing the last issue and running the cluster once more, we can see the traces reaching the exports we configured in the Gateway. Success!
Final Thoughts
In this article, we configured a simple Collector agent that runs as a sidecar for an example span-generating application.
We outlined how to deploy and configure the OpenTelemetry Collector as an agent on Kubernetes.
Please feel free to check out the source code for this article. Thanks for reading and please let me know if you have any questions or comments.
The next part of this series will explain how to save us a lot of time and effort by using Helm.

Top comments (0)