Introduction
You can use cloud storage for on-premises data backups to reduce infrastructure and administration costs. There is several ways to backup your on-premise infrastructure to cloud, here I’ll use hybrid cloud (part of your infrastructure is on the cloud and part of your infrastructure is on the on-premise) to accomplish it. In this post I’ll show AWS Storage Gateway solutions to bridge between on-premise data to cloud. The common use case is disaster recovery, backup & restore and tiered storage.
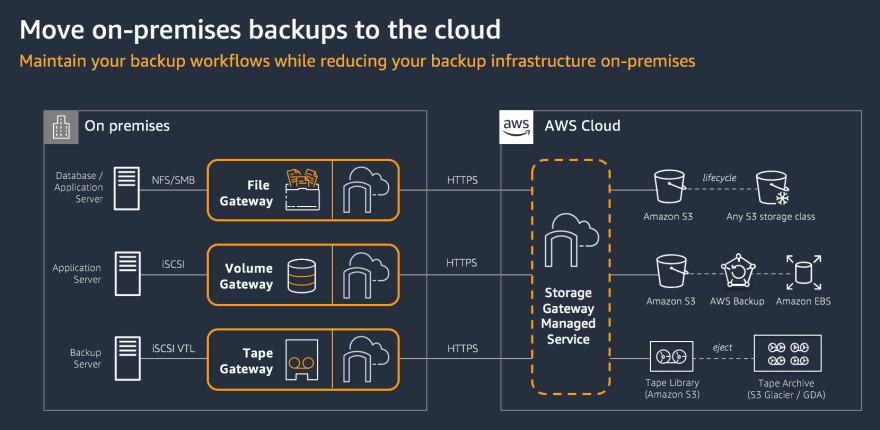
There is 3 types of Storage Gateway:
Before show how I implemented it, I’ll show a brief overview about each one.
File Gateway
Databases and applications are often backed up directly to a file server on-premises. You can now simply point these backups to the File Gateway, which copies the data to Amazon S3. Supports S3 standard, S3 IA, S3 One Zone IA so you can configure your bucket policy to move this data to any storage class in Amazon S3, depending your needs.
Features:
NFS/SMB protocol supports
Lifecyles policies in Amazon S3
Windows ACL
Most recently used data is cached in the file gateway
Support S3 Object Lock
Bandwith optimized
Can be mounted on many servers
Volume Gateway
The Volume Gateway provides either a local cache or full volumes on premises while also storing full copies of your volumes in the AWS Cloud. Volume Gateway also provides Amazon EBS snapshots of your data for backup or disaster recovery.
Features:
Block storage using iSCSI protocol backed by S3
Backed by EBS snapshots which can help restore on-premise volumes
On-premises cache of recently accessed data
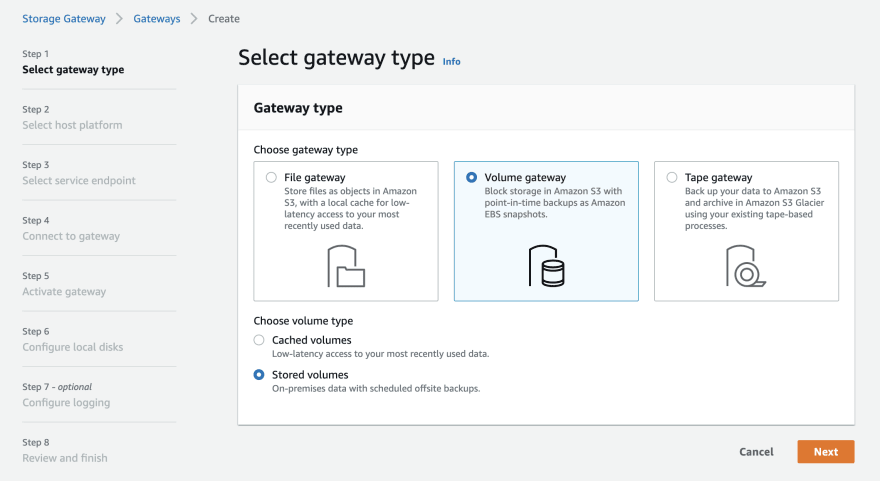
Two types of Storage Volume Gateway: * Cached volumes: low latency access to most recent data * Stored volumes: entire dataset is on premise, scheduled backups to S3
Tape Gateway
You can use Tape Gateway to replace physical tapes with virtual tapes in AWS. Tape Gateway acts as a drop-in replacement for tape libraries, tape media, and archiving services, without requiring changes to existing software or archiving workflows. Most used for enterprise backup purpose.
Features:
VirtualTape Library (VTL) backed by Amazon S3 and Glacier
Back up data using existing tape-based processes (and iSCSI interface)
Works with leading backup software vendors
In Summary, if you use: File Gateway => File access / NFS (backed by S3) Volume Gateway => Volumes / Block Storage / iSCSI (backed by S3 with EBS snapshots) Tape Gateway => VTLTape solution / Backup with iSCS (backed by S3 and Glacier)
The Volume Gateway Implementation
As I said before, there are many ways to choose your strategy, each company has individual needs. Volume Gateway stores and manages on-premises data in Amazon S3 on your behalf and operates in either cache mode or stored mode. In my case, even though a backup partition is a file share, I chose the Volume Gateway type because of the following features:
I need on-premises cache of recently accessed data to be accessed was needed (Provides low latency access to cloud-backed storage)
I need backed by EBS snapshots which restore on-premise volumes when needed ( I used Volume Gateway in conjunction with Linux file servers on premises to provide scalable storage for on-premises file applications with cloud recovery options. I used a stored volume architecture, to store all data locally and asynchronously back up point-in-time snapshots to AWS.)
With stored volumes you can store your primary data locally, while asynchronously backing up that data to AWS. Stored volumes provide your on-premises applications with low-latency access to their entire datasets. At the same time, they provide durable, offsite backups. You can create storage volumes and mount them as iSCSI devices from your on-premises application servers. Data written to your stored volumes is stored on your on-premises storage hardware. This data is asynchronously backed up to Amazon S3 as Amazon Elastic Block Store (Amazon EBS) snapshots. You can maintain your volume storage on-premises in your data center. That is, you store all your application data on your on-premises storage hardware. This solution is ideal if you want to keep data locally on-premises, because you need to have low-latency access to all your data, and also to maintain backups in AWS.
See the following diagram about stored volumes architecture:
You can deploy Volume Gateway as a virtual machine or on Ec2 instance. In this case, I have used as virtual machine architecture on premise infrastructure, but you can use as you want.
Create a Gateway Type
Before you create a volume to store data, you need to create a gateway and specify the kind of gateway you’ll use.
First, Open the AWS Management Console at https://console.aws.amazon.com/storagegateway/home, and choose the AWS Region that you want to create your gateway in.
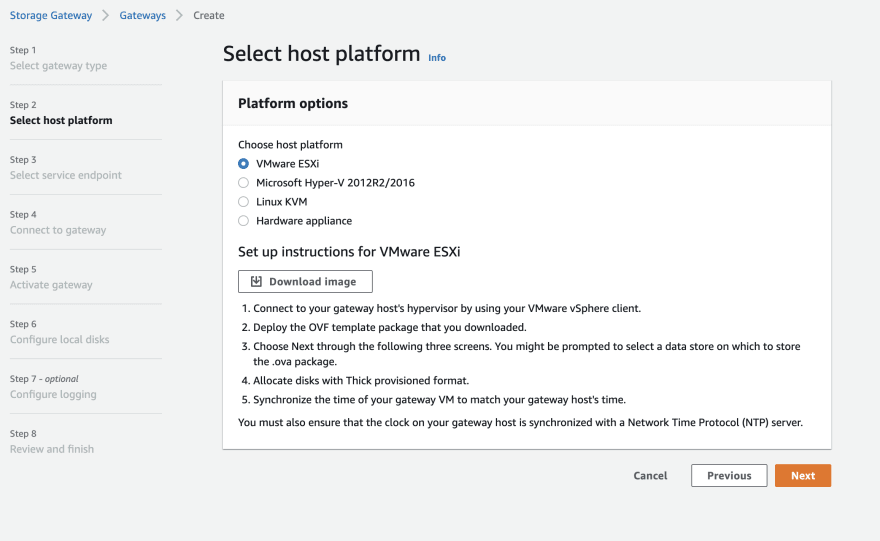
Now it is necessary to choose a Host Platform and Downloading the VM appliance. You have to choose a hypervisor option, deploy the downloaded image to your hypervisor. Add at least one local disk for your cache and one local disk for your upload buffer during the deployment. See some requirements here:
Hardware requirements for on-premises VMs
When deploying your gateway on-premises, you must make sure that the underlying hardware on which you deploy the gateway VM can dedicate the following minimum resources:
Four virtual processors assigned to the VM.
16 GiB of reserved RAM for file gateways
For volume and tape gateways, your hardware should dedicate the following amounts of RAM:
16 GiB of reserved RAM for gateways with cache size up to 16 TiB
32 GiB of reserved RAM for gateways with cache size 16 TiB to 32 TiB
48 GiB of reserved RAM for gateways with cache size 32 TiB to 64 TiB
80 GiB of disk space for installation of VM image and system data.
Depending your hypervisor and if you set on premise infrastructure, you have to check certain options according each hypervisor. In my case I have to setup the following:
VMware Setup
Store your disk using the Thick provisioned format option. When you use thick provisioning, the disk storage is allocated immediately, resulting in better performance. In contrast, thin provisioning allocates storage on demand. On-demand allocation can affect the normal functioning of AWS Storage Gateway. For Storage Gateway to function properly, the VM disks must be stored in thick-provisioned format.
Configure your gateway VM to use paravirtualized disk controllers
Now you have to choose a Service Endpoint. This is used to how your gateway will communicate with AWS storage services over the public internet. In my case I used public service endpoint.
The next step is Connecting Your Gateway. To do this it is necessary to get the IP address or activation key of your gateway VM. So, in my vmware environment I have connected through console and set the IP address. So, to connect gateway, verify that your gateway VM is running for activation to succeed and if you can access the IP address that you have setup previously.
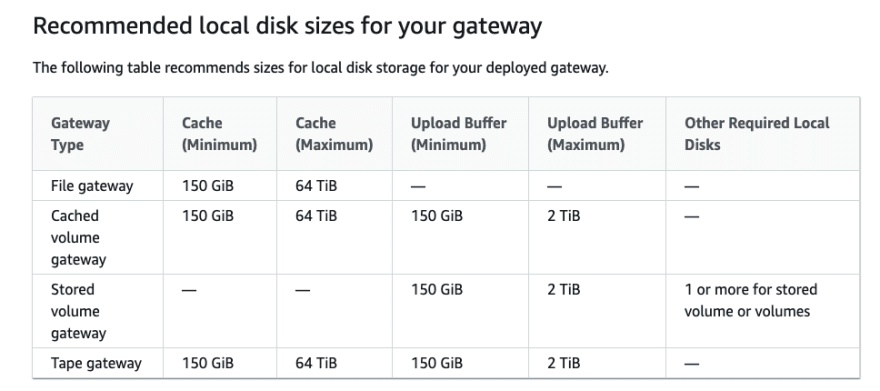
Now you have to configure your gateway to use the disks that you have created when you deployed the appliance and according the requirements of the type of the gateway. As I have used for stored volume purpose, I had to configure the upload buffer according the requirements. Bellow, are table with Depending your hypervisor and if you set on premise infrastructure, you have to check certain options according each hypervisor. In my case I have to setup the following:
VMware Setup
Store your disk using the Thick provisioned format option. When you use thick provisioning, the disk storage is allocated immediately, resulting in better performance. In contrast, thin provisioning allocates storage on demand. On-demand allocation can affect the normal functioning of AWS Storage Gateway. For Storage Gateway to function properly, the VM disks must be stored in thick-provisioned format.
Configure your gateway VM to use paravirtualized disk controllers
Now you have to choose a Service Endpoint. This is used to how your gateway will communicate with AWS storage services over the public internet. In my case I used public service endpoint.
The next step is Connecting Your Gateway. To do this it is necessary to get the IP address or activation key of your gateway VM. So, in my vmware environment I have connected through console and set the IP address. So, to connect gateway, verify that your gateway VM is running for activation to succeed and if you can access the IP address that you have setup previuosly.
Now you have to configure your gateway to use the disks that you have created when you deployed the appliance and according the requirements of the type of the gateway. As I have used for stored volume purpose, I had to configure the upload buffer according the requirements. Bellow, are table with differents sizes requirements according the type you will use. size requirements according the type you will use.
Create a Volume
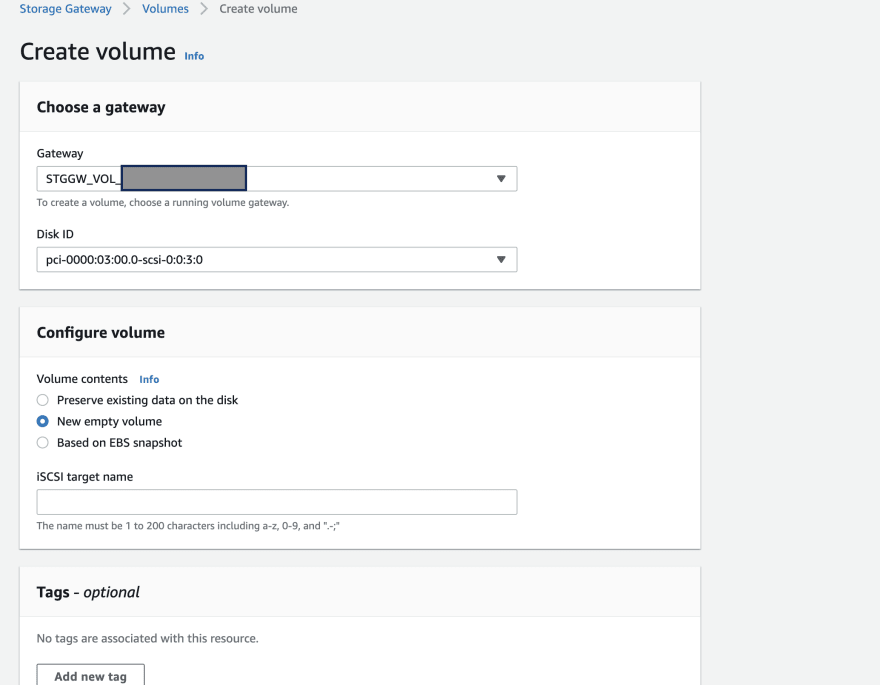
Once the gateway was created, its time to create storage volume to which your applications read and write data. Previously, you have allocated disks to upload buffer in the case of stored volume - Volume Gateway.
As you can see bellow, to create a volume in the storage gateway created, you need to select it, select the disk ID that you have create to stored data, in this case it depends which kind of hypervisor you are use.
Note that in this step, if you would like to restore data from EBS volume you need to select it and specify the snap ID you want. You can use a existing disk too and new empty volume, which is our case.
You need to specify ISCSI target volume too.
You will be asked to configure chap authentication, a provider protection against playback attacks by requiring authentication to access storage volume targets. If you do no accept it, the volume will accept connections from any ISCSI initiator.
Once created a volume, you will see the volumes availables to be mounted on your initiator.
Using a Volume
In my case, my purpose was used hybrid cloud to store samba files on-premise and have backup protection with snapshots on the cloud. So, I will show you how to create a partition to use a disk created previously.
Depending which Linux Operation System distribution you are used, it is necessary to install a packager to manager ISCSI ( iscsi-initiator-utils - Red Hat Enterprise Linux Client )
Once installed, discover the volume or VTL device targets defined for a gateway. Use the following discovery command.
iscsiadm --mode discovery --type sendtargets --portal [GATEWAY_IP]:3260
The output of the discovery command should like this:
[GATEWAY_IP]:3260,1 iqn.1997-05.com.amazon:part-home
[GATEWAY_IP]:3260,1 iqn.1997-05.com.amazon:disk-test-purpose
Now its is necessary to connect to a target.
iscsiadm --mode node --targetname iqn.1997-05.com.amazon:[ISCSI_TARGET_NAME] --portal [GATEWAY_IP]:3260,1 --login
Make sure to replace the [ISCSI_TARGET_NAME] to value that you have setup previously and obsviously, the gateway IP, the command should like this:
iscsiadm --mode node --targetname iqn.1997-05.com.amazon:disk-test-purpose --portal [GATEWAY_IP]:3260,1 --login
The successful output should like this:
Logging in to [iface: default, target: iqn.1997-05.com.amazon:disk-test-purpose, portal: [GATEWAY_IP],3260] (multiple)
Login to [iface: default, target: iqn.1997-05.com.amazon:disk-test-purpose, portal: [GATEWAY_IP],3260] successful.
Verify that the volume is attached to the client machine (the initiator). To do so, use the following command.
ls -l /dev/disk/by-path
total 0
lrwxrwxrwx 1 root root  9 abr  7 09:59 ip-[GATEWAY_IP]:3260-iscsi-iqn.1997-05.com.amazon:disk-test-purpose-lun-0 -> ../../sdd
Verify the volume attached in our case is /dev/sdd, so we will format to use this device.
Formatting Your Volume using Logical Volumes
Now lets use LVM to provides more flexibility and can also be resized dynamically when needed without any restarts.
The first thing to do is to create physical disk on the device created previously on the storage gateway and initiated by the ISCSI.
pvcreate /dev/sdd
Physical volume "/dev/sdd" successfully created.
Verify that the physical volume was created.
pvdisplay /dev/sdd
  "/dev/sdd" is a new physical volume of "20,00 GiB"
  --- NEW Physical volume ---
  PV Name               /dev/sdd
  VG Name
  PV Size               20,00 GiB
  Allocatable           NO
  PE Size               0
  Total PE              0
  Free PE               0
  Allocated PE          0
  PV UUID               Vy51TU-sSDDF-SSDFD-Hnzz-a0uP-u3WP-gI0E7C
Now you need to create volume group or add a existing one. For example, I already had a disk with 500GB allocated, if I need do expand it, I only need to add the disk to a existing volume group and expand a existing logical volume. But for now, we will create a volume group and create logical volume. Now, lets create a volume group and add physical volume created.
vgcreate stg_gtw /dev/sdd
Volume group "stg_gtw" successfully created
vgdisplay stg_gtw
  --- Volume group ---
  VG Name               stg_gtw
  System ID
  Format                lvm2
  Metadata Areas        1
  Metadata Sequence No  1
  VG Access             read/write
  VG Status             resizable
  MAX LV                0
  Cur LV                0
  Open LV               0
  Max PV                0
  Cur PV                1
  Act PV                1
  VG Size               <20,00 GiB
  PE Size               4,00 MiB
  Total PE              5119
  Alloc PE / Size       0 / 0
  Free  PE / Size       5119 / <20,00 GiB
  VG UUID               ZYAOrS-zgsdd-To9k-SDDS-gwpn-xPzo-DEdFDF
So, lets create a logical volume with 100% Volume group size (In this case 20GB):
lvcreate -l 100%FREE -n lv_disk_teste stg_gtw
Logical volume "lv_disk_teste" created.
lvdisplay /dev/stg_gtw/lv_disk_teste
  --- Logical volume ---
  LV Path                /dev/stg_gtw/lv_disk_teste
  LV Name                lv_disk_teste
  VG Name                stg_gtw
  LV UUID                EqsSDDe-OsGG4-a0Tr-djFFGX-fKSy-Enu6-jCDF1QV
  LV Write Access        read/write
  LV Creation host, time .local, 2021-04-07 10:36:17 -0300
  LV Status              available
  # open                 0
  LV Size                <20,00 GiB
  Current LE             5119
  Segments               1
  Allocation             inherit
  Read ahead sectors     auto
  - currently set to     256
  Block device           254:4
Once created, lets format the partition to store data.
> mkfs.ext4 /dev/stg_gtw/lv_disk_teste
mke2fs 1.44.5 (15-Dec-2018)
Creating filesystem with 5241856 4k blocks and 1310720 inodes
Filesystem UUID: s23e234-569c-4fdf-a4b2-5856e790e3fa
Superblock backups stored on blocks:
    32768, 98304, 163840, 229376, 294912, 819200, 884736, 1605632, 2654208,
    4096000

Allocating group tables: done
Writing inode tables: done
Creating journal (32768 blocks): done
Writing superblocks and filesystem accounting information: done

> mkdir /mnt/disk-teste-purpose
> mount /dev/stg_gtw/lv_disk_teste /mnt/disk-teste-purpose
> df -h
Sist. Arq.                          Tam. Usado Disp. Uso% Montado em
udev                                2,0G     0  2,0G   0% /dev
tmpfs                               393M   26M  368M   7% /run
/dev/mapper/vg--root-lv--root        14G  2,9G   11G  22% /
tmpfs                               2,0G     0  2,0G   0% /dev/shm
tmpfs                               5,0M     0  5,0M   0% /run/lock
tmpfs                               2,0G     0  2,0G   0% /sys/fs/cgroup
/dev/mapper/storageGW-lv_volHomeGW  493G  398G   70G  86% /mnt/storageGW
tmpfs                               393M     0  393M   0% /run/user/0
/dev/mapper/stg_gtw-lv_disk_teste    20G   45M   19G   1% /mnt/disk-teste-purpose
Finally, its done !! You can now store your files or any data (any database and so on) in the partition created and its was automatically backup to Amazon AWS with EBS Snapshots.
The last tip, if you want to startup the initiator on boot you need to start node automatically editing the follow file:
vim /etc/iscsi/nodes/iqn.1997-05.com.amazon:disk-test-purpose/[GATEWAY_IP],3260,1/default
set the option node.startup to automatic.
...
node.startup = automatic
...
Obviouslly, you have to setup fstab to mount the file system on boot and have the scsci service to startup on boot too.
Now you can create plan for EBS snapshot, so you can schedule your snapshots to be automatically created specifying the period and retention.
I hope this post was useful for you.






Oldest comments (1)
Excelente post!
Obrigado @filipemotta !
Welkson Medeiros
Natal/RN