
Written by Abdulazeez Abdulazeez Adeshina✏️
Databases often require you to communicate with them in a specific query language. Just as SQL database layers interact through SQL queries, MongoDB and other database layers communicate in their respective query languages.
In this tutorial, we’ll show you how to bridge the language gap with a universal database layer library known as nanoSQL.
What is nanoSQL?
nanoSQL is a JavaScript database layer for the client, server, and mobile devices. It provides a standardized query language you can use to carry out data storage, query operations in multiple databases such as MySQL, MongoDB, indexedDB, and Redis, and more.
nanoSQL Features
nanoSQL supports multiple databases and has an identical API. Contrary to its name, nanoSQL doesn’t only deal with SQL databases. It also works hand in hand with relational database management systems (RDBMSs).
nanoSQL performs a wide range of operations, from simply querying data to importing and exporting data. Basically, it carries out operations just as a normal database would. We’ll zoom in on a few key operations required in our app.
Among the best features is the universality of nanoSQL’s querying API, which makes it easy to migrate to other databases without having to learn new query syntaxes. nanoSQL supports SQLite (Node.js/Electron, Cordova, and NativeScript), Redis, MongoDB, among numerous other databases.

What we will build
To demonstrate how to store data from our CRUD API into nanoSQL, we’ll build a simple to-do backend. We’ll also verify the universality of nanoSQL’s query language by making our database layer MongoDB.
I’ll assume that you have MongoDB installed and basic knowledge of JavaScript, Node.js, REST, and Postman. You can find the code used in this article on GitHub.
Setup
Before we dive in too far, let’s map out the project structure and the installation of the dependencies needed for our to-do backend app. We’ll start by creating our project folder.
mkdir nanosql-todo-app && cd nanosql-todo-app
mkdir src && touch src/{app,database}.js
Next, we’ll initialize the directory and install the dependencies needed.
npm init -y
npm i express cors body-parser @nano-sql/core @nano-sql/adapter-mongo
Now it’s time to write the backend API in our app.js file.
app.js
This file is responsible for handling the routing necessary for the CRUD operations. First, we’ll import the required modules through the CommonJS modular way.
const express = require("express");
const bodyParser = require("body-parser");
const cors = require('cors')
Next, we’ll initialize the imported libraries.
const app = express();
app.use(bodyParser.json());
app.use(cors())
The next step is to write the routes for the CRUD operations:
-
/returns a list of our to-dos and allows us to post a new to-do -
/:idreturns a to-do whose ID is passed as the parameter -
/del/:iddeletes a to-do whose ID matches the one passed -
/update/:idupdates a to-do whose ID matches the one passed -
/deletedeletes every to-do in our nanoSQL database
app.get("/", (req, res) => {
});app.get("/:id", (req, res) => {
});

app.post("/", async (req, res) => {
})

app.delete("/del/:id", async (req, res) => {
})

app.put("/update/:id", async (req, res) => {
})

app.delete("/delete", async (req, res) => {
})
The code above currently does nothing. Next, we’ll write the database handlers.
Building database handlers
The backend API depends on the database to carry out any operation, so we need to write the handlers responsible for each operation.
database.js
This file is responsible for handling data storage and querying our app. We must create an object to store all CRUD methods alongside the trigger function for starting the database.
We’ll start off by importing nanoSQL and creating an instance of it.
const nSQL = require("@nano-sql/core");
const { MongoDB } = require("@nano-sql/adapter-mongo");

const db = nSQL.nSQL;
The variable db stores an instance of nanoSQL and will be used to carry out all operations. Next, we’ll create our database object.
// Start database...

let databse = {}
The database object is comprised of methods responsible for CRUD operations. We need to define a start method to launch our nanoSQL database.
let database = {
    start: async function() {
    return await db().createDatabase({
      id: "todo_list",
      mode: new MongoDB("mongodb://localhost:27017"),
      tables: [
        {
          name: "todos",
          model: {
            "id:uuid": {pk: true},
            "item:string": {},
          }
        }
      ],
    }).then(() => {
      // log a confirmation message.
      console.log("Database is up!")
    })
  },
}
The start method is an asynchronous function that returns either a success message or an error after executing nanoSQL’s createDatabase() method. The createDatabase() method takes the following parameters.
-
id— The unique database identifier -
mode— A database mode that could be either TEMP (temporary memory database), MySQL, RocksDB, MongoDB, or even localStorage (we’ll verify its universality by using it with MongoDB) -
tables— The table option takes an array of objects — i.e., multiple tables can be created.
For the purpose of this tutorial, we’ll create only one table. The object passed into the array consists of our table name, a model that defines the type of data to be stored there, a unique ID that serves as the primary key, and an item of type string.
Since our start method is asynchronous, we’ll add a callback to log a confirmation message once our database is up and running.
Querying
To perform any data operations, queries must be issued. A query in nanoSQL looks like this:
db(database_name).query("query type", ...query args).exec()
The .query() method is attached to the database instance — in our case, db("todos"). The query() method takes a query type as the primary first argument and optional arguments mainly condition as needed for a select query.
The query() method is appended with an .exec() function, which executes the query. Query types include, among others:
selecttotal-
upsert(insert) delete
We’ll see the query in action in the upcoming sections.
Next, let’s define a retrieve method, which returns a to-do of the passed ID in our database.
let database = {
  ...
  retrieve: async function(id) {
    return await db("todos").query("select").where(["id", "=", id]).exec().then((item) => item)
  },
}
The retrieve method takes id as an argument and sends it as a parameter for querying. The query type passed in the retrieve method is a select query.
The select query returns a to-do item by instructing the database to check for an item using the .where() method. The .where() method is a prefix attachment to the select statement since the select statement is primarily conditional.
The next step is to define a retrieveAll method after the retrieve method, which returns the list of to-dos in our database.
retrieveAll: async function() {
    return await (db("todos").query("select").exec())
      .then((rows) => rows)
  },
Unlike the retrieve method, the .where() method isn’t attached since we are querying for all the items in the database. This is also a good way to export all data from the database.
Now let’s define an insert method to add a new item to our to-do database.
insert: async function(item) {
    return await db("todos").query("upsert", {item: item}).exec();
  },
The insert method takes one argument and item (which is the to-do item) and inserts it into the item field using the upser query type.
The update method is defined next.
update: async function(id, item) {
    await db("todos").query("upsert", {item: item}).where(["id", "=", id]).stream((row) => {
      console.log(row)
    }, () => {
      console.log("Item Updated")
    }, (err) => {
      console.log(err)
    })
  },
The update method takes two arguments: id and item. It looks up the item to be updated by its id and then revises it with the new data passed into the update function. Upon successfully updating the data, the new data is logged to the console and a confirmation message is displayed. Otherwise, an error message is logged to the console.
Next, we’ll define the delete and deleteAll methods responsible removing one or more to-do items in our database.
delete: async function(id) {
    return await db("todos").query("delete").where(["id", "=", id]).exec();
  },
deleteAll: async function() {
  return await db("todos").query("delete").exec();
},
The delete method deletes a to-do item whose ID is passed into it. deleteAll deletes every to-do item in the database.
After the database object, we’ll export our database object for use in the app.js file.
module.exports = database;
Connecting the database to API routes
Now that we have successfully written our database handlers, we'll implement them in our API routes. Let's navigate back to our 'app.js' file to update it:
const cors = require("cors")
const database = require("./database")
...
database.start();

app.get("/", (req, res) => {
  database.retrieveAll().then((items) => {
    res.send(items)
  })
});
We’ll start by implementing the / route, which returns all the to-dos in our database. Next, we’ll implement the single to-do route.
app.get("/:id", (req, res) => {
  database.retrieve(req.params.id).then((item) => {
    res.send(item)
  })
});
The /:id passes the ID as an argument from the URL to the database to retrieve a to-do. We’ll implement the POST route /, which allows us to insert new to-dos in our database.
app.post("/", async (req, res) => {
  await database.insert(req.body.item).then(() => {
    res.status(200).send("You have successfully added a new todo.")
  })
})
This route sends a confirmation method and status upon successful insertion. The next step is to implement our /del/:id method, which deletes a single to-do, and the /delete method, which deletes all to-dos in our database.
app.delete("/del/:id", async (req, res) => {
  await database.delete(req.params.id).then(() => {
    res.status(200).send(`Todo item ${req.params.id} has been successfully deleted.`)
  })
})

app.delete("/delete", async (req, res) => {
  await database.deleteAll().then(() => {
    res.status(200).send(`All todo items have been deleted.`)
  })
})
We also implement our /update/:id route, which updates a single to-do item.
app.put("/update/:id", async (req, res) => {
  await database.update(req.params.id, req.body.item).then(() => {
    res.status(200).send(`Todo item ${req.params.id} has been updated successfully.`)
  })
})
Lastly, we’ll implement our app’s listener function.
app.listen(8081, () => {
  console.log("App's running on port 8081");
});
We’ll open a new terminal and start a MongoDB instance through mongod and then return back to our previous terminal to start our app.
mkdir todo-db && mongod --dbpath todo-db
The previous terminal looked like this:
node src/app.js
Testing the API with Postman
At this stage, we should take a moment to verify that the above code works. We’ll start by retrieving the list of to-dos in our database.
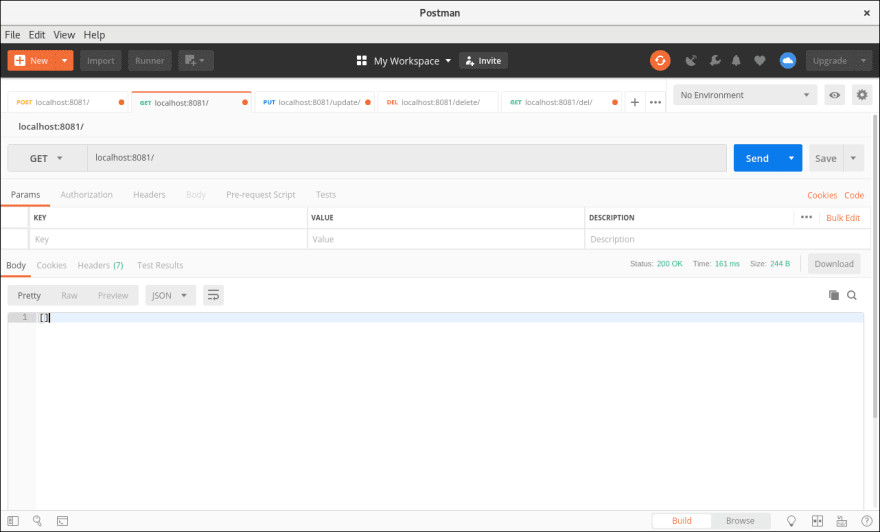
Because there is currently no data in our database, we get an empty array. Let’s add a couple of to-dos.
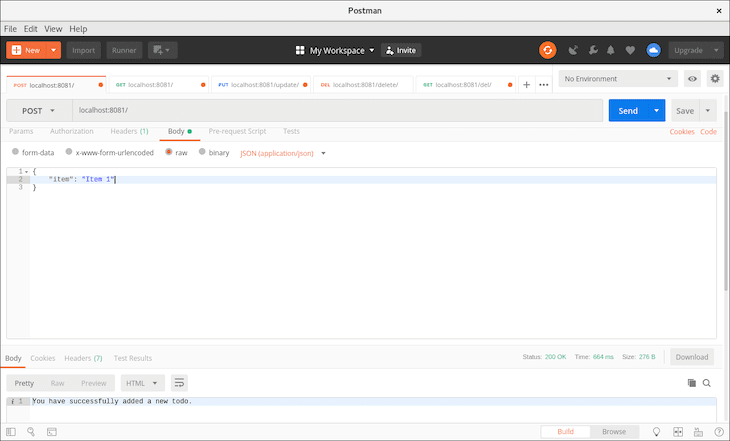
We received a successful response, so let’s run another GET request to verify that our data is really in the database.
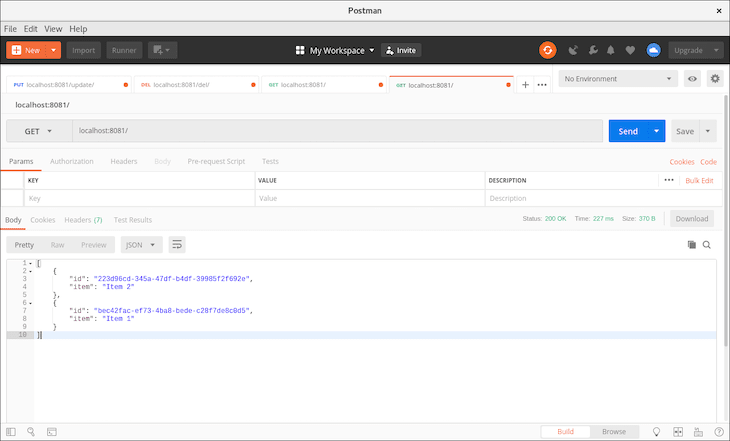
Great! Now we’ll move on to updating the first to-do item, item 1. Copy the ID of the first to-do item and place it behind localhost:8081/update/.

We received a confirmation message, which is good. Next, we’ll test the delete route. We’ll delete the second item in our to-do by placing the ID of the item just after the delete route: localhost:8081/del/.
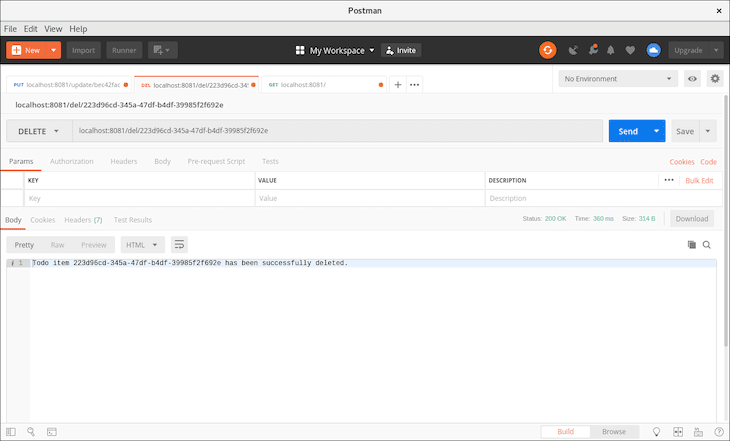
We should get a response that our to-do item with the passed ID has been deleted.
Let’s test our delete all route.

The delete request returns a successful message. If we run a GET request to list our to-dos, it returns empty data.

Conclusion
This tutorial should give you a basic understanding of what nanoSQL is all about and how its features work. The main takeaway is that you can use nanoSQL’s query language with MongoDB without writing MongoDB queries by building a simple to-do backend app and carrying out CRUD operations on it.
nanoSQL is a very useful library that requires less code to complete database operations, and when database layers change, you do not have to rewrite the existing queries. You can find the code used in the article on GitHub.
Plug: LogRocket, a DVR for web apps

LogRocket is a frontend logging tool that lets you replay problems as if they happened in your own browser. Instead of guessing why errors happen, or asking users for screenshots and log dumps, LogRocket lets you replay the session to quickly understand what went wrong. It works perfectly with any app, regardless of framework, and has plugins to log additional context from Redux, Vuex, and @ngrx/store.
In addition to logging Redux actions and state, LogRocket records console logs, JavaScript errors, stacktraces, network requests/responses with headers + bodies, browser metadata, and custom logs. It also instruments the DOM to record the HTML and CSS on the page, recreating pixel-perfect videos of even the most complex single-page apps.
Try it for free.
The post Building nanoSQL-powered APIs appeared first on LogRocket Blog.

Top comments (0)