When working as a volunteer in the fire brigade, you can be called for service at any given moment — no matter the time or day. In my village, I’m alerted about 80 to 90 times a year. If an emergency happens, it’s important to be fast. You need to leave the house and get into your car right away to show up at the fire station in time. This is even more important if the alert gives you an indication that lives are in danger.
Since the pandemic started, the work habits of many people have changed. One significant change is that working from home has become the new normal. That’s a great change for the fire brigade since more people are now accessible in case of an emergency. But what does this mean for the actual firefighters working from home?
Usually, they don’t have the opportunity to properly sign off from work when called for duty. That’s why I came up with the idea to build a fire service notification system using BPMN and Camunda Platform 8 that automatically informs all relevant stakeholders as soon as an emergency happens.
Starting with a Process
Before starting any implementation, I always visualize an ideal process for what I want to build. A benefit of this approach is that I can reuse the model as a basis for directly executing it within a process.
To visualize the process for the fire service notification system, I am going to use the business process model and notation (BPMN) 2.0 standard. For those who don’t know yet, BPMN provides the capability to model processes in a graphical notation and execute modeled processes. With Camunda Platform 8 Modeler, I can now collaboratively design this process by following the standard. Check out my model in this tool and see the diagram I created below.
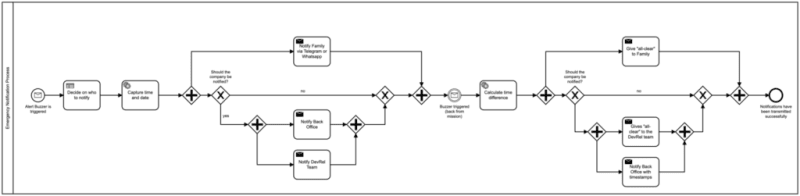
Now, let’s quickly go over the fire service notification process:
- First of all, a message event is sent after I press a physical buzzer.
- This will trigger a business rule task that decides which stakeholders to notify — my family or co-workers. That should prevent my co-workers from being alerted that I am on fire service in the middle of the night.
- Afterward, I’ll note the starting time and date of the emergency.
- Then, all relevant stakeholders will be notified, depending on my decision in step 2. The cool thing is that I can parallelize sending out my messages via Slack, SMS, and Mail.
- I’m now halfway through the process! It will wait and only continue when I’m back from duty and trigger the buzzer again.
- The time spent on service needs to be calculated before alerting all relevant stakeholders that I am back to work again. (In Germany it’s quite important for the employer to have this piece of information in order to get compensated by the government.)
- Before the process ends, all relevant parties will be notified that I am back again. Of course, this will be parallelized, and who gets notified will depend on the time and date.
- Lastly, the end event signifies that the notifications have been successfully sent.
Let’s Talk About Decisions
As mentioned in the previous section, I need to use a business rule task to decide whether I’m going to notify work-related stakeholders or not — depending on the time and day. Using the DMN standard makes it possible to easily create this decision without adding too much complexity to the overall process. This allows it to be easily understood and modified by non-coders, which is beneficial for me when I need to explain this to my family.
For example, I went with the decision in the model below. I need two input parameters for the time and weekday of the emergency. This determines whether to notify all stakeholders or just my family. The Notification Scope maps to a process variable and is used in the exclusive gateways to make a decision.
For example, if an emergency happens on Wednesday at 2 p.m., I’m going to notify “all” stakeholders.

Check out this DMN tutorial to learn more about the benefits of the DMN standard.
It’s Coding Time!
The process and decision are set — now it’s time to code the solution. To code the solution, I will use a workflow engine because it can directly execute the models from above. Now, you may ask yourself, “why use a process engine at all?” The easy answer is: because it gives you more flexibility! Adding steps to the process doesn’t affect your already existing code. It also helps you gain transparency into what your software is doing at a certain point in time.
I’m going to use Camunda Platform 8 SaaS as an orchestrator. By using this SaaS solution, I don’t need to take care of hosting a workflow engine on my own hardware. It also provides me with all the tools I need to operate and analyze my process. With my process and decision models deployed, I can now focus on writing a Spring Boot application that contains code I need on top of the process model — basically, some glue code to integrate with an SMTP server, Slack, and Twilio.
- I’ll begin with creating a new Spring Boot project and adding the Spring-Zeebe dependency, which encapsulates the logic to connect to the engine. It also makes sure that I’m properly authenticated while establishing a connection to the remote workflow engine. To do so, I’ll add this maven dependency to my ‘pom.xml’:
<dependency>
  <groupId>io.camunda</groupId>
  <artifactId>spring-zeebe-starter</artifactId>
  <version>1.3.4</version>
</dependency>
- Then, I’ll implement ‘ZeebeWorker’ inside my main class. Besides using the ‘@SpringBootApplication’ annotation, I also need ‘@EnableZeebeClient’. I can write a worker, as shown below. I’ll add the ‘@ZeebeWorker’ annotation and specify the connection to the service task in the BPMN model by the task type:
@ZeebeWorker(type = "capture_time_worker")
public void handleJob_capture_time(final JobClient client, final ActivatedJob job) {
  // call business logic to get current time
  client.newCompleteCommand(job.getKey())
         .variables("{\"startingTime\":"+ "\""+ time +"\"}")
         .send()
   .exceptionally( throwable -> { throw new RuntimeException("Could not complete job " + job, throwable); });
}
This code snippet was used in my first service task that sets the starting time of the fire service. I can call whichever business logic I’d like and set variables within the ‘newCompleteCommand’. The variables can be received by using ‘job.getVariablesAsMap().get(“”)’.
I need some more workers for sending an email, posting a Slack update, sending an SMS , and calculating the time difference between the beginning and end of the fire service. These look very similar to what we have seen above, and just differ in terms of the business logic/variables retrieved and passed to the process instance. For example, the code for sending an email could look like this and will be called from the worker.
Now, I’m good to test since all these things have been implemented.
Running the Process
For the sake of simplicity, I’m not going to discuss how to build an IoT buzzer. For my purposes, I’ve chosen a pre-built WiFi button from mystorm. It’s battery-powered, magnetic, and fits perfectly into my apartment. Since the button is programmable, it can easily call and start my process instance by making an HTTP call. Below you can see a picture of it.

To test this process, I’m going to start an instance and hand over some variables (e.g., email, SMS, and Slack recipients, as well as the name of the person who is leaving for fire service). This can be easily achieved by using this visual helper tool.
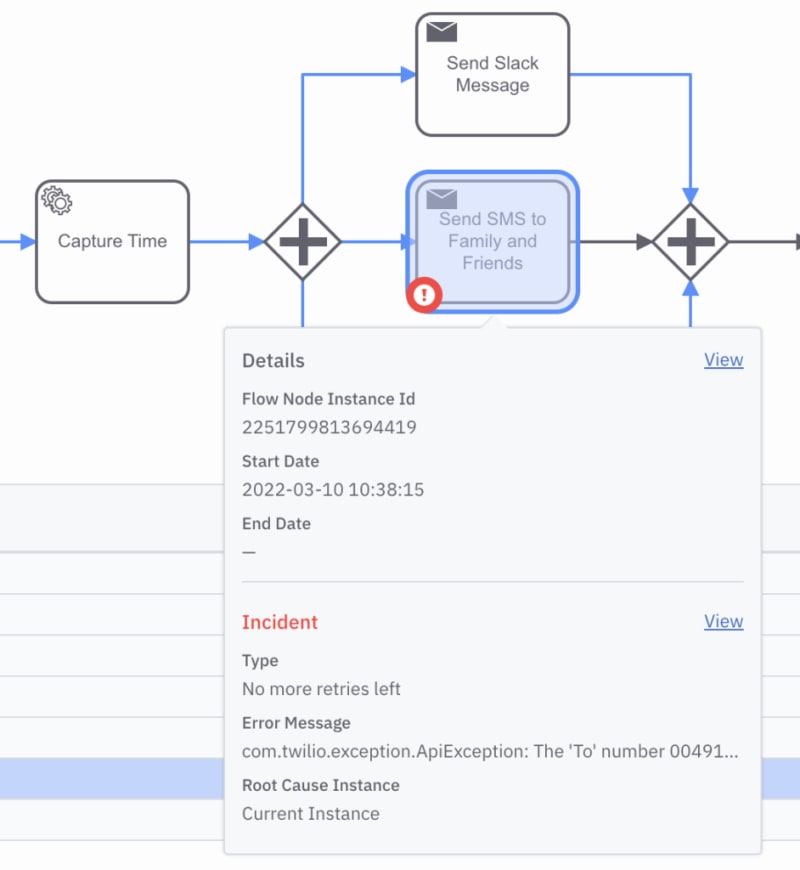
Having started a process instance, I have the option to check on the instance’s lifecycle by using Operate. This tool provides real-time visibility to monitor, analyze, and resolve problems. This is also great if something abnormal occurs. For example, imagine Twilio gives me an exception, then Operate will show me this problem as visualized in the picture below. The tool gives me the ability to check the stack trace and do some lightweight troubleshooting right away. If I would need to fix something in my code base, I could retrigger the process from this monitoring tool.
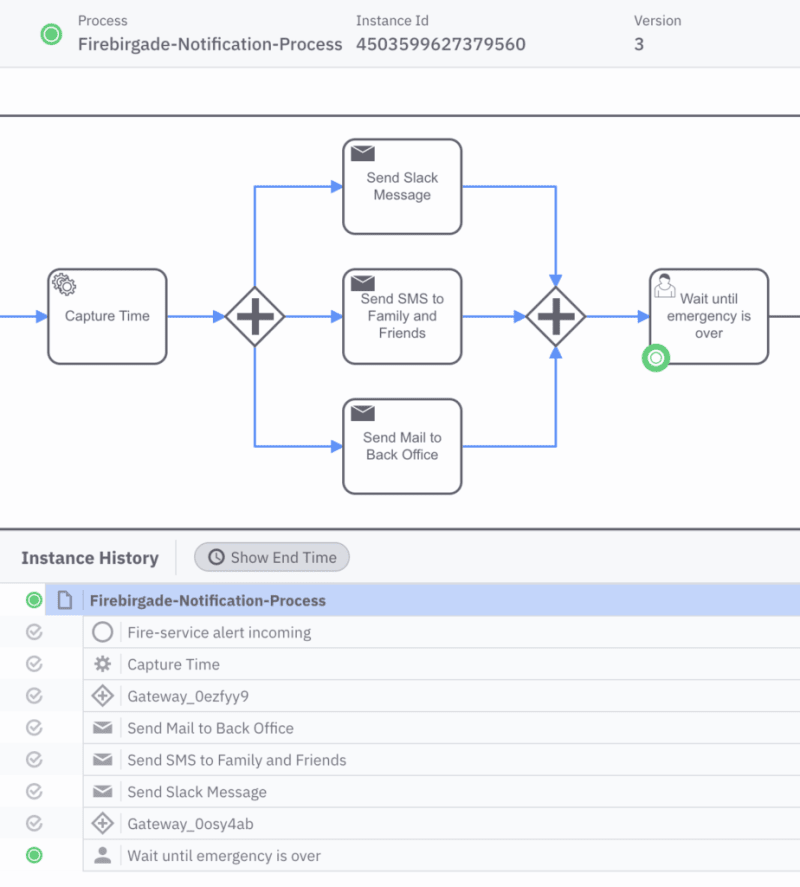
The image below demonstrates how the instance would look if everything has been executed properly.
Another great feature in Operate includes checking on all the variables of your process instance. That gives you powerful insight and is a nice way to change their values if they’re causing havoc.

What’s Next?
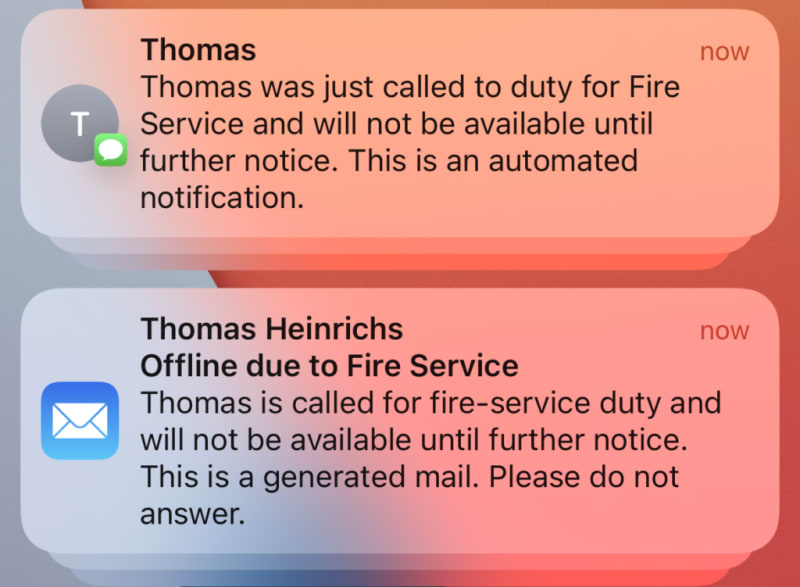
Since the process is working as expected, the first milestone has been achieved. Designing the process and developing the integrations was rather straightforward using Camunda Platform 8 SaaS. Here are some of the notifications sent to various channels below.

Even though this is not a typical use case for Camunda Platform 8, I’ll be running a few process instances this year. Nevertheless, it’s interesting to play around with this technology and demonstrate it’s potential in such a way. And who knows, maybe I’ll onboard some fellow firefighters to this tool as well. In such a case, I’m confident that Camunda Platform 8 can handle the load.
In addition, the workflow engine provided me with a lot of flexibility during development. During operation, I made use of automatic retry cycles that made sure my employer got the message. This automation will prove its benefits once an actual emergency happens. Feel free to check out the source code on GitHub to create a similar automation for your own needs.
An interesting follow up to this blog post would be analyzing this process in Camunda Optimize, a tool for creating reports and analyzing processes. Maybe I can find some interesting correlations between the type of emergency and duration. Stay tuned!
If you want to check out the talk I gave about this topic during the Camunda Community Summit ‘22 check out the demand content. Many other interesting talks are also available for free - so it is definitely worth checking out. Follow me on Twitter if you want to stay updated on upcoming events and workshops.
The post Implementing My Fire Service Notification System with Camunda Platform 8 appeared first on Camunda.

Top comments (0)