Link to the article on Why we need Vault and what problem it solves
Hashicorp Vault
Hashicorp Vault is an opensource software from Hashicorp. Vault is used to manage secrets.
What is a secret?
Secrets can be considered as anything that one uses to authenticate, authorize themselves. Secrets are also pieces of information that are private to any user.
Vault setup
The usual flow is:
- Install Vault package
- Initialize the Vault server. On the dev setup, the Vault server comes initialized with default playground configurations. This is not recommended for production setup.
- Unseal Vault server ( More about unseal in the next section )
- Create policies for users
- Enable secret management mechanisms
- Make sure to adhere to the production hardening tips from Vault
Seal/Unseal Vault server
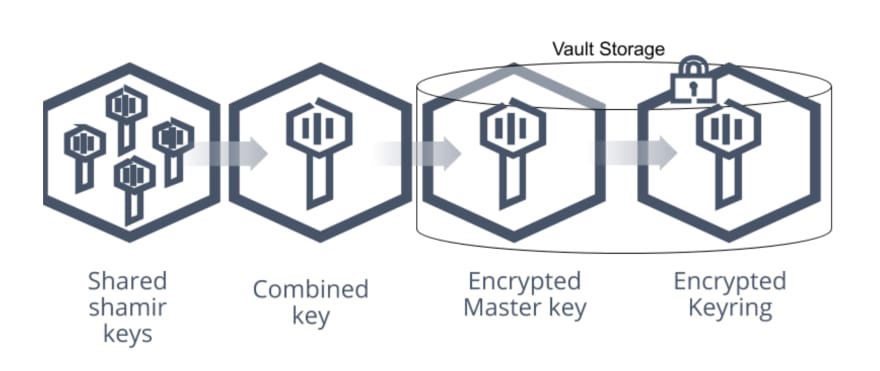
Vault stores data in encrypted format. The encryption key that is being used to encrypt/decrypt the data is also stored along with rest of the data in the keyring. When a Vault server starts, it knows where the data resides through the configuration that we provide Vault with but doesn't know how to decrypt the encryption key that is present in the keyring along with the Vault encrypted data.
Here comes the master key that is used to decrypt the encryption key which is also present alongside all other Vault data. This master key is also encrypted and we need a special key that can decrypt the master key, this key is known as Unseal key.
The Unseal key is generated during the init process using an algorithm known as 'Shamir's secret sharing', where the unseal key is split into certain number of unseal keys 'X' and every time we want to unseal the Vault server we will need a certain number of unseal keys 'Y' and these 'X' and 'Y' values can be decided by the Vault architect when initializing the Vault server.
The main intention of creating several unseal keys is to distribute these unseal keys among several stakeholders such that, a minimum number of stake holders are needed to unseal the server or perform major operations on the server.
What are policies?
Policies help you create rules that define access to various secrets. We can create policies that allow certain level access like create access, update access, read access, delete access and so on. We then assign this policy to a particular authentication mechanism of a user. This user will have only those access mentioned in the policies attached to his credentials. This way, Vault makes sure that we provide minimal and only necessary access to Vault stakeholders.
Setup commands
The steps have been performed on Linux Ubuntu Focal virtual machine.
Dev mode
To get started quickly
Vault official installation link
# install Vault from Vault website
curl -fsSL https://apt.releases.hashicorp.com/gpg | sudo apt-key add -

sudo apt-add-repository "deb [arch=amd64] https://apt.releases.hashicorp.com $(lsb_release -cs) main"

sudo apt-get update && sudo apt-get install vault

# test with the below command
vault

### DEV MODE
# start dev server
tmux new -s vault
vault server -dev # and detach tmux ( Ctrl+b d )

# export variables that will be used by Vault when commands
# are run in the current terminal session
export VAULT_ADDR='http://127.0.0.1:8200'
export VAULT_TOKEN='s.hfAJfADfj...'

# check Vault server status
vault status

# login into Vault
vault login

# view current logged in token information
vault token lookup

# create policies and respective tokens
vim secret-user-policy.hcl
path "secret/data/*" {  capabilities = ["read"] }

vim secret-admin-policy.hcl
path "secret/data/*" {  capabilities = ["read", "create", "update"] }

# command to write policy
vault policy write secret-user-policy secret-user-policy.hcl
vault policy write secret-admin-policy secret-admin-policy.hcl

# now open two tmux sessions for each type of user to test policies
tmux new -s demo # and split screens for admin and user

# at each of the tmux window
export VAULT_ADDR='http://127.0.0.1:8200'
export VAULT_TOKEN='s.hfAJfADfj...'

vault login # enter repective tokens
vault token lookup # to view current logged in token information

# on admin window & notice versions
vault kv put secret/data/mysql username=root

# add multiple keys in a single command
vault kv put secret/data/mysql username=root password=root

# prevent recording the value of the token in terminal history
vault kv put secret/data/googlecloud token=-

# read from a json file
vault kv put secret/data/googlecloud @apitoken.json

# add multiple keys in a single command
vault kv put secret/data/aerospike \
     username=root \
     password=root \
     tlsname=securecert \
     namespace=hashicorp

# read secret
vault kv get secret/data/mysql

# ON USER WINDOW
vault kv put secret/data/mysql username=root # Will not work since this user does not have privileges

vault kv get secret/data/mysql
Prod mode
For production setup. We will set up Vault with TLS ( SSL ) and file storage as backend.
### DEPLOY PROD MODE

# Generate the certs
mkdir -p /opt/vault/{tls,data}
cd /opt/vault/tls
openssl req   -out tls.crt   -new   -keyout tls.key   -newkey rsa:4096   -nodes   -sha256   -x509   -subj "/O=HashiCorp/CN=Vault"   -addext "subjectAltName = IP:<loopbackIP>,DNS:<host>"   -days 3650

cat /etc/vault/vault.hcl
# Full configuration options can be found at https://www.vaultproject.io/docs/configuration

ui = true

storage "file" {
  path = "/opt/vault/data"
}

# HTTPS listener
listener "tcp" {
  address       = "0.0.0.0:8200"
  tls_cert_file = "/opt/vault/tls/tls.crt"
  tls_key_file  = "/opt/vault/tls/tls.key"
}

###############################################

chown vault: /opt/vault/tls/*

service vault start

# make sure DNS record is present, else TLS certificate verification
# will fail

export VAULT_ADDR='https://<hostname>:8200'
export VAULT_CACERT="/opt/vault/tls/tls.crt"

# either visit https://<IP>:8200 and enter values as 5 as number of keys and 3 keys needed to unseal or regenerate keys
# copy the root token & keys
vault operator init

root@mac-saltmaster:/opt/vault/tls# vault status

root@mac-saltmaster:/opt/vault/tls# vault operator unseal --ca-cert=/opt/vault/tls/tls.crt

vault login

# Refer production hardening for more: https://learn.hashicorp.com/tutorials/vault/production-hardening
Links that help:
Thank you for reading, This is Tharun Shiv a.k.a Developer Tharun
You can find more articles here: https://www.tharunshiv.com
Roadrunners is a series that is aimed at delivering concepts as precisely as possible. Here, a roadrunner is referred to as a person who does things super fast & efficiently. Are you a roadrunner?
Thank you
Check out my YouTube Channel here: Developer Tharun - YouTube Thank you for reading!
Follow my articles on Dev.to: https://dev.to/developertharun


Oldest comments (0)