
I've recently gotten into using Docker in my development cycle and I'm really enjoying how much of a wonderful tool it is. One thing that always used to be a pain was setting up a development server to run SQL Server. Now with Docker, I can just spin up a Docker container and I instantly have a SQL Server ready to go.
I recently wrote a blog on Getting Started with Docker. If you haven't read that yet, I'd recommend checking it out first.
In this tutorial I will first show you how to configure ASP.NET Core to run on Docker, then how to configure SQL Server on Docker. Finally, I will walk you through a simple CRUD app based on this configuration, and using EF Core as the database ORM.
Configuring ASP.NET Core for Docker
Visual Studio provides a lot of tooling to automatically configure your ASP.NET Core app to use Docker, so I will be using that to configure the ASP.NET Core side of things.
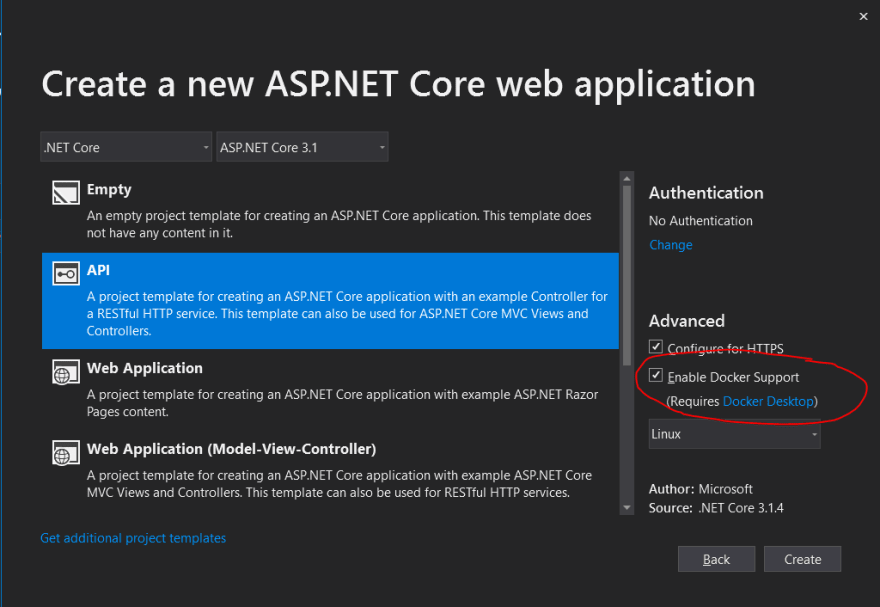
First, start by creating a new ASP.NET Core Web Application. For the purpose of this tutorial, I went for the API template. When prompted, make sure the Enable Docker Support box is checked.
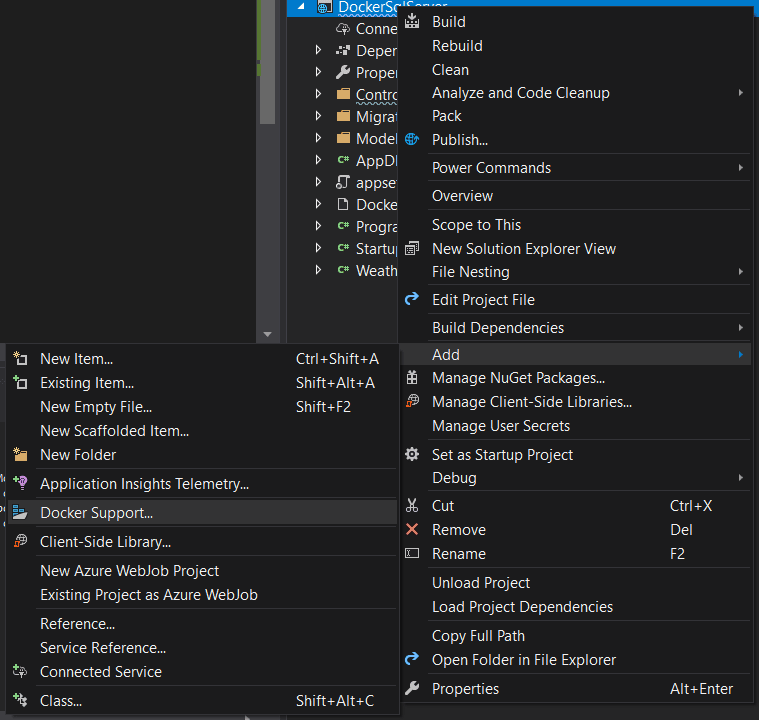
If you have an existing project, you can still enable docker support by, right clicking on your project and selecting the option from there.
Next, since we want the ASP.NET Core container and the SQL Server container to run together, we need to create a Docker Compose project. Again with Visual Studio this is very simple.
Right click on your project and select Container Orchestration Support. When the dialogs appear, select Docker Compose then use Linux as the target OS.

This will create a Docker Compose project, which we will use for coordinating the running of both the ASP.NET Core container and the SQL Server container. If you set the Docker Compose project as the startup project and click run, it should now successfully run the ASP.NET Core container.
Configuring SQL Server on Docker
If you open your docker-compose.yml file, it should currently look something like this:
version: '3.4'

services:
  dockersqlserver:
    image: ${DOCKER_REGISTRY-}dockersqlserver
    build:
      context: .
      dockerfile: DockerSqlServer/Dockerfile
This is the Docker Compose configuration for the ASP.NET Core app. To add a SQL Server container, modify the YAML file to look like this:
version: '3.4'

services:
  db:
    image: "mcr.microsoft.com/mssql/server:2017-latest"
    environment:
      - ACCEPT_EULA=Y
      - SA_PASSWORD=1Secure*Password1

  dockersqlserver:
    image: ${DOCKER_REGISTRY-}dockersqlserver
    build:
      context: .
      dockerfile: DockerSqlServer/Dockerfile
    depends_on:
      - db
Here we have added a new container called db which uses the official SQL Server Docker image. The main property you need to be concerned about is SA_PASSWORD, which you should change to your own secure password.
PLEASE NOTE: The SA_PASSWORD field seems to have some strict criteria on what the password needs to contain. I couldn't find the exact requirements, but it would be advisible to use a long password using upper and lowercase characters, numbers and special characters. For the purpose of following this tutorial the password I have provided does fulfill these criteria. If your password doesn't meet the requirements, later when you come to run the container, you will get a SqlException complaining that the application couldn't log in as the sa user. If you get this exception, try modifying the password and trying again.
Also, note that the ASP.NET Core application container has had the following lines added to it:
    depends_on:
      - db
This tells Docker Compose that the ASP.NET Core container depends on the SQL Server container, so the SQL Server container should be the first to run when the Docker Compose project is run.
The final thing we need to do to configure the two containers is to add the connection string to the ASP.NET Core application appsettings.json:
  "ConnectionStrings": {
    "AppDbContext": "Server=db;Database=AppDbContext;User=sa;Password=1Secure*Password1;"
  }
The solution is now fully configured to use the SQL Server container database in your ASP.NET Core application. You can now connect to the database and use it as you normally would inside any other application. For an example of how to do this for a simple CRUD app using EF Core, please continue reading:
Containerised CRUD app using EF Core
A CRUD application is one with the basic functionality to Create, Read, Update, and Delete. In this app we will create a basic Note model and create a basic REST API to perform these CRUD functions. We will use EF Core to interact with the SQL Server Docker container.
The full working solution can be found in this Github repo.
First make sure that you have the Docker containers set up as described above. Then we will start by creating the Note model:
// Models/Note.cs

namespace DockerSqlServer.Models
{
    public class Note
    {
        public int Id { get; set; }

        public string Text { get; set; }
    }
}
Then we need to create the database context class, which defines how EF Core interacts with our SQL Server Docker container. If you haven't worked with EF Core before, I would recommend reading this Getting Started guide. First we need to install the following NuGet packages:
Microsoft.EntityFrameworkCore
Microsoft.EntityFrameworkCore.SqlServer
Microsoft.EntityFrameworkCore.Design
Microsoft.EntityFrameworkCore.Tools
Below is the ApplicationDbContext class, which is very basic for this example and just includes the database set for our Note model.
using DockerSqlServer.Models;
using Microsoft.EntityFrameworkCore;

namespace DockerSqlServer
{
    public class AppDbContext : DbContext
    {
        public AppDbContext(DbContextOptions options) : base(options)
        {
        }

        public DbSet<Note> Notes { get; set; }
    }
}
We also need to add the following lines to the ConfigureServices method of Startup.cs:
services.AddDbContext<AppDbContext>(options => options
    .UseSqlServer(Configuration.GetConnectionString("AppDbContext")));
This will get the connection string from appsettings.json, which we set earlier in this article.
To tell the database that we want to create the Notes table. We do this by generating a migration, which is just an auto-generated code file that specify the database commands required to update the database. To generate a migration, make sure that your web application project is set as the start up project (not the Docker Compose project), then run the following command from the Package Manager Console:
add-migration AddNoteEntity
We also need to modify the Main method of the Program.cs file to look like this:
public async static Task Main(string[] args)
{
    var host = CreateHostBuilder(args).Build();

    using var scope = host.Services.CreateScope();
    var services = scope.ServiceProvider;

    try
    {
        var dbContext = services.GetRequiredService<AppDbContext>();
        if (dbContext.Database.IsSqlServer())
        {
            dbContext.Database.Migrate();
        }
    }
    catch (Exception ex)
    {
        var logger = scope.ServiceProvider.GetRequiredService<ILogger<Program>>();

        logger.LogError(ex, "An error occurred while migrating or seeding the database.");

        throw;
    }

    await host.RunAsync();
}
When the application starts, it will check if any changes need to be made to the database and updates it if necessary. Without Docker, you would normally just do this with the command line command: update-database. We can't do that here though because we need the SQL Server Docker container to be running before we try to update it.
The final class we need to create is the NoteController which will act as the CRUD REST API for our Note model. I won't go into many details on how it works because the focus of this tutorial is to configure the Docker containers. If you need additional information on creating CRUD controllers, please see this guide.
// Controllers/NotesController.cs

using DockerSqlServer.Models;
using Microsoft.AspNetCore.Mvc;
using Microsoft.EntityFrameworkCore;
using System.Threading.Tasks;

namespace DockerSqlServer.Controllers
{
    [ApiController]
    [Route("[controller]")]
    public class NotesController
    {
        private readonly AppDbContext _db;

        public NotesController(AppDbContext db)
        {
            _db = db;
        }

        [HttpGet]
        public async Task<IActionResult> Get()
        {
            var notes = await _db.Notes.ToListAsync();

            return new JsonResult(notes);
        }

        [HttpGet("{id}")]
        public async Task<IActionResult> Get(int id)
        {
            var note = await _db.Notes.FirstOrDefaultAsync(n => n.Id == id);

            return new JsonResult(note);
        }

        [HttpPost]
        public async Task<IActionResult> Post(Note note)
        {
            _db.Notes.Add(note);
            await _db.SaveChangesAsync();

            return new JsonResult(note.Id);
        }

        [HttpPut]
        public async Task<IActionResult> Put(int id, Note note)
        {
            var existingNote = await _db.Notes.FirstOrDefaultAsync(n => n.Id == id);
            existingNote.Text = note.Text;
            var success = (await _db.SaveChangesAsync()) > 0;

            return new JsonResult(success);
        }

        [HttpDelete]
        public async Task<IActionResult> Delete(int id)
        {
            var note = await _db.Notes.FirstOrDefaultAsync(n => n.Id == id);
            _db.Remove(note);
            var success = (await _db.SaveChangesAsync()) > 0;

            return new JsonResult(success);
        }
    }
}
And that's all we need to have a working CRUD REST API using Docker for both the ASP.NET Core application and the SQL Server. However, to make it easier to test I installed Swagger. To achieve this as well, install the Swashbuckle.AspNetCore NuGet package and modify the Startup.cs to look like:
using Microsoft.AspNetCore.Builder;
using Microsoft.AspNetCore.Hosting;
using Microsoft.EntityFrameworkCore;
using Microsoft.Extensions.Configuration;
using Microsoft.Extensions.DependencyInjection;
using Microsoft.Extensions.Hosting;

namespace DockerSqlServer
{
    public class Startup
    {
        public Startup(IConfiguration configuration)
        {
            Configuration = configuration;
        }

        public IConfiguration Configuration { get; }

        // This method gets called by the runtime. Use this method to add services to the container.
        public void ConfigureServices(IServiceCollection services)
        {
            services.AddControllers();

            services.AddDbContext<AppDbContext>(options => options
                .UseSqlServer(Configuration.GetConnectionString("AppDbContext")));

            services.AddSwaggerGen();
        }

        // This method gets called by the runtime. Use this method to configure the HTTP request pipeline.
        public void Configure(IApplicationBuilder app, IWebHostEnvironment env)
        {
            if (env.IsDevelopment())
            {
                app.UseDeveloperExceptionPage();
                app.UseSwagger();
                app.UseSwaggerUI(c =>
                {
                    c.SwaggerEndpoint("/swagger/v1/swagger.json", "My API V1");
                    c.RoutePrefix = string.Empty;
                });
            }

            app.UseHttpsRedirection();

            app.UseRouting();

            app.UseAuthorization();

            app.UseEndpoints(endpoints =>
            {
                endpoints.MapControllers();
            });
        }
    }
}
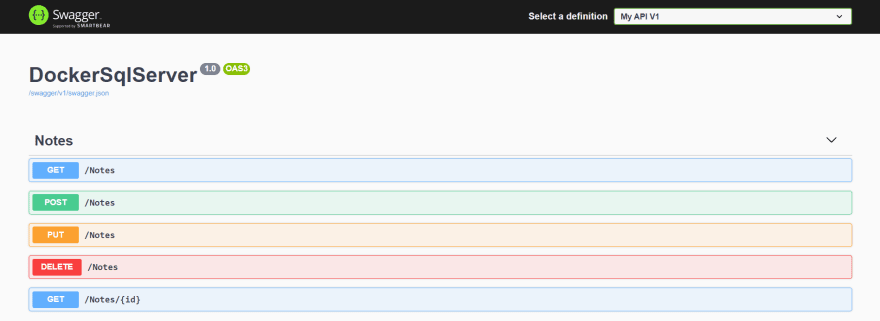
Then run the Docker Compose and navigate to the root URL of the server. You should then see the following Swagger dashboard which will allow you to easily test the CRUD functionality of the REST API we have created:
Conclusion
In this tutorial, I have shown you how to configure both an ASP.NET Core app and a SQL Server database to run on Docker containers. I have then shown you how to create a basic CRUD REST API using this containerised app. The repository for this can be found here on GitHub.
I post mostly about full stack .NET and Vue web development. To make sure that you don't miss out on any posts, please follow this blog and subscribe to my newsletter. If you found this post helpful, please like it and share it. You can also find me on Twitter.

Oldest comments (0)