Recently, I was working to implement user accounts into my application I've been building with Nuxt as the frontend and Firebase for the backend/database. I found a lot of useful articles but there were always caveats to them. Some only showed part of the process (usually the part I already had figured out) or they used a method that was way more verbose than what my situation called for. That brings us here! Without further adieux, Building user accounts with Nuxt, Firebase, and Vuex in the simplest way I know.
- Setting up your Nuxt project
- Setting up Firebase
- Setting up Vuex
- Building the UI
- Bonus: Building a user logged-in header component
Not interested in reading? You can view the source code here.
Setting Up your Nuxt Project
One of the beautiful things about Vue and Nuxt is their documentation and how easy they make it to get a fresh project up and going. If you visit the docs here you can see just how easy it is.
To start up a new project you simply type 'npx create-nuxt-app project-name' into the terminal and you're off to the races! In this case, I'll be using the command 'npx create-nuxt-app nuxt-firebase-vuex-tutorial'.
npx create-nuxt-app nuxt-firebase-vuex-tutorial
After running this command your terminal will prompt you with a few questions that it will use to help you set up your new Nuxt app.
First, it will ask you for some general information: name, description, and author. After that, it will ask for additional information to help you set up your new project. For the sake of space I'll just list the options I chose rather than screenshots
- Project Name: nuxt-firebase-vuex-tutorial
- Project description: (left blank - defaults to 'My outstanding Nuxt.js project')
- Author Name: Drew
- Package manager: NPM
- UI Framework: Tailwind CSS
- Nuxt.js Modules: DotEnv (useful if you're wanting to keep sensitive keys safe)
- Linting tools: ESLint (for clean code formatting)
- Rendering mode: Single Page App (SPA)
Using these options at setup will save you some time and get you up and running quicker. Being able to just select them at the very beginning and Nuxt just handling the setup for you is just one of the many ways Nuxt goes the extra step to allow you to focus on what you are building. (Note: There are ways to set up Nuxt outside of their CLI where you have more control over the configuration and what tools are used but for an MVP, this is sufficient enough).
You now have your new Nuxt app ready to go!
Setting up Firebase
Before we can jump into some code we need to set up a firebase account for our app that we'll use later. You do have to be logged in to an active google account so be sure to have an @gmail.com email setup, or take a few moments and create one.
To get started visit firebase.google.com and look in the top right corner of the screen. Just to the right of the languages dropdown menu, you'll see 'Go to console' in blue text. Click that! You'll be greeted with the screen you see below and you'll want to click 'Create a project'.

The following screens will ask you for a project name and if you'd like to enable Google Analytics. If you select yes to GA, a third screen will ask you to which google account you'd like to connect.
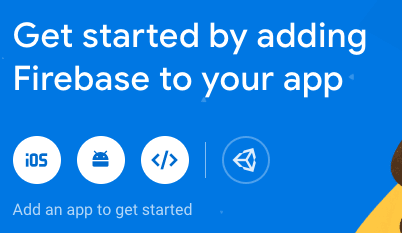
From there you'll be greeted with your Firebase app dashboard! Within that dashboard, you'll see this section pictured below. It's hard to miss because it is right at eye level, front, and center. For our project, we're going to want a web app so we're going to select the third circle with the '</>' in it.
After clicking that, it's going to ask for an app nickname.
Once you've provided a nickname you'll receive this prompt with important information you'll want to keep. There isn't anything in my app besides this tutorial but for security's sake, I'll keep mine covered (until I forget and expose them later :D)
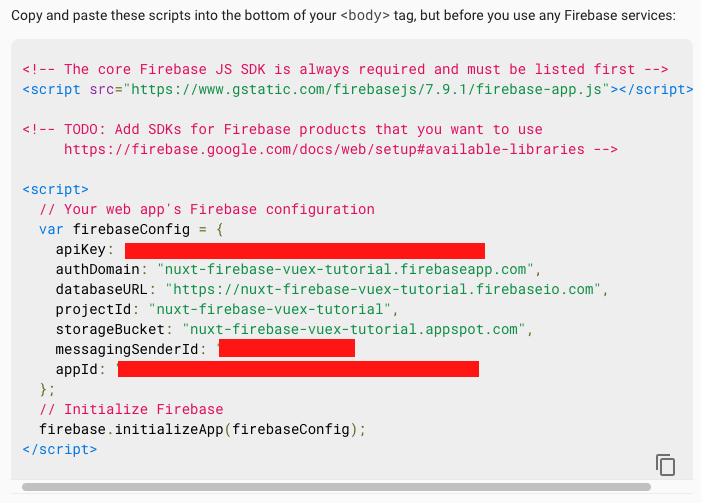
We're primarily interested in the var firebaseConfig ={...}; firebase.initializeApp(firebase.Config) section with the different API keys and URLs we'll need for our project. You can easily retrieve these from your project dashboard or, if you want to you can throw them in a scratch file in your text editor of choice. We'll be using them later so keep them handy.
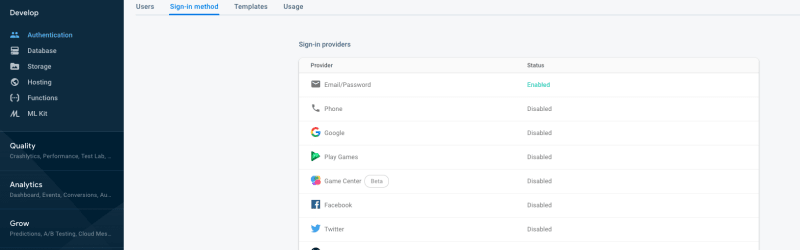
There's one more thing in the firebase dashboard we need to do. On the left of the screen, click the authentication link and from there you'll click the Sign in methods tab to the right. Be sure to enable to email and password as that is the sign-in method we'll be using.
Now that we've gotten that part ready to go, it's time to jump into our editor and do some setup there. We'll start by installing the firebase package and then configuring the plugin in our Nuxt app. I'm working with VSCode so I'm working in the integrated terminal. (Note: Make sure you're in the right directory for your Nuxt project).
npm install firebase --save //you can also use Yarn add firebase
If you look in the directory Nuxt created when you first ran create-nuxt-app, you'll see a folder titled 'plugins'. Inside of that folder, create a file called firebase.js. (Note: You can name the file whatever you want, just remember the name because we'll reference it later).
This is where some of the fun code stuff starts to happen! Inside of this file, we're going to do a few things. We're going to import Firebase and Firebase auth from the package we installed earlier, establish our API keys and other configurations, check if an instance of Firebase is already running - if there isn't then our app will create one, and lastly, we'll export firebase and auth from our file so we can use them later. (Note: This is where you need that important info we talked about earlier. If you forgot to jot it down, you can easily retrieve it from your project settings in the Firebase dashboard).
View the code
// ~/plugins/firebase.js

import * as firebase from 'firebase/app'
import 'firebase/auth'

// Your web app's Firebase configuration
var firebaseConfig = {
  apiKey: "Put your API here",
  authDomain: "your-project-name.firebaseapp.com",
  databaseURL: "https://your-project-name.firebaseio.com",
  projectId: "your-project-name",
  storageBucket: "your-project-name.appspot.com",
  messagingSenderId: "Put your messaging sender ID here",
  appId: "Put your app ID here"
};
// Initialize Firebase
!firebase.apps.length ? firebase.initializeApp(firebaseConfig) : ''

export const auth = firebase.auth()
export default firebase
Next, jump over to your nuxt.config.js file in the root of your directory to register the firebase plugin.
// ~/nuxt.config.js

/*
  ** Plugins to load before mounting the App
  */
  plugins: [
    '~/plugins/firebase.js',
  ],
Now your basic Nuxt/Firebase configuration is set, but we have one more step to implement auth before we can move on. While we're here, we're going to set up a little bit of code that will help us with Vuex later.
Inside of your plugins folder, create a file called fireauth.js (Note: again, you can name it whatever - just make sure you reference it by the right name later).
Here we're going to import the auth module from our '~/plugins/firebase.js' component we created earlier. After that, we're going to write an export function that will do a few things, but the most important right now is setting up the method 'onAuthStateChanged' that is provided from Firebase.
What this does is that it watches the auth state of a user and sends an update to Firebase. So, when they log in it basically says "Hey, they just logged in. Authenticate them" and when they log out it will send another update that says "Hey, that person left. Remove that authentication." In our export function, we're going to return a new Promise to handle some of the logic - we'll set this promise up as an arrow function and pass it the arguments 'resolve' and 'reject'.
// ~/plugins/fireauth.js

import { auth } from '~/plugins/firebase.js'

export default (context) => {
  const { store } = context

  return new Promise((resolve, reject) => {

  })
}
A promise is a placeholder for any value that may not be known when its created - so your promise is either going to come back with the value it needs and resolve itself or it will error and reject.
Inside of our promise, we're going to call the auth function that we imported from our Firebase plugin and give it the 'onAuthStateChanged' method. We're going to set this up as an arrow function as well and pass it a user parameter. Here is where your code is going to make a request to Firebase and if everything is set up correctly, it will return a user object for whatever credentials were passed (in our case we'll use email and password - later).
return new Promise((resolve, reject) => {
  auth.onAuthStateChanged(user => {

   // here is you would want to build your user
    // object, but for now, we'll just take everything

    store.commit('setUser', user)
    resolve()
  })
})
One thing we're going to jump a little ahead of ourselves for is to go ahead and write some code that our Vuex store will use later.
We'll start by passing the parameter 'context' to our export function and then inside of that function we'll set the variable const { store } = context. Basically, what this is doing is it's going to be able to grab some of the data that will get passed through here later and send it on to the Vuex store. To do that, inside of our 'auth.onAuthStateChanged' function we're going to commit the data that's being returned to our store with a function called 'setUser' - which we'll set up in just a bit, and passing the user parameter there as well. After all of that is said and done we're going to resolve() our promise.
View the code
// ~/plugins/fireauth.js

import { auth } from '~/plugins/firebase.js'

export default (context) => {
  const { store } = context

  return new Promise((resolve, reject) => {
    auth.onAuthStateChanged(user => {

      // here is you would want to build your user
      // object, but for now, we'll just take everything

      store.commit('setUser', user)
      resolve()
    })
  })
}
Now we'll jump back to our nuxt.config.js file and import the fireauth plugin.
// ~/nuxt.config.js

/*
  ** Plugins to load before mounting the App
  */
  plugins: [
    '~/plugins/firebase.js',
    '~/plugins/fireauth.js'
  ],
That was a bit long-winded but there a lot of moving parts around Firebase auth and Vuex that we want to have in place and at least a rough understanding of.
One thing I wanted to mention was how firebase.js and fireauth.js work together. Firebase.js is what's bringing Firebase into our application - one of the modules it's importing for us is Firebase's auth. Fireauth.js is running that auth method, logging our user in, and then setting the users auth state in our Vuex store. So, firebase is bringing all of the pieces in and fireauth is watching our auth state and storing it in Vuex for us.
Setting up Vuex
Another beautiful thing with Nuxt is that it comes with Vuex, so there isn't a whole lot of configuration to it. All you have to do is import it into the right file and start writing what you need it to do.
We're going to start this by creating an index.js file in our /store folder that Nuxt created for you. In this file, we're going to import Vuex from 'vuex', import { auth } from '~/plugins/firebase.js' (yes, the same one we used in our fireauth.js but for different reasons here), we're going to create the variable const createStore and set it as an arrow function. Inside of that arrow function, we're going to return new Vuex.Store({}) which creates our Vuex store for us, and lastly we'll export default createStore.
// ~/store/index.js

import Vuex from 'vuex'
import { auth } from '~/plugins/firebase.js'

const createStore = () => {

}

export default createStore
Inside of our Vuex.store, we're going to create a few objects. We'll create a state object where our logged-in state will live, a getters object which will return the state of our user and if it finds one it will set isAuthenticated, a mutations object which will hold our setUser mutation (remember 'setUser' from our fireauth.js?), and an actions object which will hold the actions our user can make (sign in/up/out).
// ~/store/index.js

import Vuex from 'vuex'
import { auth } from '~/plugins/firebase.js'

const createStore = () => {
  return new Vuex.Store({
    state: {

    },

    getters: {
      user() {

      },

      isAuthenticated() {

      }
    },

    mutations: {
      setUser() {

      }
    },

    actions: {
      signUp() {

      },

      signInWithEmail() {

      },

      signOut() {

      }
    }
  })
}

export default createStore
Here we have our empty objects, so let's jump in and make some magic with them!
In our state object, we simply want to set our user's state to an empty string so the default is to always have an empty user with an unauthenticated state.
// ~/store/index.js

state: {
  user: '',
},
In our getters, we have two functions, a user function, and an isAuthenticated function. For our user function, we want to pass it the argument 'state' and then inside of the function return state.user. This is retrieving the user object we declared above in our state. For isAuthenticated, we again want to pass the 'state' argument but this time we're going to check if there is a user object in state and return it with return !!state.user
// ~/store/index.js

getters: {
  user(state) {
    return state.user
  },

  isAuthenticated(state) {
    return !!state.user
  }
}
In our mutations object is where we're going to create our setUser function that the fireauth.js we created earlier uses to set our users when they log in. This function is going to take two arguments, state, and payload. Within the function, we're going to say state.user = payload. what this is doing is it's taking all of the data that's being returned from firebase when our user is signed in and authenticated and placing it in the state.user we created at the top of our Vuex store.
// ~/store/index.js

mutations: {
  setUser(state, payload) {
    state.user = payload
  }
}
Lastly, for our actions object, we're going to create three functions that will later be tied to some of our UI.
The first is our signUp function and it's going to accept two objects as arguments. We'll pass it { commit } and { email, password }. Commit is so our fireauth gets what it needs to set the state in the Vuex store and email/password will pass the email and password a user signs up with to our firebase method for signing in and authentication. So, we've passed our two arguments, and then inside we're going to return auth.createUserWithEmailAndPassword(email, password). If all goes well then this will create a user account and sign them in!
Our second function here is the signInWithEmail function. This is very similar to our signUp function, but we'll use the method .signInWithEmailandPassword() instead.
// ~/store/index.js

actions: {
  signUp({ commit }, { email, password }) {
    return auth.createUserWithEmailAndPassword(email, password)
  },

  signInWithEmail({ commit }, { email, password }) {
    return auth.signInWithEmailAndPassword(email, password)
  },
}
Our signOut function is a little simpler since we're not passing much data as much as we are clearing it out. In the signOut function we're going to call auth again and then give it the signOut method from Firebase like so 'auth.signOut()'. From there, we're going to use .then and an arrow function to set our state.user back to null (since they've signed out) with .then(() ={ commit('setUser', null}).
// ~/store/index.js

actions: {
  signUp({ commit }, { email, password }) {
    return auth.createUserWithEmailAndPassword(email, password)
  },

  signInWithEmail({ commit }, { email, password }) {
    return auth.signInWithEmailAndPassword(email, password)
  },

  signOut() {
    return auth.signOut()
  }
}
Congratulations! You now have your Nuxt app setup to use Firebase and Vuex. We can jump into building a UI for the user to interact with at this point, so let's go!
Building the UI
Now we're going to be jumping into the front-end of our application that the user will interact with.
First, we're going to set up our header component as we'll be placing links to our pages there, and later displaying a logged-in user. So, in your components folder create a file called Header.vue.
For those that don't know, Vue uses what's called a single file component (SFC) structure. In these SFC's are three parts - your template, script, and style. Let's go ahead and scaffold that out. If you're working with VScode you can install the extension Vue VScode Snippets from sarah.drasner and then type vbase, which will scaffold an empty template for you. You'll have a few options with vbase - default, ts, and css. I always use vbase-css. We'll throw an H1 in there so we have something to render.
<!-- ~/components/Header.vue -->

<template>
  <div>
    <h1>Hi, I'm the header.</h1>
  </div>
</template>

<script>
 export default {}
</script>

<style scoped>
</style>
Before we build this header out, let's jump over to our default.vue file in our layouts folder and go ahead and put the component in place.
First, we want to import and register our component. Your imports always go inside of your script tag but outside of your export default {}. So, we'll 'import Header from "~/components/Header.vue"' and then in our export default, we'll create a components:{} object and register our Header there.
<!--  In the script tag of ~/layouts/default.vue -->

<script>
import Header from "~/components/Header.vue";

export default {
  components: {
    Header
  }
};
</script>
Next, we'll jump to our template and place our component like so. One additional thing we're adding here is div wrapping the Nuxt component and then giving it a Tailwind class of mt-12. This is purely for style/positioning and isn't required.
View the code
<!-- In the template tag~/layouts/default.vue -->

<template>
  <div>
    <Header />
    <div class="mt-12">
      <nuxt />
    </div>
  </div>
</template
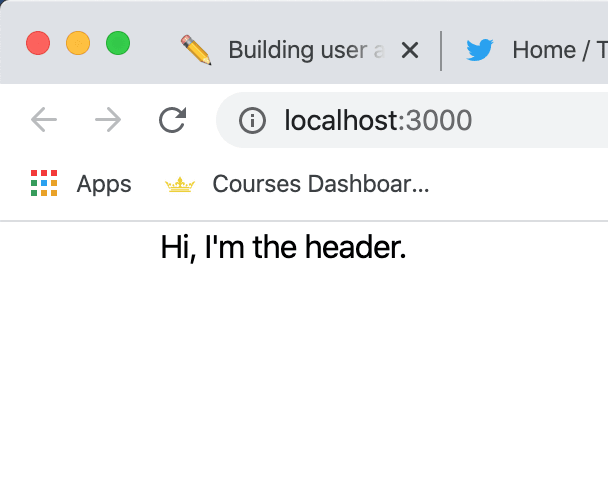
If we run npm run dev in our terminal and jump over to our browser, we'll see our header is imported properly.
We're going to throw together a rough header and thanks to Tailwind CSS that we set up earlier we can style it pretty easily. So what we want to do is, inside of our header's parent div, we're going to create another div and inside of that div, we'll place an H1 for our "logo" and a nuxt-link that directs to a sign-in page (we haven't created this page yet - but it's on the way).
Now, you don't have to create the extra div - I'm doing that because I want a shadow that spans the full width of the browser but I want our header content to be confined to the container with margin on both sides. And just for some extra styling, we'll place class="py-2 shadow" on our parent div. These are being supplied by Tailwind and they make it so easy to build these UI's quickly and easily. On our second div, We'll throw a class="container mx-auto flex justify-between" on there. The container is setting a maximum width on that element, mx-auto is setting margin: 0 auto, flex is setting the display: flex, and justify-between is going to pin the two elements two each side of the header. So here is what our code looks like.
<!-- ~/components/Header.vue -->

<template>
  <div class="py-2 shadow">
    <div class="container mx-auto flex justify-between">
      <h1 class="leading-tight font-bold text-green-500 text-2xl">RadAPP</h1>

      <nuxt-link to="/signin">Sign In</nuxt-link>
    </div>
  </div>
</template>

<script>
export default {}
</script>

<style scoped>
</style>
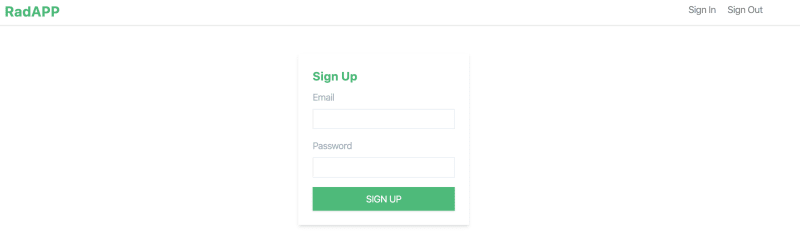
And if we jump to the browser we'll see our beautiful header component!

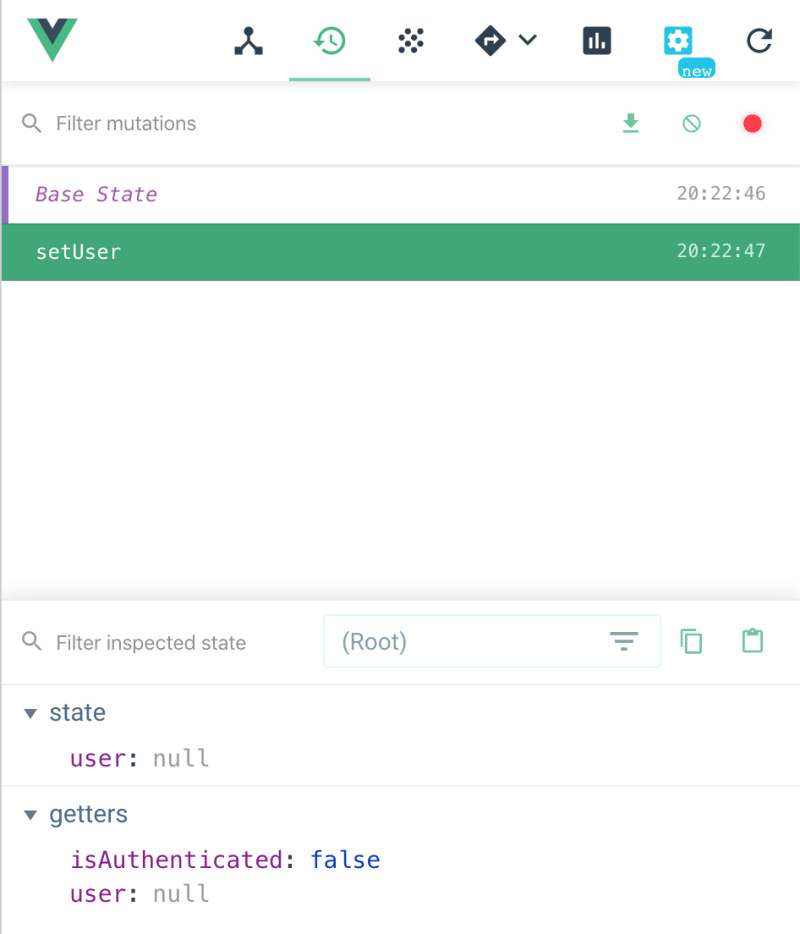
If you have the vue dev tools installed (I'm using the Chrome browser) and inspect our vuex store, you'll see that our setUser function is firing and at the bottom, you'll see that our user object is null and our isAuthenticated is set to false. So far so good!
Next, we'll jump back to our index.vue and build our sign-up form.
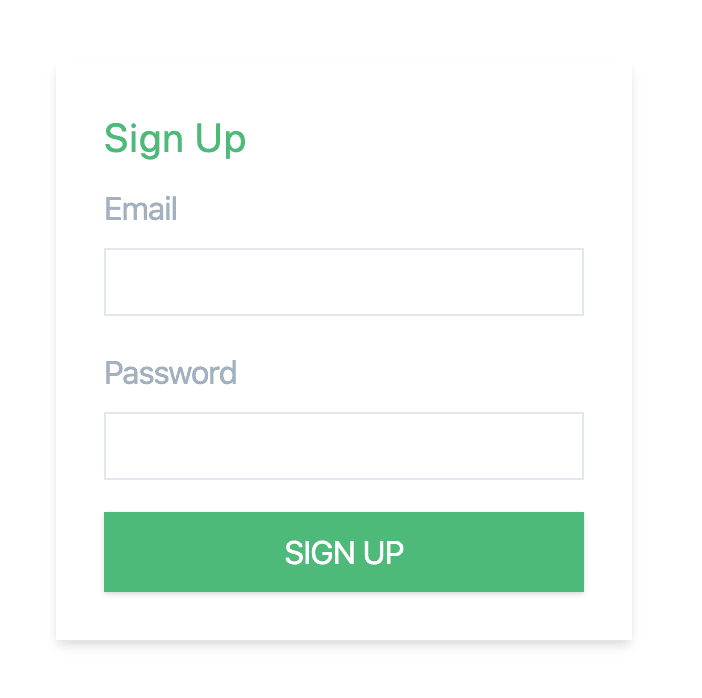
For the sake of time and space, we're going to put our sign up form right on the home page, so jump over to index.vue in your pages directory and we'll put a form together. In this form, we'll need two inputs. One for email and one for the password. I'm assuming you have some HTML knowledge so I won't break down everything about the form below you can see my code. I went ahead and threw some Tailwind classes on there just so we have something pretty work with.
<!-- ~/pages/index.vue -->

<template>
  <div class="p-6 w-1/5 container mx-auto shadow-md">
    <form>
      <h2 class="mb-2 text-xl text-green-500">Sign Up</h2>

      <div class="mb-4">
        <label class="block mb-2 text-gray-500" for="email">Email</label>
        <input class="border w-full px-2 py-1" type="text" id="email"/>
      </div>

      <div class="mb-4">
        <label class="block mb-2 text-gray-500" for="password">Password</label>
        <input class="border w-full px-2 py-1" type="password" id="password"/>
      </div>
    </form>
  </div>
</template>
So here is what our pretty form looks like!
To start adding some functionality to our form, we first want to declare the two pieces of data we'll want to interact with and set them to null. so in our script tags, within our export default function, we'll create this data object below.
<!-- In the script tag of ~/pages/index.vue -->

<script>
export default {

  data: function() {
    return {
      email: "",
      password: ""
    };
  },
}
</script>
Now we need to bind our form inputs to this data model and luckily for us, Vue makes this super easy. On their respective inputs, place v-model="insert data-name". It should look like something below.
<!-- In the template tag of ~/pages/index.vue -->

<div class="mb-4">
  <label class="block mb-2 text-gray-500" for="email">Email</label>
  <input class="border w-full px-2 py-1" type="text" id="email"/>
</div>

<div class="mb-4">
  <label class="block mb-2 text-gray-500" for="password">Password</label>
  <input class="border w-full px-2 py-1" type="password" id="password"/>
</div>
Our next step is to create a sign-up method that will create a new user account when the form is filled out and the sign-up button is clicked. We'll start by creating a section for our methods, and inside of that, we'll create a userSignUp function.
<!-- In the script tag of ~/pages/index.vue -->

<script>
export default {

  data: function() {
    return {
      email: "",
      password: ""
    };
  },

  methods: {
    userSignUp: function() {

    }
  }
}
</script>
Next, we're going to use the signUp function we created in our vuex store and pass the email and password data to it. We do this by calling this.$store.dispatch() - which is basically saying "look in the vuex store and send us whatever function we're about to ask for. So, in our .dispatch() call we're going to pass the name of the Vuex function we want, in this case, that's signUp. We also need to pass in the email and password and we do that by referencing our data object with this.email and this.password. This is telling the function to look at the data we declare earlier in our SFC and pass them to our Vuex function with these names. (Note: we're passing err into our function so we can reference it later for a little error handling)
<!-- In the script tag of ~/pages/index.vue -->

<script>
export default {

  data: function() {
    return {
      email: "",
      password: ""
    };
  },

  methods: {
    userSignUp: function(err) {
      this.$store
        .dispatch('signUp', {
          email: this.mail,
          password: this.password
        })
    }
  }
}
</script>
From there we'll call .then and write an arrow function that sets our email and password data back to null. We don't want to store the information our user is giving us after they've completed what the form is there for, so this is just a small bit of security to keep their data safe.
// In the script tag of ~/pages/index.vue

methods: {
  userSignUp: function(err) {
    this.$store
      .dispatch('signUp', {
        email: this.mail,
        password: this.password
      })
      .then(() => {
        this.email = "";
        this.password = "";
        //if you wanted to redirect after sign id you'd that here with this.$router.push('/pagename')
      })
  }
}
Lastly, we'll run a .catch() to handle any errors and for presentation's sake, we'll put that into an alert.
// In the script tag of ~/pages/index.vue

methods: {
  userSignUp: function(err) {
    this.$store
      .dispatch('signUp', {
        email: this.mail,
        password: this.password
      })
      .then(() => {
        this.email = "";
        this.password = "";
        //if you wanted to redirect after sign id you'd that here with this.$router.push('/pagename')
      })
      .catch(err => {
        alert(err.message)
      })
  }
}
Before we're finished up here, we need to tell the form what to do once it's submitted. Vue makes event handling super easy with the '@' symbol. So here we're going to @submit.prevent="userSignUp". So, we're going to jump to the opening form tag and add @submit.prevent="userSignUp"(Note: .prevent is the same as having .preventDefault in your function).
<!-- In the template of ~/pages/index.vue -->

<form @submit.prevent="userSignUp">
Here is what your full index.vue file should look like now.
View the code
<!-- ~/pages/index.vue -->

<template>
  <div class="p-6 w-1/5 container mx-auto shadow-md">
    <form @submit.prevent="userSignUp">
      <h2 class="mb-2 text-xl text-green-500 font-bold">Sign Up</h2>

      <div class="mb-4">
        <label class="block mb-2 text-gray-500" for="email">Email</label>
        <input class="border w-full px-2 py-1" type="text" id="email" v-model="email" />
      </div>

      <div class="mb-4">
        <label class="block mb-2 text-gray-500" for="password">Password</label>
        <input class="border w-full px-2 py-1" type="password" id="password" v-model="password" />
      </div>

      <button class="bg-green-500 text-white uppercase py-2 w-full shadow">Sign Up</button>
    </form>
  </div>
</template>

<script>
import Logo from "~/components/Logo.vue";

export default {
  components: {
    Logo
  },

  data: function() {
    return {
      email: "",
      password: ""
    };
  },

  methods: {
    userSignUp: function(err) {
      this.$store
        .dispatch("signUp", {
          email: this.email,
          password: this.password
        })
        .then(() => {
          this.email = "";
          this.password = "";
          //if you wanted to redirect after sign in you'd do that here with this.$router.push('/pagename')
        })
        .catch(err => {
          alert(err.message);
        });
    }
  }
};
</script>
Success! You can use your Vue dev tools to inspect the Vuex store and you'll see that our setUser mutation was called again and that now our user in state has an object within it and that our isAuthenticated is set to true.

Another way we can check to see if this worked is to jump over to our Firebase console and look in the Authentication tab. If it worked, you'll see your first account!

Now that we have a user account, let's build the sign in and sign out functionality for them to interact with on our app. Sign in is very similar to our sign up so let's do that one first.
In your pages folder, create a signup.vue file. We can save a little time by using v-base (if you have the vue snippets installed) and copying the form we just created from index.vue. Since our two forms are using the same data, all you have to do is change any instance of up to in and it's good to go. Jump into your browser and visit /signin to verify the page is rendering properly.
<!-- In the template of ~/pages/signin.vue -->

<template>
  <div class="p-6 w-1/5 container mx-auto shadow-md">
    <form @submit.prevent="userSignIn">
      <h2 class="mb-2 text-xl text-green-500 font-bold">Sign In</h2>

      <div class="mb-4">
        <label class="block mb-2 text-gray-500" for="email">Email</label>
        <input class="border w-full px-2 py-1" type="text" id="email" v-model="email" />
      </div>

      <div class="mb-4">
        <label class="block mb-2 text-gray-500" for="password">Password</label>
        <input class="border w-full px-2 py-1" type="password" id="password" v-model="password" />
      </div>

      <button class="bg-green-500 text-white uppercase py-2 w-full shadow">Sign In</button>
    </form>
  </div>
</template>
A lot of this file is very similar to the one we just created and can be copied over. The difference here is we're asking for 'signInWithEmail' in our .dispatch() call.(Note: Be sure to give your signin.vue a name after opening your export default{} function like below).
<!-- The script tag of ~/pages/signin.vue -->

<script>
export default {
  name: "signin",

  data: function() {
    return {
      email: "",
      password: ""
    };
  },

  methods: {
    userSignIn: function(err) {
      this.$store
        .dispatch("signInWithEmail", {
          email: this.email,
          password: this.password
        })
        .then(() => {
          this.email = "";
          this.password = "";
        })
        .catch(err => {
          alert(err.message);
        });
    }
  }
};
</script>
After all of this, you should have a functioning sign-in page! Here is what your code should look like.
<!-- ~/pages/signin.vue -->

<template>
  <div class="p-6 w-1/5 container mx-auto shadow-md">
    <form @submit.prevent="userSignIn">
      <h2 class="mb-2 text-xl text-green-500 font-bold">Sign In</h2>

      <div class="mb-4">
        <label class="block mb-2 text-gray-500" for="email">Email</label>
        <input class="border w-full px-2 py-1" type="text" id="email" v-model="email" />
      </div>

      <div class="mb-4">
        <label class="block mb-2 text-gray-500" for="password">Password</label>
        <input class="border w-full px-2 py-1" type="password" id="password" v-model="password" />
      </div>

      <button class="bg-green-500 text-white uppercase py-2 w-full shadow">Sign In</button>
    </form>
  </div>
</template>

<script>
export default {
  name: "signin",

  data: function() {
    return {
      email: "",
      password: ""
    };
  },

  methods: {
    userSignIn: function(err) {
      this.$store
        .dispatch("signInWithEmail", {
          email: this.email,
          password: this.password
        })
        .then(() => {
          this.email = "";
          this.password = "";
        })
        .catch(err => {
          alert(err.message);
        });
    }
  }
};
</script>
Our next step is to jump back to our header so we can build our sign out button and this will also lead to building our user logged in display.
So in our Header.vue component, what we'll do here is wrap our sign-in link in a div and in that div we'll add a sign-out button. We're wrapping these in a div here so they're positioned as a pair by the tailwind flex class we added on their parent element earlier.
While we're here, we're going to go ahead and put some code in place for our sign out button. First is a click event for our button to react to. Vue again makes this easy for us so all we have to do is put @click="signOut" (remember what you put here because we'll have to name a function the same thing later in the file).
To get a little fancy on ourselves, we're going to add a v-if statement here so our sign out button only renders when there is a user who may need to log out. We'll do this by checking if our vuex store has a user object. So on our button we'll add v-if="$store.state.user". This doesn't function on its own, we'll have to add more code below for it to work.
<!-- Inside ~/components/Header.vue -->

<div>
  <nuxt-link to="/signin" class="opacity-50 hover:opacity-100">Sign In</nuxt-link>
  <button
    @click="signOut"
    class="pl-4 opacity-50 hover:opacity-100"
    v-if="$store.state.user"
  >Sign Out</button>
</div>
To make the v-if statement work we need to do a few things. First, we need to import mapGetters from Vuex. Can you guess what this does? When called, this will map over any getters in our Vuex store and return their data. We'll take that data and grab what we need out of it with a computed property. In our computed object, we'll iterate over our mapGetters and set user to "user". At this point, our v-if statement should be working.
<!-- In the script tag of ~/components/Header.vue -->

<script>
import mapGetters from "vuex"

export default {
  computed: {
    ...mapGetters({
      user: "user"
    })
  }
}
</script>
After that, we'll want to create a sign out method (remember to use the same you gave your @click event earlier). Since we're not working with any data here and just removing it all we need to do is call on our Vuex store with this.$store.dispatch() and pass it 'signOut' (or whatever you named your sign out function). We'll again add a .catch(err⇒ {alert(err.message)} so if anything goes wrong we can see what it was.
<!-- In the script tag of ~/components/Header.vue -->

<script>
import mapGetters from "vuex"

export default {
  computed: {
    ...mapGetters({
      user: "user"
    })
  },

  methods: {
    signOut: function(err) {
      this.$store.dispatch("signOut").catch(err => {
        alert(err.message);
      });
    }
  }
}
</script>
Here's what your header code should look like. View the code
<!-- ~/components/Header.vue -->

<template>
  <div class="py-2 shadow">
    <div class="container mx-auto flex justify-between">
      <nuxt-link to="/" class="leading-tight font-bold text-green-500 text-2xl">RadAPP</nuxt-link>

      <div>
        <span v-if="$store.state.user">{{$store.state.user.email}}</span>
        <nuxt-link to="/signin" class="opacity-50 hover:opacity-100" v-else>Sign In</nuxt-link>
        <button
          @click="signOut"
          class="pl-4 opacity-50 hover:opacity-100"
          v-if="$store.state.user"
        >Sign Out</button>
      </div>
    </div>
  </div>
</template>

<script>
import { mapGetters } from "vuex";

export default {
  computed: {
    ...mapGetters({
      user: "user"
    })
  },

  methods: {
    signOut: function(err) {
      this.$store.dispatch("signOut").catch(err => {
        alert(err.message);
      });
    }
  }
};
</script>
So! Now your sign out button should toggle its visibility based on whether your user is logged in or not! Congratulations! One step close to world domina... I mean, building this user account interface!
Building a header with a user loggedIn display
The last part of our journey is here to show the email of the logged-in user. Some web apps may show a username or avatar, but we'll use email here. The great part about this is is a lot of what we need to make this work is already in place so it doesn't take much work to make it happen!
What we're going to be doing here is swapping between our sign-in link and our user's email. We're doing this because if someone is already signed in then they don't need to see a link to the sign-in page. Remember the v-if we used earlier? We'll be using that same technique here.
Since we already have mapGetters happening in this file all we have to do is set up a v-if v-else condition based on our user. We do this by creating a span above our nuxt-link and using the same v-if from where we're checking the vuex store for a user. If a user is logged in we want to display that email. That email is part of the user object firebase is returning to us so to access it we just add .email to the end of our same $store.state.user statement in the v-if condition. And to finish this out you simple add v-else to our sign in nuxt-link.
<!-- In the template tag of ~/components/Header.vue -->

<div>
  <span v-if="$store.state.user">{{$store.state.user.email}}</span>
  <nuxt-link to="/signin" class="opacity-50 hover:opacity-100" v-else>Sign In</nuxt-link>
  <button
    @click="signOut"
    class="pl-4 opacity-50 hover:opacity-100"
    v-if="$store.state.user"
  >Sign Out</button>
</div>
Voila! You now have a functioning sign in/out/up setup with Nuxt and Firebase! I want to reiterate that probably there are a lot more processes that could be added and this could be far more complex if your app has more pieces and moving parts, but here's the basic functionality of it!
Now, go conquer the world with your aspirations.
You can view the source code here..

Oldest comments (14)
Love the detail and time you put into this. thank you so much!
Firstly, great article this has been very helpful, however I have run into an issue, the following is causing "Do not mutate vuex store outside mutation handlers" error to appear infinitely and crashes my browser.
auth.onAuthStateChanged((user) => {
})
My auth store (Using modules)
import { auth } from '~/plugins/firebase.js'
// state
export const state = () => ({
user: ''
})
export const getters = {
user (state) {
return state.user
},
isAuthenticated (state) {
return !!state.user
}
}
// mutations
export const mutations = {
SET_USER (state, user) {
state.user = user
}
}
// actions
export const actions = {
setUser ({ commit, store }, payload) {
commit('SET_USER', payload)
},
signUp ({ commit }, { email, password }) {
return auth.createUserWithEmailAndPassword(email, password)
},
signInWithEmail ({ commit }, { email, password }) {
return auth.signInWithEmailAndPassword(email, password)
},
signOut () {
return auth.signOut()
}
}
export const strict = false
Thanks for this, Steve!
It seems like this article is due for an update. This was written based off of some code that was originally written in 2018, so there are some practices (which is what you found) that aren't the 'best' anymore.
I'll put it on my to-do list to try and get this update this week. I'm sorry you ran into issues!
Cool article, but how do you prevent users from accessing pages that require authentication, as middleware runs only on server side on initial page load?
Great question! Perhaps I should update this article to include that.
In the meantime, you can check out this repo that does just that.
github.com/drewclem/Colt
Here is where middleware is set up
github.com/drewclem/Colt/blob/mast...
And here is how you would lock a page behind the authentication (see line 43)
github.com/drewclem/Colt/blob/mast...
great article by the way... Oh Hi...
I was wondering how you implement firebase.js plugin with ENV variables... as you know to commit API keys is not a healthy practice. I have been trying it out with no luck and little insight to it would be really helpful. Thank you
Did you manage to solve this issue? I am facing the same problem and the only solution would be to migrate the firebase config to nuxt.config.js ?
For this, you'd create a .env file and store your keys there. Then you'd setup your nuxt.config.js to use those variables as well.
From there, you'd use process.env.YOUR_KEY where you needed to access the key.
Thanks for replying, I have been working on this for over a week and seems like this is the only fix so far: stackoverflow.com/questions/703036...
This kind of a gotcha with JAMstack sites and authentication, because at some level, the keys will be exposed somewhere within the compiled code.
However, using the .env and nuxt.config.js route will at least keep them out of the repo.
I haven't built anything with this setup that gets enough traffic to warrant going the extra mile for the extra security.
I don't know of a workaround for this.
Completely agree, I have been struggling with this for a week and wanted to finish my app with the best practise but from looking at what the community is saying, its a common problem. Thanks mate.
Thank you for taking the time on this article; I found it very helpful. Steve's comment from October 2020 was also a great addition. There are some things I have had to tweak as well and others might find this useful.
This might be obvious, but just in case others might have missed this: in the onAuthStateChanged observer we not only have to point to an action rather than a mutation we also have to have "store.dispatch" instead of "store.commit."
Nuxt allows you to organize your store with modular files -- so auth.js, posts.js, etc. If you do this, then you need to indicate the file name with the action. In my store, I have an auth.js file, so I have this in fireAuth.js:
auth.onAuthStateChanged((user) => {
store.dispatch('auth/setUser', user)
resolve()
})
In the SET_USER mutation, I had to specify two different values for the payload to prevent the browser from crashing. Here’s what I did:
SET_USER(state, payload) {
if (payload === null) {state.user = payload}
if (payload !== null) {state.user = payload.uid}
},
If there is a user (i.e. payload !== null), you can of course grab whatever you want from payload to assign to state.user.
These are great points!
This article is actually due for an update, and these will definitely be included!
Hi thanks for the above, how to we go about protecting the sensitive keys in the firebase config? From what I am seeing across stackoverflow and other forums is that you cannot use environment variables from plugins and would need to migrate the info over to nuxt.config?