Over the past month I have been involved in a project that requires offline first capabilities. I worked on automatic synchronization in the past and it was a real pain to do because everything was so manual and annoying. I basically had to write the code that made all the moving parts work, from persisting the data locally, listening for network presence and then moving the data.
Enter PouchDb and CouchDb
Since then I learnt about the pouch and couch db combo and life has become much easier. Pouchdb helps with the offline storage part and has a seamless, fast and reliable relationship with couchdb. All you need do is connect both databases using your preferred replication, then save to pouchdb the rest happens automagically.
So lets get started..
What do you need
You need the following:
* Active Microsoft azure subscription
* Some knowledge of SSH
* Some knowledge of how couchdb works
Installing Couchdb
As you might already know Microsoft azure is a platform as a service (PaaS). It can provide you a dedicated environment consisting of basically almost anything you need to host, hmmm, basically anything you want (Is it just me or does that statement sound strange, anyways moving on). One of those environments is a Virtual Machine (VM).
To use Couchdb you need a VM, but never fear, Bitnami as usual is a lifesaver.
Step 1 (Go to the marketplace)
Go to the new azure portal and login if not already logged in. On the dashboard find marketplace. If you can't find it on the dashboard, click all services by the side then look for marketplace and click on it.

Step 2 (Search for Couchdb)

Just type "Couchdb" or more directly "CouchDB Certified by Bitnami" you should be get the marketplace app as shown in the image and select it on the next screen you should see some explanation about what couchbase is, Scroll to the bottom and click the create button below.
Step 3 (Configure your VM instance)
The next screen displays some configuration options for your Virtual Machine. If you are familiar with Azure already most of the options should be pretty obvious. Options like resource group, region and availability set. They all have the information icon beside them which you can hover and get information about the field, but I will explain the fields that are mission critical (wink :-), wanted to say that for a while now).
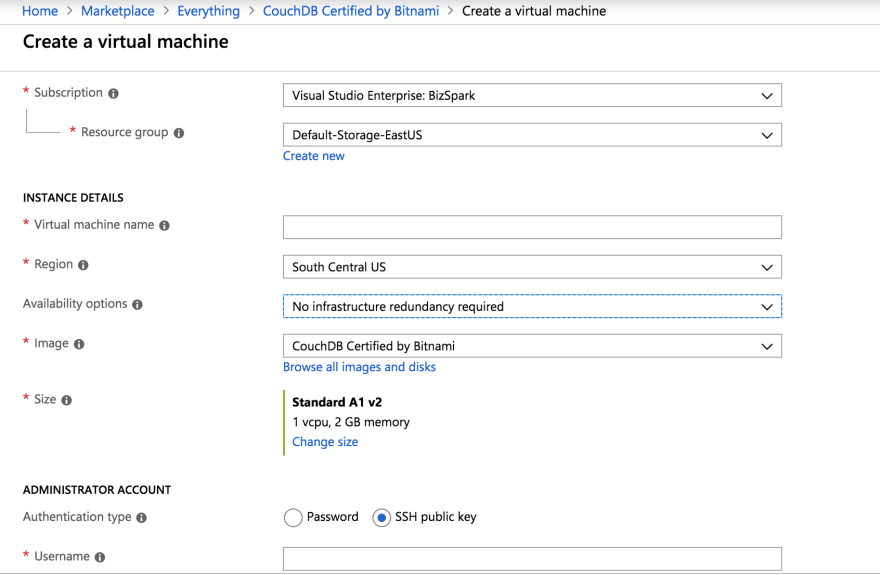
Virtual machine name
This is a name to recognize your virtual machine by and also the hostname. Use a good and explanatory name here, not too long but explanatory.
Availability Options
This is important but not an absolute must have since your app won't fail if there is no server. But I decided to talk about it (Hmm... feeling like MGK, he sucks though :-( ), because its important for some apps. Take for example, if your business logic states that you must absolutely backup every X period. Then there would be an issue if your server is down wouldn't there.
Availability options just ensures that your server doesn't go down by providing a mirror or replicated server somewhere else that will kick in whenever your real server goes down for some reason.
Image
Leave this option alone as is except you changed your mind about deploying couchdb of course.
Size
Another option you should probably leave as is. The default option should be standard A1 v2. Which is a standard setup for most purposes. I'd advice you let it be and scale up as needed with time.
Administrator Account
This is absolutely crucial. The administrator is the username and password you will use in logging into your virtual machine. As for me, i used a username and password combination for now, basically because I won't be the only one accessing the vm and I didn't wish to ship SSH keys to everyone that required access. But i intend to change this eventually when we are more certain about who gets the keys to the kingdom.
Once all fields are filled you can go ahead and click review and create. Except you absolutely know what you are doing, do not mess with the other tabs. Once you click preview and create, it loads for a while as it creates the VM, just grab your favourite drink and watch an episode of Rick and Morty while it does its thing.
It should be done now, congratulations you have a new born VM with couchbase installed. The options might seem confusing at first but work with me.
Setting up Couchdb
Bitnami provides an official documentation here. Just an FYI.
Obtain server credentials (For those that signed up using password)
Method 1: Boot Diagnostics method
By default your username is admin, but you also need to obtain your password. To do that, visit the dashboard of the virtual machine you just created and search for Boot Diagnostics. Select the option and you are presented with another menu that contains Screenshot and Serial log.
The first menu Item, screenshot, gives you are screenshot of the current system display in cli while the second contains the log file for your system. Get ready, you are about to dig through some logs. I advice you download the logs to your computer and go through it locally. What you are looking for are the words "Setting bitnami application password to".
You can see this youtube video for more info
@Youtube for bitnami
NB: This method will only work the first time you create the VM. Otherwise the password would have been overwritten by new log.
Method 2: SSH
You can also obtain the credentials by connecting to your VM using SSH. To obtain your credentials for azure SSH you can follow the steps here
How to obtain SSH credentials.
Once you are logged into SSH, execute the following command cat ./bitnami_credentials. If no content is displayed in the file above run the following command sudo cat /opt/bitnami/var/data/bitnami_credentials/credentials.
If you made use of SSH keys you will have to login using different methods. Visit the link specified above for more information.
Connect to Fauxton
Fauxton is the web interface that makes working with couchdb very easy. If you don't know about it or haven't used it before, please do, it makes your life very easy. But to work with Fauxton, you need port 5984, but that port is blocked by default for security reasons.
I will describe two methods one that is secure but limits access to one computer at a time by using tunelling and the other gives public access but with password protection of course. If you wish to expose the port publicly make sure you know what you are doing and that you absolutely have to. By absolutely have to, I mean the only reason you should even be considering it is because you wish to provide access to other members of your team/company.
Method 1 (SSH Tunelling)
By default Couchdb listens to local interface only, so an SSH tunnel is needed to access it. An SSH tunnel needs a port for both ends, a source port and a destination port. For the purpose of making this connection you need to use 5984 for both ends of the tunnel.
To connect use the following on MAC
ssh -N -L 5984:127.0.0.1:5984 USERNAME@SERVER-IP
Where username is the VM username you set when creating the VM and server IP can be found on your dashboard. You will be prompted for your password, enter it and a connection should be established.
There is a caveat however, ensure your local couchdb instance is not currently running, else you will get an error about not being able to bind to the port or something of the sorts. It took me a while to figure this one out, because i kept trying to login with the credentials of my remote couchdb, you can guess that it didn't work. I eventually had to kill the process using port 5984 before it worked.
Another caveat is that once its connected you don't get a message about connecting successfully. So what you need to do is visit fauxton's url. It will be thesame url as your local couchdb instance since you tunnelled using your localhost. http://127.0.0.1:5984/_utils/. You should see the interface now. Login and enjoy.
Method 2 (Public access)
To unlock the port you need to allow the port 5984 through your firewall. To do this you need to add an inbound rule, luckily this is pretty easy to do. Just search for Networking from the sidemenu and click the inbound rules button when the blade comes up. By default the settings for new inbound rules will be set to advanced, change it to basic and you should see the screen below

Click the service dropdown and pick couchdb from the options. You can change the name if you wish to something more easy to remember. Then save, it takes a little time.
Once the inbound rule has been added, connect to your VM using SSH then run the following command vim /opt/bitnami/couchdb/etc/local.ini. The command will open the file in the path using vim, you need to enter INSERT mode before you can edit, so press "i" on your keyboard. Scroll down and look for
[chttpd]
port = 5984
bind_address = 0.0.0.0
...
[httpd]
bind_address = 0.0.0.0
...
In my own case i only found the first one. Change 0.0.0.0 to 127.0.0.1. Save the file by exiting INSERT mode, so press esc key. Then press :wq and press enter to save. Open the file again to confirm the rules have been saved. Then restart your couchdb instance sudo /opt/bitnami/ctlscript.sh restart couchdb. Your Fauxton instance is now ready.
To connect to it use [Your VM public Ip]:5984/_utils/. You should see your fauxton instance now.
I hope you are successful in making this work, if not leave me a message and we can debug together. Please watchout for the next article on how to connect the instance we just created to pouchdb and perform data sync.

Oldest comments (1)
"In my own case i only found the first one. Change 0.0.0.0 to 127.0.0.1. Save the file by exiting INSERT mode, so press esc key."
There are two things that are 0.0.0.0... I have no idea how to do the last step. Maybe just show us what the sections should look like?