
In this case study, we will cover the process of fine-tuning the YOLOv8-seg pre-trained model to improve its accuracy for specific object classes. The Ikomia API simplifies the development of Computer Vision workflows and allows for easy experimentation with different parameters to achieve the best results.
Get started with Ikomia API
With the Ikomia API, we can train a custom YOLOv8 Instance Segmentation model with just a few lines of code. To get started, you need to install the API in a virtual environment.
How to install a virtual environment
pip install ikomia
In this tutorial, we will use the coral dataset from Roboflow. You can download this dataset by following this link: Dataset Download Link.
Run the train YOLOv8 instance segmentation algorithm with a few lines of code
You can also charge directly the open-source notebook we have prepared.
from ikomia.dataprocess.workflow import Workflow

# Initialize the workflow
wf = Workflow()

# Add the dataset loader to load your custom data and annotations
dataset = wf.add_task(name='dataset_coco')

# Set the parameters of the dataset loader
dataset.set_parameters({
    'json_file': 'Path/To/Mesophotic Coral/Dataset/train/_annotations.coco.json',
    'image_folder': 'Path/To/Mesophotic Coral/Dataset/train',
    'task': 'instance_segmentation',
})

# Add the YOLOv8 segmentation algorithm
train = wf.add_task(name='train_yolo_v8_seg', auto_connect=True)

# Set the parameters of the YOLOv8 segmentation algorithm
train.set_parameters({
    'model_name': 'yolov8m-seg',
    'batch_size': '4',
    'epochs': '50',
    'input_size': '640',
    'dataset_split_ratio': '0.8',
    'output_folder': 'Path/To/Folder/Where/Model-weights/Will/Be/Saved'
})
The training process for 50 epochs was completed in approximately 1h using an NVIDIA GeForce RTX 3060 Laptop GPU with 6143.5MB.
What is YOLOv8 instance segmentation?
Before going through a step by step approach with all parameters details, let's dive deeper into instance segmentation and YOLOv8.
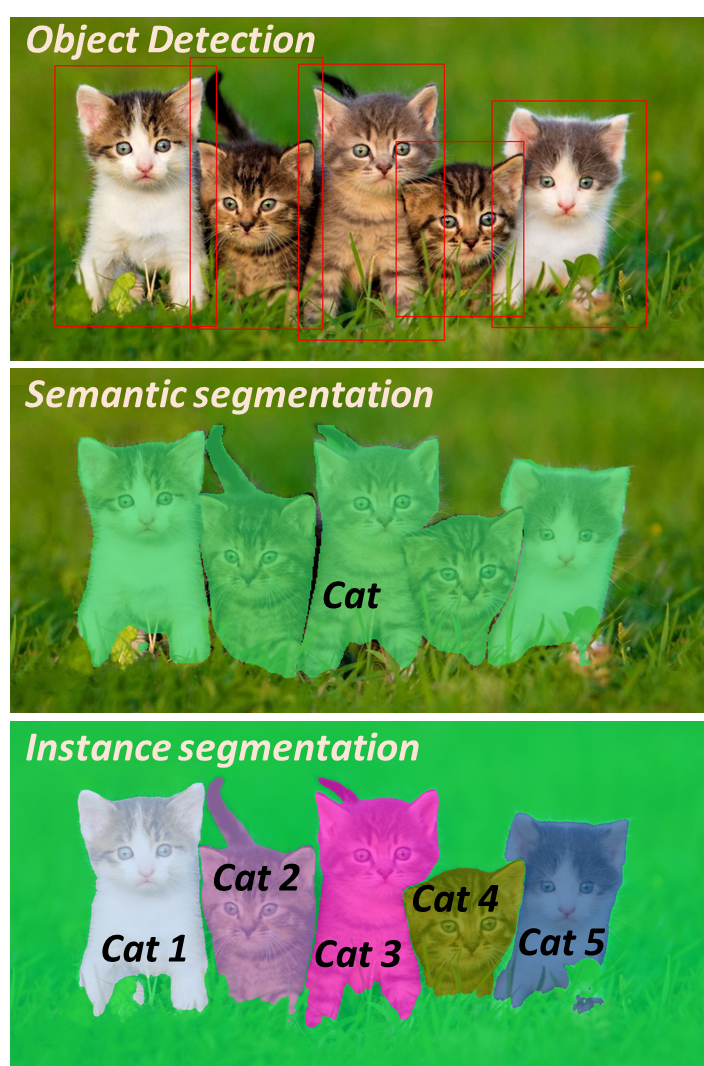
What is instance segmentation?
Instance segmentation is a Computer Vision task that involves identifying and delineating individual objects within an image. Unlike semantic segmentation, which classifies each pixel into pre-defined categories, instance segmentation aims to differentiate and separate instances of objects from one another.
In instance segmentation, the goal is to not only classify each pixel but also assign a unique label or identifier to each distinct object instance. This means that objects of the same class are treated as separate entities. For example, if there are multiple instances of cars in an image, instance segmentation algorithms will assign a unique label to each car, allowing for precise identification and differentiation.
Instance segmentation provides more detailed and granular information about object boundaries and spatial extent compared to other segmentation techniques. It is widely used in various applications, including autonomous driving, robotics, object detection, medical imaging, and video analysis.
Many modern instance segmentation algorithms, like YOLOv8-seg, employ deep learning techniques, particularly convolutional neural networks (CNNs), to perform pixel-wise classification and object localization simultaneously. These algorithms often combine the strengths of object detection and semantic segmentation to achieve accurate instance-level segmentation results.
Overview of YOLOv8
Release and benefits
YOLOv8, developed by Ultralytics, is a model that specializes in object detection, image classification, and instance segmentation tasks. It is known for its accuracy and compact model size, making it a notable addition to the YOLO series, which has seen success with YOLOv5. With its improved architecture and user-friendly enhancements, YOLOv8 offers a great option for Computer Vision projects.
]](https://res.cloudinary.com/practicaldev/image/fetch/s--JgtyqHho--/c_limit%2Cf_auto%2Cfl_progressive%2Cq_auto%2Cw_800/https://cdn-images-1.medium.com/max/3200/0%2Aq4tR6lbtWZLXArhO)
Architecture and innovations
While an official research paper for YOLOv8 is currently unavailable, an analysis of the repository and available information provide insights on its architecture. YOLOv8 introduces anchor-free detection, which predicts object centers instead of relying on anchor boxes. This approach simplifies the model and improves post-processing steps like Non-Maximum Suppression.
The architecture also incorporates new convolutions and module configurations, leaning towards a ResNet-like structure. For a detailed visualization of the network's architecture, refer to the image created by GitHub user RangeKing.
]](https://res.cloudinary.com/practicaldev/image/fetch/s--NBqY_C-3--/c_limit%2Cf_auto%2Cfl_progressive%2Cq_auto%2Cw_800/https://cdn-images-1.medium.com/max/2758/0%2AbS3JqYHRO5SJFycA)
Training routine and augmentation
The training routine of YOLOv8 incorporates mosaic augmentation, where multiple images are combined to expose the model to variations in object locations, occlusion, and surrounding pixels. However, this augmentation is turned off during the final training epochs to prevent performance degradation.
Accuracy and performance
The accuracy improvements of YOLOv8 have been validated on the widely used COCO benchmark, where the model achieves impressive mean Average Precision (mAP) scores. For instance, the YOLOv8m-seg model achieves a remarkable 49.9% mAP on COCO. The following table provides a summary of the model sizes, mAP scores, and other performance metrics for different variants of YOLOv8-seg:

Here is an example of outputs using YOLOv8x detection and instance segmentation models:
]](https://res.cloudinary.com/practicaldev/image/fetch/s--7XBKPIbp--/c_limit%2Cf_auto%2Cfl_progressive%2Cq_auto%2Cw_800/https://cdn-images-1.medium.com/max/2000/0%2AVdp5JUHIxcfELomN)
Step by step: Fine tune a pre-trained YOLOv8-seg model using Ikomia API
With the dataset of aerial images that you downloaded, you can train a custom YOLO v7 model using the Ikomia API.
Step 1: import and create workflow
from ikomia.dataprocess.workflow import Workflow

wf = Workflow()
- Workflow is the base object to create a workflow. It provides methods for setting inputs such as images, videos, and directories, configuring task parameters, obtaining time metrics, and accessing specific task outputs such as graphics, segmentation masks, and texts.
We initialize a workflow instance. The “wf” object can then be used to add tasks to the workflow instance, configure their parameters, and run them on input data.
Step 2: add the dataset loader
The downloaded COCO dataset includes two main formats: .JSON and image files. Images are split into train, val, test folders, with each associated a .json file containing the images annotations:
Image file name
Image size (width and height)
List of objects with the following information: Object class (e.g., "person," "car"); Bounding box coordinates (x, y, width, height) and Segmentation mask (polygon)
We will use the dataset_coco module provided by Ikomia API to load the custom data and annotations.
# Add the dataset loader to load your custom data and annotations
dataset = wf.add_task(name='dataset_coco')

# Set the parameters of the dataset loader
dataset.set_parameters({
    'json_file': 'Path/To/Mesophotic Coral/Dataset/train/_annotations.coco.json',
    'image_folder': 'Path/To/Mesophotic Coral/Dataset/train,
                    'task': 'instance_segmentation'
})
Step 3: add the YOLOv8 segmentation model and set the parameters
We add the ‘**train_yolo_v8_seg’ **task to our workflow for training our custom YOLOv8-seg model. To customize our training, we specify the following parameters:
# Add the YOLOv8 segmentation algorithm
train = wf.add_task(name='train_yolo_v8_seg', auto_connect=True)

# Set the parameters of the YOLOv8 segmentation algorithm
train.set_parameters({
    'model_name': 'yolov8m-seg',
    'batch_size': '4',
    'epochs': '50',
    'input_size': '640',
    'dataset_split_ratio': '0.8',
    'output_folder': 'Path/To/Folder/Where/Model-weights/Will/Be/Saved'
})
Here are the configurable parameters and their respective descriptions:
batch_size: Number of samples processed before the model is updated.
epochs: Number of complete passes through the training dataset.
input_size: Input image size during training and validation.
dataset_split_ratio: the algorithm automatically divides the dataset into train and evaluation sets. A value of 0.8 means the use of 80% of the data for training and 20% for evaluation.
You also have the option to modify the following parameters:
workers: Number of worker threads for data loading. Currently set to '0'.
optimizer: The optimizer to use. Available choices include SGD, Adam, Adamax, AdamW, NAdam, RAdam, RMSProp, and auto.
weight_decay: The weight decay for the optimizer. Currently set to '5e-4'.
momentum: The SGD momentum/Adam beta1 value. Currently set to '0.937'.
lr0: Initial learning rate. For SGD, it is set to 1E-2, and for Adam, it is set to 1E-3.
lrf: Final learning rate, calculated as lr0 * lrf. Currently set to '0.01'.
Step 4: run your workflow
Finally, we run the workflow to start the training process.
wf.run()
You can monitor the progress of your training using tools like Tensorboard or MLflow.
Once the training is complete, the train_yolo_v8_seg task will save the best model in a folder named with a timestamp inside the output_folder. You can find your best.pt model in the weights folder of the time-stamped folder.
Test your fine-tuned YOLOv8-seg model
First, can we run a coral image on the pre-trained YOLOv8-seg model:
from ikomia.dataprocess.workflow import Workflow
from ikomia.utils.displayIO import display

# Initialize the workflow
wf = Workflow()

# Add the YOLOv8 segmentation alrogithm
yolov8seg = wf.add_task(name='infer_yolo_v8_seg', auto_connect=True)

# Set the parameters of the YOLOv8 segmentation algorithm
yolov8seg.set_parameters({
    'model_name': 'yolov8m-seg',
    'conf_thres': '0.2',
    'iou_thres': '0.7'
})
# Run on your image
wf.run_on(
    path="Path/To/Mesophotic Coral Identification.v1i.coco-segmentation/valid/TCRMP20221021_clip_LBP_T109_jpg.rf.a4cf5c963d5eb62b6dab06b8d4b540f2.jpg")

# Inspect your results
display(yolov8seg.get_image_with_mask_and_graphics())
})

We can observe that the infer_yolo_v8_seg default pre-trained mistake a coral for a bear. This is because the model has been trained on the COCO dataset, which does not contain any coral objects.
To test the model we just trained, we specify the path to our custom model using the ’model_weight_file’ argument. We then run the workflow on the same image we used previously.
# Set the path of you custom YOLOv8-seg model to the parameter
yolov8seg.set_parameters({
    'model_weight_file': 'Path/To/Output_folder/[timestamp]/train/weights/best.pt',
    'conf_thres': '0.5',
    'iou_thres': '0.7'
})

Comparing our results to the ground truth, we successfully identified the species Orbicella spp. Nevertheless, we did observe some instances of false negatives. To enhance the performance of our custom model, further training for additional epochs and augmenting our dataset with more images could be beneficial.
Another example showcasing effective detection results is demonstrated with the Agaricia agaricites species:

Start training easily with Ikomia
To learn more about the API, you can refer to the documentation. Additionally, you can explore the list of state-of-the-art algorithms on Ikomia HUB and try out Ikomia STUDIO, which provides a user-friendly interface with the same features as the API.

Top comments (0)